Tag : fun stampers journey

72 posts

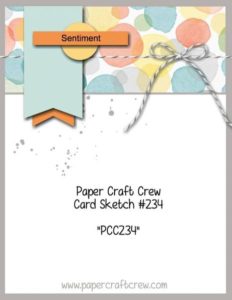
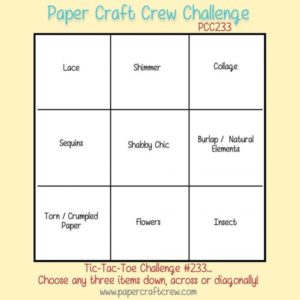
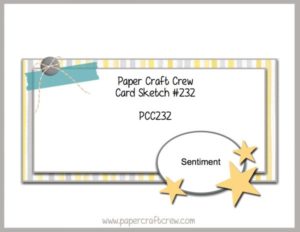
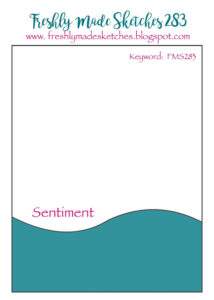
It has been a while since I have posted a card challenge. I have battled two colds since Christmas, and I am finally feeling better after two doctor visits, 2 rounds of antibiotics, and steriods. It is great to back to creating cards using my Fun Stampers Journey products.  Since it is Mondy, I decided to check out the  Freshly Made Sketches Challenge.  This week is a simple sketch that allows creative ideas to pop, pop, pop. Here is the sketch:

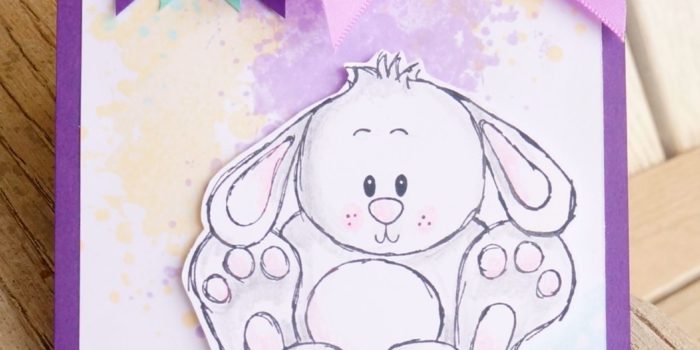
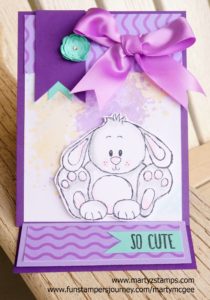
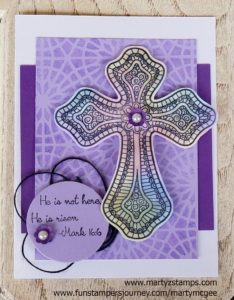
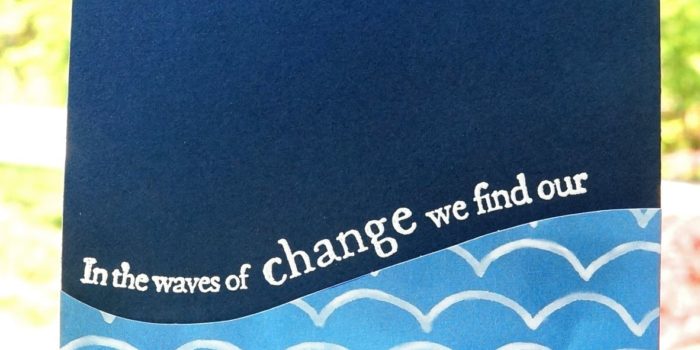
I decided to jump off in the deep end of the pool by cutting apart my words for the sentiment portion of this card. I just couldn’t resist. I chose FSJ Denim Days as my base cardstock and wave portion from FSJ Under The Sea Prints (PP-0041) 6 x 6 paper pack. I adhered the printed paper onto the Denim Days base. I used my Misti to stamp the sentiment. Since these stamps are deep etched red rubber, I had to work a bit to get a curve right amount of curve in each strip of words. I dusted the Denim Days with my embossing buddy to eliminate any static cling and I stamped the workd using Versamark ink. I sprinkled some FSJ white embossing powder onto the sentiment and heated with my FSJ heat tool. The sentiment reads In the waves of change we find our (front) direction (inside).

I looked up on YouTube how to tie a sailors knot and chose one I thought would look good on this card and place it at the top. This was a super quick and simple card; great to give someone who needs encouragement.

Here is the completed card:

Supplies: Please click here to order supplies to create this project.

I just love the Bunny set from Fun Stampers Journey called Spring Fling. I thought it was the perfect set to create an easel card along with the Paper Craft Crew Sketch #234.

One of our Fun Stampers Journey Facebook Challenge for coaches is an easel card; so, I combined it with the Paper Craft Crew Challenge card sketch. The base of the card is FSJ Deep Lilac. The focal point of card is the large, super cute bunny. It is stamped in FSJ Black Licorice onto FSJ Whip Cream cardstock and colored with the Journey Color Burst Pencils. The mat it is adhered to was stamped with the FSJ ATS Ink Splat stamp in FSJ Bubble Gum, Banana Cream, Pool Party, and Pretty Amethyst inks. The top of the card and the Pretty Amethyst mat with the sentiment are accented with a strip of FSJ Eggcellent 6×6 paper pack cardstock. The banners were created out of FSJ Deep Lilac and Cool Pool cardstocks. The flower was punched out of FSJ Cool Pool and the Summer Pretties punch and accented with a diamond rhinestone. The sentiment on the FSJ Cool Pool banner was stamped in FSJ Black Licorice ink using the sentiment from FSJ ATS Pocket Pup stamp. The bunny and the sentiment mat are popped out with FSJ Foam Squares (medium). The final embellishment is the bow created from FSJ Lavendar Fusion Satin Ribbon.

I know anyone would love to receive this card.

Supplies:

Fun Stampers Journey (to order click here)

Stamps: Spring Fling, Ink Splat, Pocket Pup
Cardstock: Deep Lilac, Pretty Amethyst, Whip Cream, Cool Pool, Eggcellent paper pack
Inks: Black Licorice, Banana Cream, Bubble Gum, Pool Party, Pretty Amethyst
Accessories: Summer Pretties punch, diamond rhinestone, Foam Squares, Lavendar Fusion Satin Ribbon, Color Burst Pencils


For this week’s Freshly Made Sketches #278 challenge, I made a variation of this month’s Make It Class card to meet the sketch challenge (I will post this month’s Make It cards on another post). Here is the FMS #278 sketch:

I had created a cross card from a video/demo Richard Garay had for FSJ coaches using a special technique to create a stained glass effect. I began by stamping the cross from FSJ Color Cross stamp set onto FSJ Whip Cream cardstock using Black Licorice ink. After I stamped the image, I took the solid flower stamp from FSJ Be Happy stamp set (note: any solid shape would work) and stamped it into various colors of ink (one at a time) then stamping onto the cross (you can go out of the lines because the cross will be cut out). I used the following Fun Stampers Journey inks to create this stained glass effect (Bubble Gum, Sweet Pear, Banana Cream, Pool Party, and Pretty Amethyst). Note: If you try this technique, make sure to clean your stamp off after each inking because the black ink sometimes comes off onto the stamp. This will help eliminate any frustration if colors bleed and become muddy/murky). Once I finished stamping, I cut the cross out and applied Journey Glaze to give it a little shine. Set the cross aside to dry.

I created the patterned mat by placing the FSJ Starburst stencil on top of the piece of FSJ Pretty Amethyst cardstock. In a FSJ Media Mister, I combined one squirt of FSJ Sweet Berry Splash and one squirt of FSJ Blue Lagoon Splash and filled with water to create the purple mist. I spritzed the paper with the purple mist and immediately applied a paper towel to the stencil to soak up any excess liquid. This created another stained glass effect for the card.

I used FSJ Deep Lilac for the back mat. I layered the patterned mat on top. I adhered the cross with FSJ Foam Squares (medium). I stamped the sentiment onto FSJ Pretty Amethyst cardstock and die cut a circle from the stamped cardstock. I placed a loose loop of black twine behind the circle sentiment and adhered the sentiment with FSJ Foam Squares (medium) as well. For the final touch, I punched two small flowers from the FSJ Summer Pretties punch. I curled the edges and applied a peal accent to the middle. They were adhered to the card project with FSJ liquid glue.

Here is the final project.

Supplies:

Fun Stampers Journey (click here to order)

Stamps: Color Cross Bundle, Be Happy
Cardstock: Whip Cream, Pretty Amethyst, Deep Lilac
Inks: Black Licorice, Bubble Gum, Pool Party, Pretty Amethyst, Banana Cream, Sweet Pear
Accessories: Black Twine, Journey Glaze, Pearl Accents, Circle Die, Starburst Stencil, Media Mister, Sweet Berry Splash, Blue Lagoon Splash

I am making it under the wire, yet again, for a Paper Craft Crew (#233) challenge. This week’s challenge is a Tic-Tac-Toe Challenge. I chose the middle, vertical column (shimmer, Shabby Chic, flowers) for my card. Here is the sketch:

This image is a digi stamp I purchased from Sherri Baldy’s Etsy shop. The purchase gave me two digi stamps of the cutest girl. I have a blog post featuring the other image here.

I had decided to try and make dread locks/ringlets on my girl after watching a YouTube tutorial on coloring with alcohol markers (sorry, I didn’t make a note of the video). I will do my best to note the markers I used, but this was one of those creative moments where I was creating and not paying attention to the details of what I used. Anyway, I’ll pull out my Spectrum Noir Hex chart and do the best I can (it will be pretty close).

Spectrum Noir alcohol markers were used on the girl and the flowers. The hair – IG10, IG2, BG6, BG3; skin – HB2, FS2, FS7, BG4, TN3, TN5; lips and cheeks – FS8; dress/headband/pants – LG2, LG3, LG5, LY`, OR1, OR2; eye – LG2, LG5; flowers – CT2, OR2, OR3; leaves – LG2, LG3, LG5; and, the blender pen was used throughout.

The base cardstock is SU! Pistachio. The images were stamped on Spectrum Noir cardstock using Memento Tuxedo Black ink. The base mat is Pink and Main designer paper die cut with Fun Stamper Journey Persian Garden die, The orange mat is FSJ Creamsicle cardstock with a light green mat of designer paper from Heartfelt Creations Sweet Berry 12×12 paper pack (this explains all the flowers – I had to cover up all the strawberries on the mat – LOL), a Spellbinders die was used to create some FSJ Creamsicle swirls. Spectrum Noir clear glitter pen was applied to the hair and skirt to add the SHIMMER. FSJ Journey Glaze was applied to the flowers, skirt waist, skirt trim, and eye. Diamond rhinestones were added to the flower centers, and a triple bow from SU! lace Pistachio ribbon accented the card. Last but not least, everything is popped, popped, popped up. A lot of dimension is going on here.

It is a very busy card, but I like busy and it really yells Shabby Chic.

I really love the way this card turned out. It is one of my favorites.

Yesterday I had a Spectrum Noir Alcohol Marker coloring class, which focused on shading clothing. I had recently ordered from Etsy a Sherri Baldy digi stamp (there were two images to my surprise and delight). I thought this would be a great image to practice clothing coloring. A color palette of blues and pinks was chosen. When she was finished, I knew I had to submit another card to the Fusion Card Challenge – Pretty in Pink Card Challenge.

She was so much fun to color. Here are the markers we used: Hair – base from roots to midway of hair GB11 then GB4 to the ends. TN3, GB 10, TN5, EB4, EB5 (dots throughout hair); skin – EB1, FS7, FS9 and FS8 for cheeks and lips; dress and headband- TB1, TB4, TB5; Pants – LY1, CT4; Flowers PP1 and PP3 and Blender throughout project.

The flowers are from the Heartfelt Creations – Botanical Rose. The base of the card is FSJ Whip Cream with FSJ Watermelon Fusion and FSJ Bubble Gum cardstocks as mats. The oval was cut from Heartfelt Creations Strawberry Fields 12 x 12 paper pack. The pearl accents are FSJ pearls and they were colored with Spectrum Noir PP2 marker to make them pink. A layer of Journey Glaze was added to all the flowers to make them shine and pop. And, finally the bow is SU! silk ribbon made into a double bow.

If you would like to order any products from Fun Stampers Journey, click here.

So excited to show off this Oldie But Cool truck in the Paper Craft Crew Challenge #232. I love the way PCC sketches inspire you to think outside the box. Here is this week’s sketch:

This card was created with a friend after a Make It party she had at her house. We went downstairs to her basement craft room. We were wanting to use our Spectrum Noir Alcohol Markers to color something in shades of red. We decided the Fun Stampers Journey Hit The Road stamp set was the perfect choice. As we began coloring, I can tell you several times I thought I had ruined my truck. But, as alcohol marker colorists know, you have to walk away and let it dry and voila it looks great. I did have to cut the truck out because I kept coloring out of the lines. You know, Mama said there would be days like this – LOL. Once we finished with the truck, the background came about by trial and error.

I began the background mat by wanting to stamp the route 66 outline stamp in FSJ Sour Lemon ink, but I used FSJ Electric Lime by accident (that’s where one of the errors came in). Instead of tossing the stamped background, I thought, “Why don’t I stamp the full coverage route 66 image offset and on top of the outlined route 66 image in FSJ lemon drop?” It looked great. Then, I made another error stamping the one way image and smeared some ink. Oh ho, that wouldn’t do. So, I thought, “Hmm, what would FSJ Huckleberry Fusion look like stamped on FSJ Electric Lime cardstock?” It looked great. Thus the one way stamped images adhered off of the stamped background mat. I finished the background stamping the gas pump in FSJ Candy Apple ink. The final touch was some splatters of FSJ Sour Lemon silk. I love this card! I hope you do too.


Supplies: Fun Stampers Journey supplies can be ordered by clicking here.

You know how you purchase a stamp set because it’s so cute; and, then it sits unopened, unused for several months? Well, if you don’t, I do. The stamp set I used today was purchased back in September 2016, and I just pulled it out and used it for the Freshly Made Sketch #276 card challenge. Here is this week’s sketch:

I chose Fun Stampers Journey Hey Honey stamp set to create this simple and quick adorable card. I stamped the images on FSJ Whip Cream cardstock using FSJ Black Licorice ink. I colored the beehive and the bee with FSJ Color Burst Pencils. I used for the hive – 015, 016, 017; hive base – 039 with 040 colored on top; bee – 015, 016, 017 and a touch of gray on the wings and eyes. I added a little glitz to the bee’s wings with FSJ Sparkle Dust. The honeycomb background is stamped using FSJ Lemon Drop ink with the FSJ ATS Honeycomb stamp. The center strip is accented on either side with FSJ Summer Days cardstock. All stamped images are popped up using FSJ Foam Squares (medium and small). The sentiment has a looping of FSJ Black Twine behind it. A great card to make for beginners as well as seasoned card makers.

This project was created using Fun Stampers Journey products. If you would like to purchase any of the supplies listed above click here.

Here in Georgia, the weather is fine, the trees are blooming, the birds are building their nests, and wouldn’t you know the most adorable bunnies showed up in my craft room wanting to make a grand entrance as well. They hopped right over and posed for a Pretty in Pink Bunny Delight portrait.

This was perfect timing for the Fusion Card Challenge – Pretty in Pink. Fusion Card Challenges allow three variations to a crafter’s designs. First choice, you can choose just the template layout; second choice, you can choose the color theme; or, you can combine both into one design. I decided to stick with the color theme of PINK.

Once the bunnies were settled down and ready for me to create, I stamped their images onto Spectrum Noir cardstock using Fun Stampers Journey Spring Fling stamp set. I then colored them with the following Sprectrum Noir Alcohol Markers: The bunnies heads and bodies IG1 and IG2; their ears, feet, bellies, cheeks, and noses PP1. This was a very simple and easy coloring project. Great for beginners. They are just too cute.

The base of the card is Fun Stampers Journey Whip Cream cardstock, and the mat with a large oval cut out of it is FSJ Watermelon Fusion cardstock.  I stamped circles with FSJ Watermelon Fusion ink from the FSJ Planner Sketch stamp set. An acetate sheet was placed behind the Watermelon Fusion mat. The zig-zag accent mat is from Pink and Main Spring Fling 6×6 paper stack. The Watermelon Fusion mat is raised using a double layer of foam tape. The bunnies are popped-out using FSJ Foam Squares Medium. The sequins in the oval are assorted sequins from my stash (Note: a horizontal strip foam tape about a 1/2″ up from the bottom of the oval to keep the sequins from “disappearing” when the card is upright). The final touch is a double bow created from SU! pink ribbon.

Such a cute card.

Supplies:
Fun Stampers Journey supplies can be ordered through me – click here

Super excited to receive the notice from Pam Staples with Paper Craft Crew I had made the Top Picks for Challenge #230!!!

The card that made the top picks is the adorable Penguin card letting someone special know, “i love you”. Here is the card:

Click here for the post detailing how the card was created and what products were used. All the products used on this card are Fun Stampers Journey products. If you are interested in learning more about Fun Stampers Journey or purchasing products, please go to my website www.funstampersjourney.com/martymcgee (my Coach number is 818561).

The theme challenge for Paper Craft Crew #230 is “LOVE”.

I have the perfect card for this theme. It is super cute and adorable. It features a cutie patootie peguin with the sentiment “P.S. i love u.”
This card was created for my Make-It Card Class, and it was a favorite design. The base of the card is FSJ Whip Cream. The background mat was created using FSJ Sweet Berry splash, Cranberry Bliss, Outrageous Pink, and Silver silks. To the background mat, I added a FSJ Bubble Gum pierced circle mat with a FSJ Cranberry Bliss die cut heart splattered with the same silks used on the background mat. The heart is accented with a looping of FSJ Black twine. The penguin is a FSJ P.S. ATS (Artist Trading Stamp). Both images were stamped using FSJ Black Licorice ink onto FSJ Whip Cream cardstock. They were both fussy cut leaving a 1/8″ border around the images. The heart, the penguin, and the sentiment are popped up with FSJ Medium Foam Squares.

This was a quick and simple Wow card creation.

Supplies:

Fun Stampers Journey products – To order click here.

PAGE TOP
[dealsbar preview] Amazing Deals: !!toolbar-deal-title!! - !!toolbar-deal-merchant!!