Category : Paper Piecing

5 posts

Welcome, to the November Creative Team Blog Hop.

Once you finish my blog click on the names below to hop along:

Kazan Clark

Lezlye Lauterbach

Carrie Rhoades

Christine Chan

Jill Hilliard

Marty McGee (you are here)

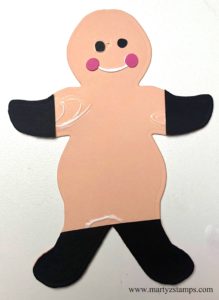
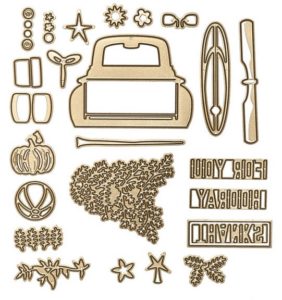
The blog hop theme for November is Christmas and I wanted to bring to life a 3D project featuring the Gingerbread Boy Tag Set.

Click on the banner below to order your Gingerbread Boy Tag Die Set:

This little guy evolved from a Pumpkin Bread Gingerbread Boy to a Santa Gingerbread Man. In fact, there are two Santas bringing you a special treat for Christmas.

To begin, cut one each of the gingerbread boy die in the following cardstock colors: Peaches and Cream, Candy Apple, Whip Cream and Black Licorice.

To create a Santa, take your die-cuts and proceed as follows. On the Black Licorice die-cut, cut off the arms and legs for Santa’s gloves and boots. On the Whip Cream die-cut, cut rectangular shaped pieces off each arm (near the shoulder),  off each leg (near body), at neck into the body portion and the middle part of the face. For Santa’s suit cut off the arms, feet and head from the Candy Apple die-cut. You will need to cut off the top portion of the Candy Apple head for the hat and save back one of the hands for the tip of the cap (the top portion for the cap is not pictured).

Glue the arms and legs onto the Peaches and Cream gingerbread Santa. Add the facial features onto Santa’s face. These pieces are cut from Black Licorice, Watermelon Fusion and Whip Cream.

Adhere the red suit and cap to Santa’s body.

To finish off Santa’s outfit, die-cut a curvy Whip Cream strip, three large Black Licorice circles and one large Whip Cream circle. Apply the curvy strip down the front of Santa’s suit, add buttons and puff to end of Santa’s cap. Go ahead and add the cuffs, rim of cap and neck trim to body.

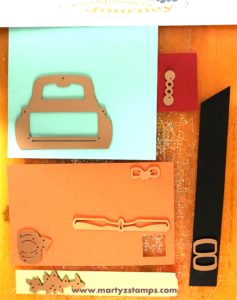
Set aside the two Santas. Cut two strips of Candy Apple cardstock one at 5 3/8″ x 1 1/2″ and the other 5″ x 2 1/2″. Score both pieces at 1 3/4″ measure in from each end. On the 5″ x 2 1/2″ strip, score down each long side at 1/4″, cut out the scored tabs on the middle portion (between the two 1 3/4″ score lines).   Place the 5 3/8″ x  1 1/2″ strip crosswise onto the 5″ x 2 1/2″ strip.  Adhere the tabbed edges to the inside of the crosswise strip.


Adhere a Santa to each narrow end of the box, where the middle of the Santa hides the box.

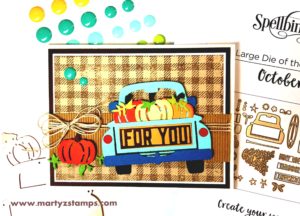
The last step is to Place candy or small cookies into a cello bag and tie off with a ribbon. Place treat into holder.

How cute is this for a Christmas treat.


Supplies:

Gingerbread Boy Tag Die Set
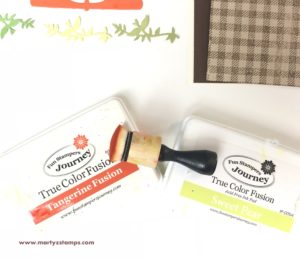
Cardstock – Peaches and Cream, Candy Apple, Whip Cream, Black Licorice, Watermelon Fusion
Trimmer
Cello Bag
Twine
Journey Glue
White Liner Tape
Precision Shears


It is Day 3 of the FSJ + Spellbinders launch. So many awesome products and so many ways to bring paper to life!
I decided to do something a little different than a regular A2 size card.

Today’s inspiration showcases Spellbinders Gingerbread Boy Garland Tag and Recipe Card set by Sharyn Sowell.
I featured a 6 x 6 recipe card because they hold a special place in my heart. For over 10 years, I held a Christmas In The Woods Stamp Camp, each participant created a 6 x 6 recipe card swap and made the dish featured on the swap. So many wonderful dishes were enjoyed over the years. I still have every swap safely stored in 6 x 6 scrapbook albums.

Here are the stamps and dies I used on this project:

There are no special techniques used to create this project, just die cutting and a little stamping. Cardstock used on the Gingerbread Boy are Pumpkin Bread, Whip Cream, Bubble Gum and Black Licorice with the edges of the “boy” sponged with Pumpkin Bread Fusion adding depth to the die cut figure. The Candy Apple rick-a-rack mat has a Butter Cream mat with Hazelnut Blend stamped lines. The sentiment “Baked With Love” is stamped first with Pumpkin Bread Fusion Ink and then offset slightly and stamped with Hazelnut Blend Ink. The absolutely adorable rolling pin is cut from Turbo Teal cardstock with a Candy Apple red flower and Electric Lime leaves. I adhered a double bow from the Beach Breeze Twine onto the rick-a-rack mat. All die cuts are popped out with medium Foam Squares. The mat dimensions are 5″ x 5″ Hazelnut Blend mat, 5 1/8″ x 5 1/8″ Oatmeal Cookie mat and a
5 7/8″ x 5 7/8″ Candy Apple base mat.

I hope this inspires you to create recipe cards to give to family and friends or to start your own recipe album.

Click on the images below to order:

Gingerbread Boy Recipe Card

Have you ever messed up a project and used the cast-a-ways to create a new project? Well, this is how the Holly Bells Ornament card came into existence.

Here’s the back story. I began creating my kits for PJ’s & Papercrafting Nov/Dec Virtual Stamp Class and for some reason andfor the life of me, I couldn’t die cut a centered circle into the card mat for the window box card project. This happened on all four attempts. I gave up and walked away.

Flash ahead to the FSJ + Spellbinders Better Together Launch. I planned on posting five projects made with two stamp and die sets I received from Spellbinders to celebrate this partnership. As I was looking around my craft room for inspiration, I found my messed up mat with die cut circle:

Guess what? The mat could be used as a base mat and the circle would make a great ornament. So, the project began. The base of the card is FSJ Whip Cream cardstock with the Candy Apple cardstock mat placed on top of the base. A piece of Whip Cream cardstock with piercings created from the Journey Rectangles die set was adhered to the Candy Apple mat with medium foam squares.

I ran the Candy Apple circle through my Platinum machine in a retired host embossing folder. Any embossing folder with details would work. I suggest the Mystic Impressions Embossing Folder as a substitute for the one I used which is a brocade design.

Once these steps were completed, I stamped the holly from the Holly Bells stamp and die set onto Spectrum Noir cardstock using Memento Tuxedo Black ink.

holly bells, gold embossed holly leaves

I chose the following Spectrum Noir Alcohol Markers to color the holly:

I did the same with the banner and sentiment from the Winter Build-a-Scene ATS with coordinating die.

The Spectrum Noir markers for the banner are:

I cut a top for the ornament out of Silver cardstock with the scallop die from the Build-a-Scene coordinating dies and adhered it to the back of the red ornament. The colored holly leaves are popped out with medium foam squares and placed at the top of the ornament. The Merry Christmas sentiment banner is popped out with small foam squares in the lower left portion of the ornament and the ornament is popped out with medium foam squares. Man, that’s a whole lot of poppin’ out going on.

The finished project is below:

Leave a comment and let me know how you used a messed up project to create a new project.

Spectrum Noir Alcohol markers and paper can be ordered from Consumer Crafts. Click the link below. Search “Spectrum Noir Alcohol Markers”:

All Other Supplies (click on image to order):

Holly Bells Christmas Ornament


Do you love dies as much as I do? I confess I am a die addict and if you love dies like I do, then you are one too. When FSJ partnered with Spellbinders, I couldn’t get enough viewing time of their die selections. One of Spellbinders biggest Wow products, to me, is their Die of the month club. This month’s Large Die Club features an adorable truck with a truck load of accessories.

Here is a look at all the dies:

There are endless possibilities as to what you can make with with this set. My friend, Debbie Kissel, joined the Large and Small Die Cutting Club (a much better price point) and she was so gracious to bring both sets over for us to create a card project (we had no more than two hours of creating time; therefore, one card). She thought pumpkins would be good and I agreed.

The process began with me choosing the color combinations and cutting out the pieces on my Platinum die cutting machine.

Such a great use of scraps and it saved on cutting time as well.


As you can see in the picture below, I have a base of Butter Cream CS, a Hazelnut Blend base mat, a Buttercream mat (not shown) and an Oatmeal Cookie mat. The truck is Cool Pool with a fender and side view mirrors cut from Blue Lagoon CS (photo shows Tangerine Fusion, but as we put the truck together the side view mirrors blended in with the pumpkins – time to rethink those colors). The pumpkins are Sweet Pear, Tangerine Fusion, Citrus Cooler with Hazelnut Blend stems. The sentiment “For You” is cut from Hazelnut Blend and matted on Citrus Cooler. Of course, there are red tail lights and black tires. Last but not least is the greenery, it is Limeade Splash, Sweet Pear and Green Olive cardstocks. The stamp set is Flannel Life and the inks are Hazelnut Blend, Tangerine Fusion and Sweet Pear.

Before I began the assembly process, I sponged the edges of the pumpkins with their coordinating ink and I stamped the Flannel Life onto the Oatmeal Cookie with Hazelnut Blend.

Now comes the fun part, putting the truck together! Once the truck is assembled, it is time to bring the card together. I wanted to keep this rustic and “fallish”; so, I grabbed a piece of Corrugated cardstock and trimmed it. As you can see it wasn’t wide enough, but no problem, I just cut it in half and glued it down knowing the truck would cover up the gap. Some loops of Natural Twin with a triple ribbon with tie everything together.

Last but not least is a final accent piece. I placed a couple of Candy Drops in the upper left hand corner.

It is just too cute! Such a fun and relaxing project.


As we move toward November and the final transition to the new Spellbinders + FSJ team, I hope this inspires you to check out Spellbinders today. The FSJ products will not be available on the Spellbinders website until November 1st. I have those supplies below the Spellbinders Banner. Click on a product from there and you will be taken to my FSJ website where you can order.

In this new transition of partnering with Spellbinders, I have become a part of the Spellbinders + FSJ affiliate program.  If you would like to purchase a Spellbinders product, please click on the banner below. It will take you to their site. I will receive a commission on anything you purchase at NO ADDITIONAL cost to you. This helps me to continue creating inspiring products for you.

Spellbinders NEW Monthly Die Cutting Clubs

Product List

Love Bug Card


I am moving earlier blog posts from my old site to this one. This was a card I made based on a variation of a 3-D project. I found the original idea on this web-site http://www.mypapercrafting.com/2012/01/qq-spellbinders-sneak-peek-3.html and had to make this cute bug work with Stampin’ Up! punches (note: I did cut the oval head pieces and the eyes out on my Cricut so the proportions would look great!).

Discontinued Supplies: Scalloped Heart of Hearts Embosslit, Pretty in Pink card stock, Regal Rose card stock, and Pretty in Pink stamp pad.

note: I used one of the itty bitty punch pack circles to punch the nose, but I’m going to include the owl punch which would substitute well for the nose.


Price: $99.95

Supply List

Built for Free Using: My Stampin Blog

PAGE TOP
[dealsbar preview] Amazing Deals: !!toolbar-deal-title!! - !!toolbar-deal-merchant!!