Tag : silk

8 posts

I just received the cutest stamp set from Fun Stampers Journey this week. It is Fun Stampers Journey, Hey Sugar (SS-0301) and it includes 9 stamps. I decided to use it for Freshly Made Sketches 324 card challenge this week. Here is this week’s sketch:

This is a quick and simple card to make when you are in a hurry and need a special card for a special person. The base and mat are Fun Stampers Journey Whip Cream card stock (cs-0040). The “where you bean all my life?” was stamped using FSJ Hazelnut Blend Fusion Ink (IP-0012) and the “hey sugar” was stamped using FSJ Blue Lagoon Fusion Ink (IP-0002). The two strips of paper behind the circle are Catalina Splash (cs-0114) and Hazelnut Blend (cs-0013) card stocks. I splattered some Dark Roast Silk (IP-0095) onto the pierced mat and carefully placed a piece of plastic on top and gently pressed the splattered ink to spread it out. I added some brown and silver sequins onto the card and applied FSJ Journey Glaze to the beans to make them pop (AD-0002).

Supplies not mentioned above: Foam Squares (AD-0085), Journey Craft Glue (AD-0111), Journey Circle Dies (DI-0039) and Journey Rectangles (DI-0041).

If you would like to order any of these supplies to create your own card, please click here.


I am in the middle of a very hectic schedule and turning my son’s old bedroom into a craft room. The craft room change over has been slow but steady. This transition has hampered my creativity due to my current craft room being a MESS! I’m in the process of determining what must stay, what must go on Ebay or Etsy to be sold, and what can be moved to the new room so far. I still need to get desk tops and Ikea drawers to complete the transition. I will have a blog about this at some point in the near future.

When I saw this week’s Paper Craft Crew Cared Challenge #245, I knew I had the perfect card to meet the tic-tac-toe challenge:

My Bloom Box stampers met this past Monday and made our cards from the kit, BUT I thought they needed a little something more. So, prior to our meet-up, I had ordered the FSJ SS-0078 Summer Garden stamp set along with our new dauber dowels and sponges (TO0137 – small and TO0138 – large). I have a picture of the card from the kit below:

I took the basic card design and added to it along with changing the sentiment to Well Wishes. The initial card consisted of FSJ Butter Cream cardstock base, FSJ Banana Cream mat, and final piece of FSJ Rock Candy. The doilies are the featured stamp set in this month’s Bloom Box kit. They were stamped onto the Rock Candy cardstock using FSJ Butter Cream ink. I think the stamped images turned out wonderfully well. I changed my sentiment to Well Wishes and stamped it onto the pre-cut tag using FSJ Rock Candy ink. I popped it out using FSJ Foam Squares. The flower and leaves were created using a technique Richard Garay shared on one of his Facebook Live tutorials. I took a sponge dauber dowel and picked up some FSJ Rich Coral ink onto the sponge and I applied the ink to my cardstock in a circular motion. I did this same technique using FSJ Sweet Pear and FSJ Lemongrass. I, then, took my stamps and stamped the images onto those sponged areas using FSJ Black Licorice ink. The flower and foliage were adhered using FSJ Medium Foam Squares. For the ribbon accent, I took the button from the kit and applied FSJ Rock Candy ink straight onto the button edges using the ink pad. I adhered a large diamond rhinestone into its center and adhered it to a double bow made from FSJ twine. Once every thing was adhered to the card, I applied FSJ Journey Glaze to the flower and parts of the leaves. I think this card turned out to be very elegant with a pop of color. I almost forgot – last but not least, a sprinkling of FSJ Silver Silk was applied to the card. Bodda-Bling, Bodda-Boom!

Supplies:

All supplies except for the diamond rhinestone (who knows where I got it from – it was just part of my stash and fit exactly into the depressed area of the button) are available through www.funstampersjourney.com/martymcgee. Note: The stamp set is only available with the Bloom Box Kit. It must be purchased before the end of May and then a commitment of purchasing 5 more kits is required.

So excited to show off this Oldie But Cool truck in the Paper Craft Crew Challenge #232. I love the way PCC sketches inspire you to think outside the box. Here is this week’s sketch:

This card was created with a friend after a Make It party she had at her house. We went downstairs to her basement craft room. We were wanting to use our Spectrum Noir Alcohol Markers to color something in shades of red. We decided the Fun Stampers Journey Hit The Road stamp set was the perfect choice. As we began coloring, I can tell you several times I thought I had ruined my truck. But, as alcohol marker colorists know, you have to walk away and let it dry and voila it looks great. I did have to cut the truck out because I kept coloring out of the lines. You know, Mama said there would be days like this – LOL. Once we finished with the truck, the background came about by trial and error.

I began the background mat by wanting to stamp the route 66 outline stamp in FSJ Sour Lemon ink, but I used FSJ Electric Lime by accident (that’s where one of the errors came in). Instead of tossing the stamped background, I thought, “Why don’t I stamp the full coverage route 66 image offset and on top of the outlined route 66 image in FSJ lemon drop?” It looked great. Then, I made another error stamping the one way image and smeared some ink. Oh ho, that wouldn’t do. So, I thought, “Hmm, what would FSJ Huckleberry Fusion look like stamped on FSJ Electric Lime cardstock?” It looked great. Thus the one way stamped images adhered off of the stamped background mat. I finished the background stamping the gas pump in FSJ Candy Apple ink. The final touch was some splatters of FSJ Sour Lemon silk. I love this card! I hope you do too.


Supplies: Fun Stampers Journey supplies can be ordered by clicking here.

Super excited to receive the notice from Pam Staples with Paper Craft Crew I had made the Top Picks for Challenge #230!!!

The card that made the top picks is the adorable Penguin card letting someone special know, “i love you”. Here is the card:

Click here for the post detailing how the card was created and what products were used. All the products used on this card are Fun Stampers Journey products. If you are interested in learning more about Fun Stampers Journey or purchasing products, please go to my website www.funstampersjourney.com/martymcgee (my Coach number is 818561).

This past weekend a few of my fellow stampers and I attended Heirloom’s Lawrenceville Rubber Stamp & Paper Arts Festival. It began with the Design & Treasure Make-n-Take Friday night. We made four cards, visited with a favorite vendor “Pink & Main”, used new products, experienced new techniques, and had a great time. When we were leaving, I noticed a notebook on display with ATC (Artist Trading Card) on display and announcing the ATC contest. I remembered reading about it and wanting to create an entry when I registered, but I had forgotten about it. I decided to make a couple of ATCs which were to reflect the theme of Freedom and enter them the next day.

Saturday morning came bright and early. I had set my alarm the night before, but it didn’t go off; so, I was in a little bit of a rush before my friend, Cheyenne, got here with some stamp sets that were Freedom themed. We were to  head toward the weekend’s shopping event where we were to meet some other friends at the event by 10:00 a.m. Just a note to the alarm issue, I did set it, but for the weekday. LOL

I began the creation process half awake and a head full of cotton, but that could have been a plus since I couldn’t overthink the process. Really, I could barely think. I took the 3 1/2 x 2 1/2 pieces of cardstock and pulled out my Fun Stampers Journey Sweet Berry Splash, Blue Lagoon Splash, Cranberry Bliss silk, Sparkle Dust, Black Licorice Twine, Journey Medium paste along the FSJ spatula applicator along with some post-it note tape. I pulled out my SU! stripes and stars stencils; thus began the card base process.

In a container, I spritzed some Sweet Berry with a mist of water. I used a paint brush and applied a swipe of Sweet Berry across the cards. It wasn’t brillant enough; so, I thought why don’t I add some Cranberry Bliss silk and that did the trick. I reapplied the mixture to the card and it looked gorgeous. Then, I took the Blue Lagoon Splash and did the same process.  I did try to add some Dark Roast to create a more navy blue color and it was a little too much which created a blackish blue. All I did was add more Blue Lagoon splash and pulled a small, small dot of the blackish blue color into it, mixed it a little, and Bob’s your uncle; it looked great. On the soldier ATC I added full blue color, but on the eagle ATC, I masked off some stripes and added the color to this area to provide a little interest.

Next, I applied the medium paste using the stencils to the card base and sprinkled Sparkle Dust onto the wet medium to create some sparkle and glitz. The final embellishment was several loops of Black Twine. I sat the emerging ATC pieces to the side to work on the stamped images.

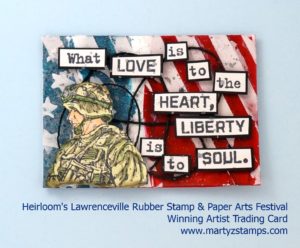
By this time, Cheyenne arrived with the SU! stamps. I didn’t have any stamps that reflected the Freedom theme, but she had two SU! retired stamp sets (they are very, very retired). They were perfect. I took the soldier stamp and coordinating words from one stamp set and stamped them onto FSJ Whip Cream cardstock using Memento ink. I colored the soldier using Spectrum Noir markers. Each of the words I cut out individually and matted on FSJ Black Licorice cardstock. I took a very light gray Spectrum Noir marker and went over the words to tone down the brightness of the Whip Cream cardstock. I popped the soldier and words out using FSJ Foam squares; and, as a final touch, I sprinkled a little Silver silk onto the ATC. Here is Cheyenne’s iPhone pictures. She liked them better with a woodgrain background:

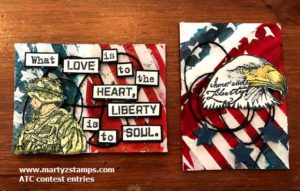
The cards were judged by the vendors at the show. Here is the winning ATC card:

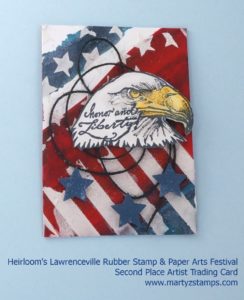
I created the eagle card by stamping the eagle onto FSJ Whip Cream cardstock using FSJ Black Licorice ink. Cheyenne suggested stamping the coordinating words directly onto the eagle. I thought that was a GREAT idea, and as you can see, it looks gorgeous. I colored the eagle with Spectrum Noir markers. The eagle is popped up using FSJ Foam squares. I punched out three small stars from FSJ Denim Days cardstock. Even though they didn’t have a first, second, and third place winner, the eagle ATC card was the second most chosen card by the vendors.

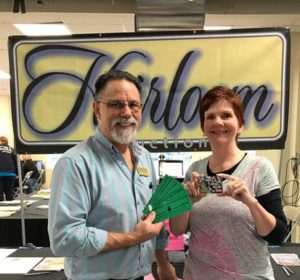
I think they both turned out beautifully. I won $25 show bucks which meant I could go and purchase products from any of the vendors. Here I am receiving the Show Bucks:

I went back to Creek Bank Creations and purchased two more 3D embossing folders from We R Memory Keepers Next Leveling Embossing folders. These are awesome; they create a 3D embossed look to your cardstock, which adds wonderful dimension and interest to your card. I have three posts coming up featuring these folders. The rest of my winnings I spent at Pink and Main. I purchased a cute, cute frog stamp set (it’s one of the upcoming card creation posts) and a pirate set just for my little buddies to create some cute cards.

Thanks Cheyenne for your stamp sets and your critiques during the creating process.

This week’s Paper Craft Crew Card Sketch #222 challenge inspired me to use Fun Stampers Journey December Bloom Box stamp set Welcome Wreaths. Here is their card sketch:


I think wreaths are a great way to welcome in the holidays and the FSJ December Bloom Box Welcome Wreaths stamp set is the perfect set to create a welcoming card featuring a wreath. I began this card with an base using FSJ Oatmeal cardstock. The bottom portion of the card has a FSJ Hazelnut Blend mat with a FSJ Cranberry Bliss mat. The Cranberry Bliss mat is stamped with the berry cluster from the stamp set in FSJ Cranberry Bliss ink. I cut a banner out of FSJ Hazelnut Blend cardstcok and cut out a “v” shape in both ends. The entire card was sprinkled with FSJ Dark Roast silk.

The wreath was a “work in progress while creating”. LOL You know what I mean. You start off with one idea of how to make something unique; and, well, . . it kinda doesn’t turn out like you expected . . . .so, you begin experimenting with different ways to create something beautiful out of a …. pig’s ear …. lol.  I started off with the branch stamp and using FSJ Lemon Grass ink went about stamping the curved branch into a wreath shape (o.k. a circle). This took multiple turns around the circle because I wanted a full and bushy wreath. When I was finished stamping, I thought the wreath look flat and dull. Hmmm,….. what can I do to make it “pop”. I thought, why not fussy cut lots of branches and layer them onto the flat, dull base. Oh, yes I did! And, I think it created the look I was trying to get from the beginning. I must say, it really didn’t take that long to fussy cut the branches (it really didn’t and it was so worth it). I stamped the small pine cones in FSJ Hazelnut Blend and colored them with my FSJ Color Burst Pencils and fussy cut them out. I stamped the berry cluster with FSJ Cranberry Bliss (all of this was stamped onto FSJ Whip Cream cardstock). I fussy cut the berries out as well. No, booing and hissing from the peanut gallery – it’s those little extra steps that make a super cute card. I took some FSJ Cocoa Gingham Ribbon and made a double bow and adhered everything onto the wreath with glue dots. I then put the card together using craft glue and I popped out the wreath and banner using Journey Foam Squares (medium). For a little extra touch, I flicked Dark Roast silk onto the wreath. Last but not least, I added a little bling by placing some dark chocolate sequins onto the card.

Here is the finished card:


Supplies: All product used can be ordered from my FSJ website. Click here. Note: Everything is Fun Stampers Journey except as noted.

December Bloom Box – Welcome Wreaths
Cardstock: Cranberry Bliss, Whip Cream, Oatmeal Cookie, Hazelnut Blend
Ink: Hazelnut Blend, Cranberry Bliss, Lemon Grass
Coloring: Color Burst Pencils
Silk: Dark Roast
Ribbon: Cocoa Gingham Ribbon
Miscellaneous: Sequins (not FSJ)

Next weekend, I along with three other friends will be at the Fun Stampers Journey – The Amazing Tour. We are super excited to go and experience all the “Amazing” energy and creativity. I have been to many papercrafting events throughout my 13 years of papercrafting, usually, involves taking cards I have made and trading them with other event participants. We call them swaps. The swaps should be exclusive to the company presenting the event. So, for this trip, my friend – Debbie Kissel – came over and we re-made some swaps we used for a Coach meeting.

I wanted to feature an Artist Trading Stamp (ATS) keeping the price point low for papercrafting beginners and those on a limited budget.  Although the card featured in this post looks labor intensive, it is a super simple and quick card to make. This card definitely has a WOW factor. Hello – you can create awesome cards without breaking the bank. 

OLYMPUS DIGITAL CAMERA


Here is how I made these cards:

  1. I used Fun Stampers Journey (FSJ) Black Licorice ink to stamp the flower and leaf images. I stamped directly on Watermelon Fusion and Lavender Fusion cardstocks. I stamped the leaf on colored cardstock as well (Sweet Pear or Limeade Splash both would make a wonderful leaf).
  2. I used the Candy Apple ink pad for the Watermelon Fusion flower and the Lavender Fusion ink pad for the Lavender Fusion flower. Using sponge daubers (one for each color) and starting in the middle of the flower, I applied the ink in a circular motion and stopped about 1/4″ from the tip of the flower petals. Do this until you are satisfied with the shading.
  3. I fussy cut the flowers and the leaf (a die is available, but the flower and leaf need to be cut next to the stamped image for the best effect). 
  4. I placed the flowers on a foam mat that is firm but not too firm (you want it to have a little give). I took the large stylus on the Journey Bloom Tool; starting in the center of each petal, I applied pressure and moved the stylus in a circular motion out to the edges of the petal and back toward the middle of the flower until the petal began to curl in on itself. I did this to each petal. Note: For this second round of flowers, Debbie was the stylus operator.
  5. I turned the flower over, cut the petals apart about 1/4″ from the center. I placed the flower on the mat; using the stylus, I pressed down hard and move in a circular motion in the center only. Note: The petals should pull in toward the middle. You can squeeze and shape the petals with your fingers. The leaves are done the same way but only working on the backside of them.
  6. I placed all the flowers that were created (10 in all) in a box and made a solution of 1/2 Journey glaze and 1/2 water (I saw Richard Garay do this on a video to make a sparkling background for a snowman card). This solution was created in a spray bottle I had in my craft room. I sprayed the flowers; then, sprinkled them with Journey Sparkle Dust (I used a small glitter shaker bottle). I should have sprayed the flowers again to set the glitter, but so far the glitter hasn’t come off.
  7. I cut a circle in the top mat ( top mat measurement 5″ x 3 1/2″) using the pierced circle dies. I placed the pierced circle die on the outside of the circle I wanted to create, and nested the cutting circle die inside the pierced die. I saved the cut circle and set it to the side.
  8. I popped out the mat with the medium Journey Foam Squares and adhered it to the Whipped Cream cardstock base.
  9. I used the circle that was left over from cutting out the mat to stamp the sentiment. I colored the sentiment with the Color Burst pencils in a color that coordinated with the flowers. I placed liquid glue on the back of the circle and pressed it into the circle and directly onto the cardstock base.
  10. I adhered the flower and petal with liquid glue and placed a Spring Accent Dot in the middle of the flower.

One of the mats had the circle cut off-center; so, instead of wasting the cardstock, I looked at it and thought . . . hmmmm. . . . I could make the same card in a horizontal position. I created an additional WOW factor using Orange Rave and Gold silk accents on this card. Note: I left the first two cards “clean”, because I didn’t have the silks I wanted to use with those flowers,. I think having two different ways to complete a card shows the versatility of our amazing products. Some of my stampers like “clean” and others do not – they want Wow, Wow, Wow.

Here is the mistake turned into a raving beauty:

Supplies:

All Fun Stampers Journey – all products can be purchased through my website.

Cardstock: Whipped Cream CS-0040, Lavender Fusion CS-0017, Watermelon Fusion CS-0039, Orange Creamsicle CS-0024
Ink: Black Licorice IP-0009, Lavender Fusion IP-0036, Candy Apple IP-0017, IP-0043
Die: Pierced Circle DI-0039    Use a Bloom Tool to separate the pierced die from the paper TO-0073
Adhesives: Journey Glaze AD-0003 or AD-0002, Journey Foam Squares AD-0085, Craft Glue AD-0111
Embellishments: Journey Sparkle Dust AC-0013, Spring Accent Dots AC-0179
Silks: Orange Rave IP-0118, Gold IP -0096
Suggested Silks for first two cards: Cosmic Grape IP-0117 and Outrageous Pink IP-0109

All my close friends know I have transitioned over to Fun Stampers Journey (FSJ) this past September. One of the amazing benefits of purchasing through FSJ are their Bloom Benefits. For every $50 spent, you will receive a Bloom Benefit FREE! This includes ATS (Artist Trading Stamps) as well as dies and embellishments. I have attached a flyer showcasing some of the Bloom Benefits (there are Bloom Benefits in the main catalog as well as the mini-Trends catalogs):

thumbnail of bloom-benefitsv2

I have all the ATS Bloom Benefits from the 2016-2017 catalog. When I saw Paper Craft Crew Card Sketch #213, I knew the Flock Together ATS from the Bloom Benefits would make a perfect card for this sketch.

pcccs213

I used what I had from my FSJ starter Kit and my first order, which is very limited. For the base of my card and the mat I stamped on, I used FSJ – Oatmeal cardstock and matted the stamped portion onto FSJ – Dark Roast cardstock. I used the FSJ – Dark Roast cardstock for the banner and base of the embossed feathers. I stamped the feathers and sentiment in Versa-Mark and embossed with SU! copper embossing powder. I stamped the feathers in FSJ – Pumpkin Bread fusion ink onto the Oatmeal cardstock.  I fussy cut the embossed feathers. I adhered everything together using FSJ – white liner tape and a glue dot. I then added FSJ – twine and sprinkled the Bronze silk onto the card to give it that extra pop. The matted portion of the card is raised with SU! dimensional.

Flock Together

FSJ – Flock Together

Supplies:

Fun Stampers Journey – Oatmeal cardstock, Dark Roast cardstock, Twine, Pumpkin Bread Fusion Ink, Bronze Silk
Stampin’ Up! – Copper Embossing Powder, dimensionals

PAGE TOP
[dealsbar preview] Amazing Deals: !!toolbar-deal-title!! - !!toolbar-deal-merchant!!