Tag : journey glaze

7 posts

Fun Stampers Journey is providing an amazing opportunity for its coaches to submit their projects in hopes of being given the honor of participating on the Designer Showcase team for the coming catalog year. The chosen designers will have their work showcased at FSJ events throughout the year. This means the design team will receive selected product before product launch to bring to life amazing projects that will inspire others to create.

Any FSJ coach can submit 2 cards and 1 scrapbook page. Once all entries are in by July 10th, Richard and the FSJ Crew will select 20 coaches to move on to the final selection (I don’t know how many are in the final selection). I have worked the last week on my projects. I wanted to share them with my readers the day I submit them to Fun Stampers Journey.

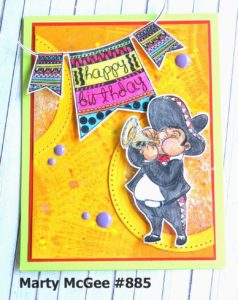
The first card is a birthday card featuring the following ATS sets AT-0156 Felicidades with the Mariachi trumpet player and AT-0195 Bday Banner. The base of the card is FSJ CS-0123 Electric Lime cardstock, the first mat is FSJ CS-0007 Candy Apple cardstock, and the final mat is FSJ CS-0042 Summer Days cardstock. To create the amazing background on the Summer Days cardstock, I took FSJ IP-0113 Orange Rave ink and applied the ink pad to the cardstock with a technique we learned from one of our Bloom Box kits (a sunburst effect is created). Then, I just had to flick as many FSJ silks as I thought reasonible (orange rave IP-0118, electric lime IP-0108, gold ip-0096, sour lemon IP-0110). The pierced open circle was in my scraps of Summer Days cardstock having been left over from a previous project. I started to make a shaker card but I didn’t want anything to disctract from the adorable Mariachi player. I remembered, when we were at the Orlando event, we made a card featuring a star with a sparkle cut center. I created the same thing but with the circle. I adhered a circle of acetate behind the open pierced Summer Days circle (DI-0039 Journey Circles); I took Journey Glaze and placed all over the acetate; then, I sprinkled FSJ AC-0151 Sparkle Cuts over the glaze and rubbed it into the glaze. I set it aside to dry. This technique just makes the card. I cut one end off the cirlce and placed them diagonally across from each other directly onto the background mat. I colored the Mariachi player and the banner with Journey Color Burst Pencils JM-0077. I accented the banner and the trumpet (after I sprinkled Journey Sparkle Dust AC-0013 onto the trumpet) with Journey Glaze AD-0002 4 oz. The banner and the Mariachi player were popped out using FSJ AD-0085 Medium Foam Squares. The final accent were a scattering of Lavender Candy Minis AC-0135. Oops, almost forgot the Sparkle Dust on the rim of the hat, seam of the pants, and the belt buckle. So cute, so adorable. Love it! It just a gorjamust-have card.

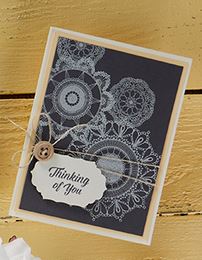
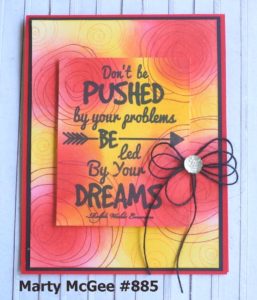
My second card is a quick and simple (very easy card) to bring to life. I started with a base of FSJ CS-0093 Rich Coral cardstock. I love this color. It is a bright red with a hint of orange. The first mat is made using FSJ CS-0003 Black Licorice cardstock. The background base and the raised smaller mat with the sentiment were created using the following: FSJ CS-0040 Whip Cream cardstock, FSJ IP-0114 Outrageous Pink ink, FSJ IP-0052 Rich Coral ink, FSJ IP-0043 Lemon Drop ink, FSJ IP-0042 Summer Days ink, FSJ IP-0041 Black Licorice ink, FSJ Dauber Dowel Large TO-0138, FSJ AC-0004 Journey Black Twine, FSJ AC-0022 Sparkle Drops, FSJ AD-0085 Medium Foam Squares, and FSJ AT-0146 Dreams ATS and last but not least FSJ SS-0454 Flower Swirls.

To begin the background process, I rubbed Outrageous Pink ink and Lemon Drop ink onto the Whip Cream cardstock with the Dauber Dowels. I added a touch of Rich Coral ink to the centers of the Outrageous Pink areas of color. I then took the various sizes of floral blooms from the Flower Swirls stamp set and stamped them onto the swirls of color using Rich Coral and Summer Days ink on the corresponding shade of color.The sentiment was stamped with Black Licorice ink (I used my Misti to stamp the sentiment several times so the black wording would pop). The finishing touch is the triple bow from the Black Twine accented with a Sparkle Drop. The sentiment mat is popped out with medium foam squares.

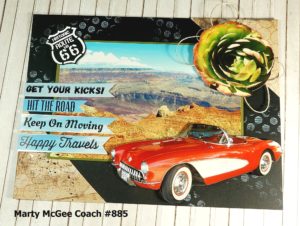
The last project is an 8′ x 6″ scrapbook page. I love the stamp set FSJ SS-0312 Hit The Road. I wanted to create a page featuring this stamp set based around Route 66 out in the Southwest part of our great nation. I knew my friend, Patsy Benson, had vacationed in that area; so, I called her up and asked if she had some pictures I could use. She said yes and I planned a day to drive over and look through her pictures to find the perfect one for my page. Before I went over to her house, I planned out my page. It started off with an 8″ x 6″ piece of Oatmeal Cookie that I distressed with Hazelnut Blend and Buttercream inks. I used a the FSJ SS-0438 Create a Dot background stamp for some interest on the background. I stamped and embossed in white trucks, signs, words in both Black Licorice and Hazelnut Blend cardstocks (I truly wish I had the new cactus stamp set; but alas, I did not). I wasn’t sure what would look great for the picture(s) I chose; therefore, the double color selection of stamped items.

Well, I got there and started looking at the pictures. I knew I wanted a desert/grand canyon type backdrop, and I found the perfect picture. As we were deciding what truck color looked the best on the page, I asked Patsy if there were any Route 66 pictures. She said yes, and we eventually found them. In one of the pictures, an antique convertible was parked at an old-timey gas station, which had multiple route 66 signs in the plate glass windows. As I looked at the convertible, I said, “EEeew (in a good way), what if I cut this convertible out and it looks like it’s driving off the page.” Once I get an inspiration, I’m off and running. Sort of like the Edward Scissor Hands of card making (there is a disaster all around where I was working, but the final outcome is very satisfying). I cut out the convertible and laid it on top of the picture in the right hand bottom corner. Then, I remembered seeing a picture featuring a succulent. I found it and my eyes got wide and I said, “EEeeww (again), I’m going to cut this out too!” Cut, cut, cut, and I’m off and running. Well, as the process usually goes, I change my mind about my first selections of cardstock; the Oatmeal Cookie cardstock did not make the page pop. I needed some color which would make the page truly come to life. think we went up and down her basement stairs twice to her craftroom each time thinking we had gathered all the supplies we needed to complete the page. I think she went up and down probably three more times getting items from the basement as the process developed. After looking through her selection of FSJ cardstock, I thought, Black Licorice would look great and make all the beautiful colors pop off the page. Done! I hated to lose the Oatmeal Cookie sheet because I had put so much effert into creating the background; so, I thought how ’bout I cut off the ends and make triangles. Snip, snip. Done! We tried embossing the route 66 stamp in black on red, Nooo that didn’t quite look right on the page. I tried sprinkling Sparkle Silk – you would think Sparkle Silk would go with anything – not so. I decided to wait until I got home to look through my stamps to find something to add interest to the background mat (I explain later the whole background process). I kept looking at the page and thinking, it needs something else. I then had a bright idea from a card swap I got in Orlando where a coach had stamped onto pictures. I tried the Black Licorice and it wouldn’t dry, but smeared terribly. I initially used Staz-On and it worked, but when I got home, I looked in the cataolog and we don’t have that product; so, I created my own skies using: FSJ CS-0092 Pool Play cardstock, Dowel Daubers, FSJ IP-0035 Huckleberry Fusion ink, FSJ IP-0051 Pool Play ink, and FSJ IP-0009 Whip Cream ink. I rubbed both shades of inks onto the Pool Play cardstock and went back and added white for clouds with the Whip Cream ink. I stamped the Hit the Road sentiments onto the pre-cut strips with Black Licorice ink (I used my Misti to get multiple stamped impressions – making the words crisp). I cut the banner portion of the sentiment strips, and then I added Journey Glaze and spread it out using my finger. It made the pieces look like they were straight from a picture. Voila. Patsy and I both had agreed it needed some twine, but she didn’t have FSJ twine or a background stamp I could use on the Black Licorice cardstock. I knew I could finish the page at home. I placed all the pieces of my project in my plastic bag and came home. That evening, I sat down and pulled the page together within minutes. I placed some looped FSJ AC-0006 Journey Twine Natural behind the succulent picture. I took the ATS Deco Dots AC-0211 and held it folded in half and dapped the rubber into the Buttercream ink IP-0031 and dabbed it in various places on the Black Licorice base. The Oatmeal Cookie corner triangle pieces are adhered onto the Black cardstock. Everything else is popped out. I really love how this page turned out. A picture does not do it justice.

I hope these projects inspire you to create something amazing. If you would like to create using Fun Stampers Journey products, please visit my website at www.funstampersjourney.com/martymcgee.

I am in the middle of a very hectic schedule and turning my son’s old bedroom into a craft room. The craft room change over has been slow but steady. This transition has hampered my creativity due to my current craft room being a MESS! I’m in the process of determining what must stay, what must go on Ebay or Etsy to be sold, and what can be moved to the new room so far. I still need to get desk tops and Ikea drawers to complete the transition. I will have a blog about this at some point in the near future.

When I saw this week’s Paper Craft Crew Cared Challenge #245, I knew I had the perfect card to meet the tic-tac-toe challenge:

My Bloom Box stampers met this past Monday and made our cards from the kit, BUT I thought they needed a little something more. So, prior to our meet-up, I had ordered the FSJ SS-0078 Summer Garden stamp set along with our new dauber dowels and sponges (TO0137 – small and TO0138 – large). I have a picture of the card from the kit below:

I took the basic card design and added to it along with changing the sentiment to Well Wishes. The initial card consisted of FSJ Butter Cream cardstock base, FSJ Banana Cream mat, and final piece of FSJ Rock Candy. The doilies are the featured stamp set in this month’s Bloom Box kit. They were stamped onto the Rock Candy cardstock using FSJ Butter Cream ink. I think the stamped images turned out wonderfully well. I changed my sentiment to Well Wishes and stamped it onto the pre-cut tag using FSJ Rock Candy ink. I popped it out using FSJ Foam Squares. The flower and leaves were created using a technique Richard Garay shared on one of his Facebook Live tutorials. I took a sponge dauber dowel and picked up some FSJ Rich Coral ink onto the sponge and I applied the ink to my cardstock in a circular motion. I did this same technique using FSJ Sweet Pear and FSJ Lemongrass. I, then, took my stamps and stamped the images onto those sponged areas using FSJ Black Licorice ink. The flower and foliage were adhered using FSJ Medium Foam Squares. For the ribbon accent, I took the button from the kit and applied FSJ Rock Candy ink straight onto the button edges using the ink pad. I adhered a large diamond rhinestone into its center and adhered it to a double bow made from FSJ twine. Once every thing was adhered to the card, I applied FSJ Journey Glaze to the flower and parts of the leaves. I think this card turned out to be very elegant with a pop of color. I almost forgot – last but not least, a sprinkling of FSJ Silver Silk was applied to the card. Bodda-Bling, Bodda-Boom!

Supplies:

All supplies except for the diamond rhinestone (who knows where I got it from – it was just part of my stash and fit exactly into the depressed area of the button) are available through www.funstampersjourney.com/martymcgee. Note: The stamp set is only available with the Bloom Box Kit. It must be purchased before the end of May and then a commitment of purchasing 5 more kits is required.

This past week, one of my good friend’s daughter had emergency surgery and had to stay in the hospital for about 4-5 days. I met up with my co-colorist, Cheyenne Luken, and we wanted to stamp and color this cute fox holding a basket of flowers with our Spectrum Noir markers. After choosing the printed papers for the mats, cutting them out, and adding a sentiment. I thought this would be the perfect card to give someone on the mend.

Here is the card with the color choices following:

Stamp: Darcy’s (I don’t know the name). Cheyenne purchased this at a Stamp Show back this past fall. But it is a super cute set. It also has a chick and another critter that escapes my mind at the moment.

Spectrum Noir Markers:

Fox Fur: TN9, TN6, TN4, TN3 – TN3 and BP3 combined
Eyes: IG1 and Blender, FS8 with BG5 and blender
Paw: BG8
Leaves: LG5, LG4, LG2, CG2
Flowers: CT4 and OR1, OR3 and OR2, B1 and IB2 and GT1, BP3, PP4, PP1
Basket: IG1 and BT8

Dies: My Favorite Things dies (cross stitched rectangles, clouds, and grass)

Fun Stampers Journey: Glaze

Paper Pack: Pink and Main 6 x 6

I think this turned out to be soooo adorable.

Yesterday I had a Spectrum Noir Alcohol Marker coloring class, which focused on shading clothing. I had recently ordered from Etsy a Sherri Baldy digi stamp (there were two images to my surprise and delight). I thought this would be a great image to practice clothing coloring. A color palette of blues and pinks was chosen. When she was finished, I knew I had to submit another card to the Fusion Card Challenge – Pretty in Pink Card Challenge.

She was so much fun to color. Here are the markers we used: Hair – base from roots to midway of hair GB11 then GB4 to the ends. TN3, GB 10, TN5, EB4, EB5 (dots throughout hair); skin – EB1, FS7, FS9 and FS8 for cheeks and lips; dress and headband- TB1, TB4, TB5; Pants – LY1, CT4; Flowers PP1 and PP3 and Blender throughout project.

The flowers are from the Heartfelt Creations – Botanical Rose. The base of the card is FSJ Whip Cream with FSJ Watermelon Fusion and FSJ Bubble Gum cardstocks as mats. The oval was cut from Heartfelt Creations Strawberry Fields 12 x 12 paper pack. The pearl accents are FSJ pearls and they were colored with Spectrum Noir PP2 marker to make them pink. A layer of Journey Glaze was added to all the flowers to make them shine and pop. And, finally the bow is SU! silk ribbon made into a double bow.

If you would like to order any products from Fun Stampers Journey, click here.

Here I am with another weekend creation from our most recent stamp haul at the Heirloom’s Lawrenceville Rubber Stamp & Paper Arts Festival. This card was created with a Pink and Main stamp set called Need Coffee. Here is the package image containing all the stamps (you can click on Pink and Main or the image to check out their shop).


Isn’t this an adorable stamp set. This stamp set was from Cheyenne’s haul. She has been wanting this stamp set since October when she first saw it at Pink and Main’s booth during a different stamp show weekend. As I mentioned in the last post, I like to design a card around a card challenge and well, why not???

The challenge I chose for this card design is Fab Friday 105 card sketch challenge. Here is the card sketch:


There were four of use working on our own variation of this card. We chose our own color palette and embossing folder. I will post Cheyenne’s card at the end of the post. I don’t have pictures of the other cards.

We took our coffee girl and stamped her onto FSJ Whip Cream cardstock using Memento ink. In hindsight, we should have stamped the image using FSJ Black Licorice because the FSJ Fusion Blender we used to blend the colored pencil areas made some of the ink smear. We colored our images with the FSJ Color Burst Pencils. The FSJ Fusion Blender was used with the Blender stumps to smooth the colors together.

I used the FSJ pierced Circle die to create the circle mat out of FSJ Whip Cream cardstock and stamped the coffee cup in FSJ Oatmeal Cookie to add depth and bring interest. I added a touch of Spectrum Noir clear glitter pen to the bunny noses and ears, the steam from the coffee, and the pink sponge curlers. I applied Journey Glaze to the cofee to add a little shine. The sentiment is stamped with VersaMark ink and embossed with white embossing powder on FSJ Black Licorice cardstock.

Let me take a moment to comment on the mat and the red dot embellishment next to the sentiment. The quilted mat was created from FSJ Candy Apple cardstock using a We R Memory Keepers Next Leveling Embossing folder (this one is Cheyenne’s) purchased from Creek Bank Creations. Under the Candy Apple mat is a FSJ Cool Pool mat giving a hint of light blue. The red embellishment dot was created using Nuvo Red Berry Crystal Drops which was purchased from Sparkle and Sprinkle.

Here is the completed card:


Here is Cheyenne’s card (the base mat is FSJ Deep Lilac, the quilted mat is FSJ Cool Pool, the pierced rectangle mat is FSJ Lavender Fusion cardstocks):

Supplies:

You may purchase Fun Stamper Journey products through my FSJ website – click here.

To purchase the embossing folders or Nuvo Crystal Drops go to the vendor name and click on it.

It is another week with a wonderful card sketch challenge from Freshly Made Sketches #266. Here is their challenge sketch:

I wanted to take advantage of the Christmas season, yet again. I pulled out my Fun Stampers Journey (FSJ) Frosty Fun ATS and coordinating die to use on this challenge. As I was pulling this card together, I tried various colors of cardstock for the background, but every color I chose took away from the Frosty Snowman stamped image. I realized I had the perfect background die I received this past Friday from Fun Stampers Journey. It is the Persian Gardens die. I cut the base and the background die cut out of FSJ Whip Cream cardstock. I adhered the die cut onto the base using FSJ Craft glue which dries in a matte finish.

In place of the heart image, I took a large snowflake from the FSJ Snowflake Elements and applied Journey Glaze to the snowflake and then covered it with Sparkle Dust. I burnished the Sparkle Dust onto the snowflake with my finger. I cut the square piece out of FSJ Cool Pool cardstock with the FSJ Square pierced dies. I adhered both of these accents to the card with the FSJ craft glue. I stamped Frosty Fun onto FSJ Whip Cream with Black Licorice ink and colored him with FSJ Color Burst Pencils. For the circle element, I replaced it with some FSJ Tinsel Trim. I popped Frosty out with Journey Foam Squares (medium). I stamped the Christmas sentiment from FSJ Holiday Script with coordinating die in Cranberry Bliss ink and die cut it out. I adhered it with Journey Foam squares.

This is a cute card to give to a friend or family.


Supplies:

Fun Stampers Journey (all products used can be ordered through my FSJ website – click here).

Stamps: FSJ Frosty Fun (ATS – artist trading stamp) with coordinating die
Cardstock: FSJ Whip Cream, FSJ Coo Pool
Ink: FSJ Black Licorice, FSJ Cranberry Bliss
Dies: FSJ Square Pierced Dies, FSJ Persian Gard Die, FSJ Frosty Fun die
Coloring: FSJ Color Burst Pencils
Ribbon: FSJ Tinsel Trim
Miscellaneous: FSJ Foam Squares, FSJ Snowflake Elements, FSJ Craft Glue, FSJ Journey Glaze, FSJ Sparkle Dust

Well, Cheyenne and I got together on Wednesday and made the most adorable card EVER! She had purchased Tim Holtz’s Dog stamp set with coordinating dies. She came over to my house whipped those stamps and dies out of her little black bag, and we got off to a ruff start (ha, ha – do you like the pun). Anyway, she wanted to create a dog with textured hair. She had a picture to go by from a Pinterest pin, and I tried to pick out Spectrum Noir colors that were a close match. We got half of our dog’s faces done and she didn’t like them. They weren’t the correct color. So, upon her insistence, we started with a fresh dog stamped in SU! Smokey Slate. The first one was stamped with Memento Tuxedo Black, but we wanted the hair to over-balance the stamped image’s outline. That’s when I said, let’s make our card using the Paper Craft Crew Challenge #217 (why not kill two birds with one stone). So, she pulled the sketch up on her phone and we began again.


We took our stamped image and gave it a base color of Spectrum Noir EB1 and LV1. Then, we took my Fun Stamper Journey Color Burst pencils and began to create shading (darkest brown) along with several other colors to create lighter shading and depth to the dog. Once all of this was accomplished, we kept our pencils sharpened and began making flicks of color onto the dog image. This took a LONG time. It takes a very light touch, and when you flick the pencil lead, you need to lift at the same time so your hair image looks light and hairy. We used several different colors with the black pencil giving more depth and a white gel pen was used to add light effects on the hair. Cheyenne said my dog looked mad and her dog looked scared.

Once we were happy with our hair and color of our dog, we cut out a nose and popped it out and added Journey glaze to give it a nice shine. A bone and ball were added to my card. Cheyenne added a leash to her card, but I couldn’t add one to mine because my matted dog was in a different place on my card than her card. I took the Fun Stampers Journey ATS stamp and stamped the sentiment onto FSJ Oatmeal Cookie cardstock. I made faux washi tape out of cardstock and placed a Journey twine bow up at the top of the card (I did have my twine on the smaller mat as in the sketch, but it pulled your eye away from the focal point – the dog). Last but not least, the dog, the mat the dog is on, the bone, tennis ball, sentiment, and the smaller piece of washi tape are popped out. I used fun foam for everything but the washi tape. All of the printed paper is from The Pets Stack paper stack which was purchased from Hobby Lobby a long, long time ago. The base of the card is FSJ Oatmeal Cookie cardstock. The mat for the dog was cut out using a rounded corner stitched rectangle die from Pink and Main. Here he is. He thinks you are “Looking Good.”


Hope you enjoy!

PAGE TOP
[dealsbar preview] Amazing Deals: !!toolbar-deal-title!! - !!toolbar-deal-merchant!!