Tag : alcohol markers

16 posts

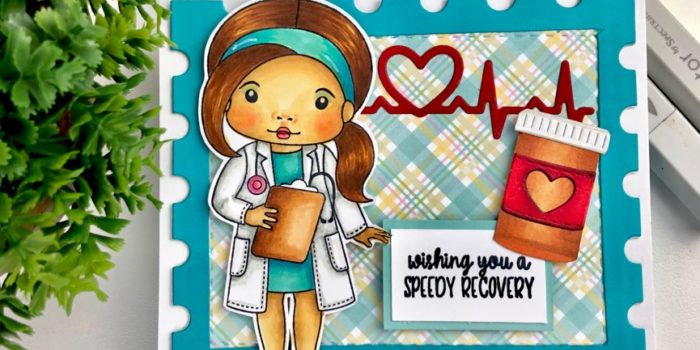
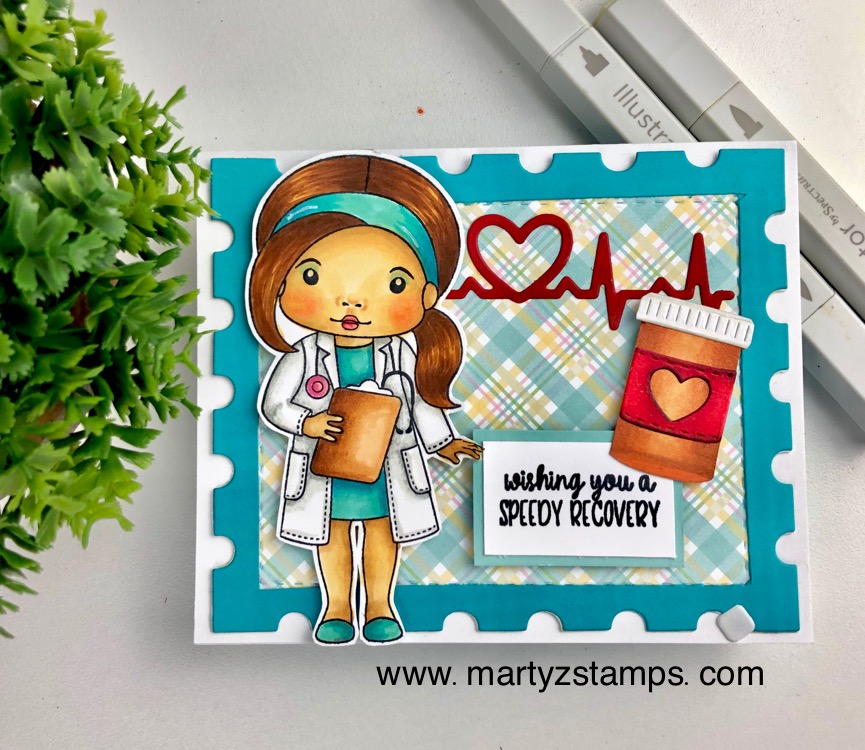
Recently, a friend’s husband had bypass surgery. A card featuring Dr. Marcie stamp and coordinating dies from a Club La-La Land Kit was the perfect set to create a get well soon card.

La-La Land Crafts has the most wonderful collection of stamps and dies to fit any occasion. Their stamps and dies combined with FSJ and Pink and Main supplies created the perfect card.

The base is FSJ Whip Cream CS with a FSJ Turbo Teal mat die cut using a Pink and Main die, the plaid mat is FSJ printed paper from my huge collection of printed paper, the EKG heart with beats is die-cut with one of the coordinating dies from the kit using FSJ Cranberry Bliss CS and the pill bottle is another of the coordinating die-cut using FSJ Whip Cream CS. Marcie and the pill bottle are colored with Spectrum Noir alcohol markers.

Here is a list of the markers I used for coloring (all colors are the original blend unless noted):

Skin: FS9, EB2, FS6 Illustrator markers and FS4, TN3 and FS2
Cheeks: CR3 Lips: CR3, FS8 Illustrator
Dress and Headband: BGR3, BT8, IB3, AB1
Coat: GG2, GG1 and Blender
Stethoscope: AP1
Pill Bottle: IG1, TN7, TN5, TN3, CR7, CR11, DR6
Clipboard: TN7, TN5, TN3
Hair: TN8, TN7, TN3, TN2, TN5
Nose: FS4, TN3

Supplies:

La-La Land Crafts (kit is not available but there are other stamps/dies that would work well)

Spectrum Noir Alcohol Markers

Pink and Main

Spellbinders/FSJ:


My friend, Julie Hill, just had a birthday and I missed giving her a card on time, but I guess better late than never. Right?

I received the cutest stamp called Brew It Anya from The Greeting Farm in my January Flavor of the Month Kit from Scrapping for Less. Crystal Minkler had created some adorable cards with Anya on a circle mat.

I took the idea and went in a slightly different direction. I made the actual card from a scalloped circle.

Anya is colored using Spectrum Noir Markers and all the cardstock used was from the kit. Even the wooden glasses were part of the kit. They are just too cute (I stole this idea from one of the design team members if I remember correctly).

She’s just too stinkin’ cute!

Post-note – Anya may very well have to go on a regular A2 size card base. The glasses make her top heavy and she rolls to the side when set up for display! LOL Note how the card is positioned next to the dies. They are holding her upright!

To order Spectrum Noir alcohol markers, click the banner below:

To order the Nestabilities Fancy Edged Circle Dies, click the banner below:

My goal for this year is to find new card challenges to enter. As I started making this goal happen, I stumbled across the Sunday Stamps blog. The sketch for this challenge is a color combo.

I love these colors and as it happened, I had the November 2018 Scrapping for Less Kit that had some stamps crying out to be used. I took one of the kits and created a thank you card with a masculine theme. Here’s a view of the tools I used.

This card is clean and simple (not so quick due to the coloring). I took the “Dapper Man” kit with its coordinating paper to create a fun thank you card. The colored images began by stamping the neck ties and bow ties onto Neenah Solar White cardstock with FSJ Black Licorice Fusion ink. I colored the ties with Spectrum Noir Markers OR3, EB2, IG5, TB1, TB2 and GG1. The sentiment was die cut from the SFL coordinating cardstock base featured on the card and layered on two more “thanks” die cuts from Black Licorice cardstock to create dimension. Both the base mat and image mat were die cut with stitched rectangle dies from my stash.

I hope this inspires you to create.

Supplies:


I am making it under the wire, yet again, for a Paper Craft Crew (#233) challenge. This week’s challenge is a Tic-Tac-Toe Challenge. I chose the middle, vertical column (shimmer, Shabby Chic, flowers) for my card. Here is the sketch:

This image is a digi stamp I purchased from Sherri Baldy’s Etsy shop. The purchase gave me two digi stamps of the cutest girl. I have a blog post featuring the other image here.

I had decided to try and make dread locks/ringlets on my girl after watching a YouTube tutorial on coloring with alcohol markers (sorry, I didn’t make a note of the video). I will do my best to note the markers I used, but this was one of those creative moments where I was creating and not paying attention to the details of what I used. Anyway, I’ll pull out my Spectrum Noir Hex chart and do the best I can (it will be pretty close).

Spectrum Noir alcohol markers were used on the girl and the flowers. The hair – IG10, IG2, BG6, BG3; skin – HB2, FS2, FS7, BG4, TN3, TN5; lips and cheeks – FS8; dress/headband/pants – LG2, LG3, LG5, LY`, OR1, OR2; eye – LG2, LG5; flowers – CT2, OR2, OR3; leaves – LG2, LG3, LG5; and, the blender pen was used throughout.

The base cardstock is SU! Pistachio. The images were stamped on Spectrum Noir cardstock using Memento Tuxedo Black ink. The base mat is Pink and Main designer paper die cut with Fun Stamper Journey Persian Garden die, The orange mat is FSJ Creamsicle cardstock with a light green mat of designer paper from Heartfelt Creations Sweet Berry 12×12 paper pack (this explains all the flowers – I had to cover up all the strawberries on the mat – LOL), a Spellbinders die was used to create some FSJ Creamsicle swirls. Spectrum Noir clear glitter pen was applied to the hair and skirt to add the SHIMMER. FSJ Journey Glaze was applied to the flowers, skirt waist, skirt trim, and eye. Diamond rhinestones were added to the flower centers, and a triple bow from SU! lace Pistachio ribbon accented the card. Last but not least, everything is popped, popped, popped up. A lot of dimension is going on here.

It is a very busy card, but I like busy and it really yells Shabby Chic.

I really love the way this card turned out. It is one of my favorites.

Yesterday I had a Spectrum Noir Alcohol Marker coloring class, which focused on shading clothing. I had recently ordered from Etsy a Sherri Baldy digi stamp (there were two images to my surprise and delight). I thought this would be a great image to practice clothing coloring. A color palette of blues and pinks was chosen. When she was finished, I knew I had to submit another card to the Fusion Card Challenge – Pretty in Pink Card Challenge.

She was so much fun to color. Here are the markers we used: Hair – base from roots to midway of hair GB11 then GB4 to the ends. TN3, GB 10, TN5, EB4, EB5 (dots throughout hair); skin – EB1, FS7, FS9 and FS8 for cheeks and lips; dress and headband- TB1, TB4, TB5; Pants – LY1, CT4; Flowers PP1 and PP3 and Blender throughout project.

The flowers are from the Heartfelt Creations – Botanical Rose. The base of the card is FSJ Whip Cream with FSJ Watermelon Fusion and FSJ Bubble Gum cardstocks as mats. The oval was cut from Heartfelt Creations Strawberry Fields 12 x 12 paper pack. The pearl accents are FSJ pearls and they were colored with Spectrum Noir PP2 marker to make them pink. A layer of Journey Glaze was added to all the flowers to make them shine and pop. And, finally the bow is SU! silk ribbon made into a double bow.

If you would like to order any products from Fun Stampers Journey, click here.

So excited to show off this Oldie But Cool truck in the Paper Craft Crew Challenge #232. I love the way PCC sketches inspire you to think outside the box. Here is this week’s sketch:

This card was created with a friend after a Make It party she had at her house. We went downstairs to her basement craft room. We were wanting to use our Spectrum Noir Alcohol Markers to color something in shades of red. We decided the Fun Stampers Journey Hit The Road stamp set was the perfect choice. As we began coloring, I can tell you several times I thought I had ruined my truck. But, as alcohol marker colorists know, you have to walk away and let it dry and voila it looks great. I did have to cut the truck out because I kept coloring out of the lines. You know, Mama said there would be days like this – LOL. Once we finished with the truck, the background came about by trial and error.

I began the background mat by wanting to stamp the route 66 outline stamp in FSJ Sour Lemon ink, but I used FSJ Electric Lime by accident (that’s where one of the errors came in). Instead of tossing the stamped background, I thought, “Why don’t I stamp the full coverage route 66 image offset and on top of the outlined route 66 image in FSJ lemon drop?” It looked great. Then, I made another error stamping the one way image and smeared some ink. Oh ho, that wouldn’t do. So, I thought, “Hmm, what would FSJ Huckleberry Fusion look like stamped on FSJ Electric Lime cardstock?” It looked great. Thus the one way stamped images adhered off of the stamped background mat. I finished the background stamping the gas pump in FSJ Candy Apple ink. The final touch was some splatters of FSJ Sour Lemon silk. I love this card! I hope you do too.


Supplies: Fun Stampers Journey supplies can be ordered by clicking here.

This week’s Freshly Made Sketches #274 card sketch is the perfect sketch to showcase Pink and Main’s Bear Hugs Stamp Set. Here is the sketch:

When I am creating a card for a challenge, I first look at the card sketch and then go through my stamps to determine which stamp would best fit the card sketch design. As I mentioned in the opening paragraph, I chose Pink and Main’s Bear Hug stamp set featuring an adorable boy with his teddy bear.

I stamped the images onto Spectrum Noir cardstock using Memento Tuxedo Black ink. I colored the boy and bear with my Spectrum Noir markers. Here are the color combinations: Hair – LV1, CT4, GB3, GB6, GB10; Skin – Fs2, FS3, FS6, TN2 and FS8 for cheek color; Shirt – LV1, CG1, HB3, HB2; Bear – TN2, TN3, GB6, GB10, TN6, TN9; Pants – TB2, TB3, TB8; Shoes – TN4, TN7, TN9. He turned out so cute.

I cut a FSJ Whip Cream mat to 5 1/8″ X 3 7/8″ and ran it through my Big Shot with a diagonal stripe embossing folder (SU!). I cut a small mat out of FSJ Denim Days and stamped the sentiment on it using VersaMark ink and embossed using white embossing powder. I popped the boy and bear image out using FSJ Medium Foam square. A simply adorable card.

Supplies:

Fun Stamper Journey – www.funstampersjourney.com/martymcgee
Pink and Main – www.pinkandmain.com
Spectrum Noir Markers – www.consumercrafts.com

Here is the post featuring the last of the three cards we made this weekend. I used the card sketch from the Fusion Interlocking Hearts Card Challenge. This design features Pink and Main Rain Frogs stamp set. This set is just too cute. Here is the sketch and the image of the stamps in the Rain Frog set:


The frog and umbrella, rain boots, and sentiment were stamped on Spectrum Noir cardstock with Memento Tuxedo Black ink. The images were colored with Spectrum Noir markers. I will admit I didn’t write down the colors I used but I think I can give a good guess as to which ones I used.

The frog – DG1, DG2, DG3, DG4. The umbrella – TN2, TN3, CT1, CT4, DR1, BP5. The raincoat and raindrops – TB1, TB2, TB3, IB1, IB2. The rainboots – CT1, CT4, DR1, BP5, TB1, TB3, TB8. The words – BP5, TB2. The frog and rainboots were cut out using a Brother Scan n Cut 2. The sentiment was fussy cut. All images were popped up using FSJ Foam Squares. The base printed cardstock and the yellow with white polka dot banner were from a Pink and Main paper pack. Love the designs. The circle mat was cut using a FSJ pierced die from FSJ Whip Cream cardstock. The embossed mat was cut from FSJ Huckleberry Fusion cardstock and embossed with a We R Memory Next Leveling embossing folder. Both mats were die cut with stitched rectangle dies (one from Simon Says and the other from My Favorite Things). The banner was matted on a piece of FSJ Watermelon Fusion cardstock. Last but not least FSJ Journey Glaze was added to the raindrops and puddle as well as the toes of the rainboots.

So cute!

Supplies:

You may purchase Fun Stamper Journey products through my FSJ website – click here.

To purchase the embossing folder click here or Pink and Main click here.

This past weekend a very dear friend’s daughter, Paulina, celebrated her Quinceanera. I wanted to make her a very special card for her birthday using Spectrum Noir alcohol markers, because I, my daughter and son, and my friend, Cheyenne, bought her 84 Spectrum Noir markers. Woo Hoo! I know she will make some incredible art projects using her markers.

I thought the Fun Stampers Journey Media Artist girl was the perfect stamp to create a card for Paulina. I stamped the image on SU! Whisper White cardstock using Memento Tuxedo Black ink. This is the best cardstock I’ve found for coloring with alcohol markers. It took me about two hours to complete the coloring. To get a smooth finish, you have to take your time and work coloring small areas at a time. I tried to video tape the process, but the battery gave out before I was finished.

Lest any of you think I just throw together cards with no mess ups or problems. I had to pull this card apart about five times before I was satisfied with how the card looked. I decided about the fourth go round to make a shaker card, and I think this was a great choice. Here is the first picture before I stamped the flowers onto the card.


After I took this picture, I decided to stamp the flowers that is part of the FSJ Media Artist girl stamp set onto the card using SU! Midnight Muse. Here is the final card.

I absolutely love this card and I hope you do too!

Supplies:

Fun Stampers Journey:
Stamp Set: FSJ Media Artist girl

Stampin’ Up!:
Cardstock: Whisper White, Bashful Blue, Night of Navy
Ink: Midnight Muse

Spectrum Noir Alcohol Markers, Spectrum Noir Clear Glitter Pen

Miscellaneous:
Sequins, Acetate, Stitched Oval Dies from Lawn Fawn

This past September three friends and I went to the Stamp Scrap Art Tour held in Duluth, GA. Pink and Main was one of the vendors at this show. The owner and illustrator for Pink and Main, Michelle Currie, was at the Friday night make-n-take, and we were able to complete an awesome card, purchase a discounted die set (only available during the make-n-take), and have a great time enjoying her company. We also had the opportunity to see her the next day while shopping for all sorts of goodies. My friend and co-crafter, Cheyenne, purchased their scarecrow stamp set and coordinating dies.

We spent a whole afternoon stamping the scarecrows and coloring them with our Spectrum Noir alcohol markers. We had a great time. Cheyenne ended up putting her card together that evening, but when I am tired I know better than to try to pull together something important. It usually spells disaster. I finally put mine together this weekend. AND, it is gorgeous.

When I saw the Paper Craft Crew #215 challenge today, I knew my Pink and Main Scarecrow card was the perfect match for this challenge. Here is the card challenge:

For our scarecrow card, we stamped the images on Spectrum Noir paper with Tuxedo Black Memento Ink. The images were colored with our Spectrum Noir alcohol markers. See the end of this post for the color combos. Several of the images are raised using black foam. I believe we used Lawn Fawn’s 6×6 plaid paper pack for the printed mat. The blue mat is SU! Bashful Blue (a very retired cardstock), the plaid mat is on FSJ Hazelnut cardstock and the base is a SU! paper (Cheyenne’s paper wasn’t listed but I think FSJ Orange Rave or Tangerine Fusion would work really well). The mini-clothes pin and twine are from Fun Stampers Journey (FSJ). Here is the card:

Spectrum Noir Color Combos (the ones I wrote down):

Jeans – TB5, TB2, TB4, GG1
Corn – CT1, GB9, GB6
Straw – CT4, GB6
Hat – Fl Yellow, TN3, FS1 and Color Burst pencils for crosshatch texture
Pumpkins – CT1, OR2, OR3
Corn stalks – can’t remember the lighter green but I did palette blending with the lighter one and DG3

Supplies:

Pink and Main – Scarecrows and dies, stitched rectangular (rounded corner) dies
Lawn Fawn – plaid paper stack
FSJ – Tangerine Fusion, Hazelnut cardstocks, Color Burst Pencils, twine, clothes pin
Inks and Markers – Memento Black, Spectrum Noir alcohol markers
Misc – Black Fun Foam sheets, fence die (bought a long time ago from My Favorite Things)

PAGE TOP
[dealsbar preview] Amazing Deals: !!toolbar-deal-title!! - !!toolbar-deal-merchant!!