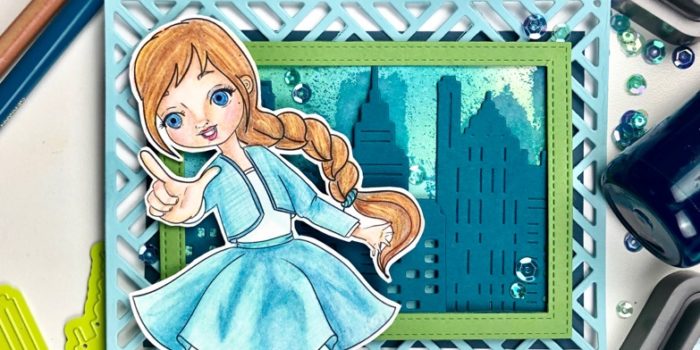
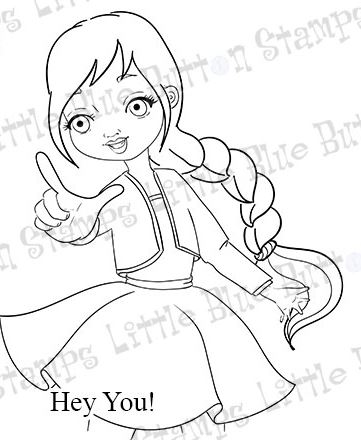
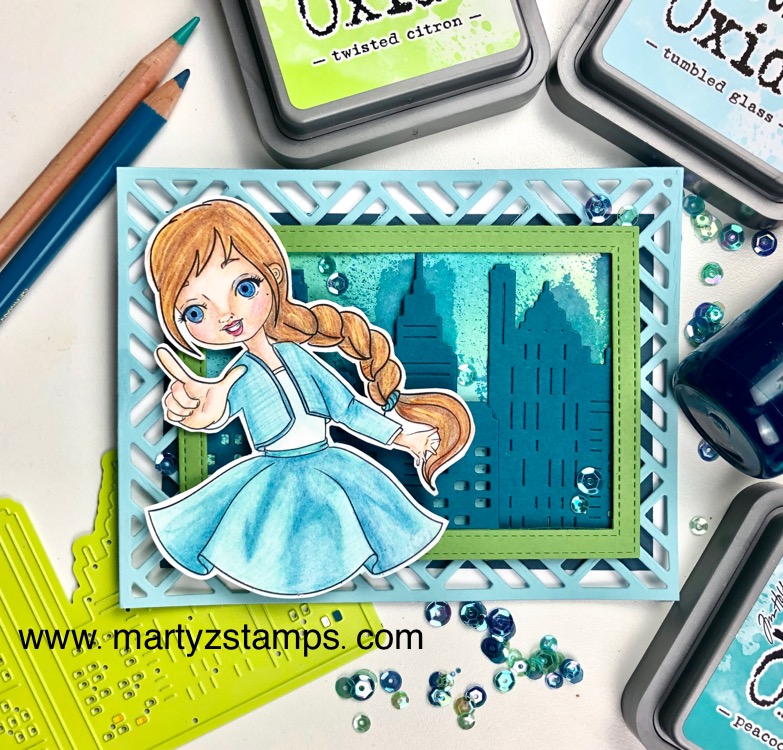
It’s time for Little Blue Button Stamps July Release. The digital stamp I am featuring on my blog is “Hey You!”
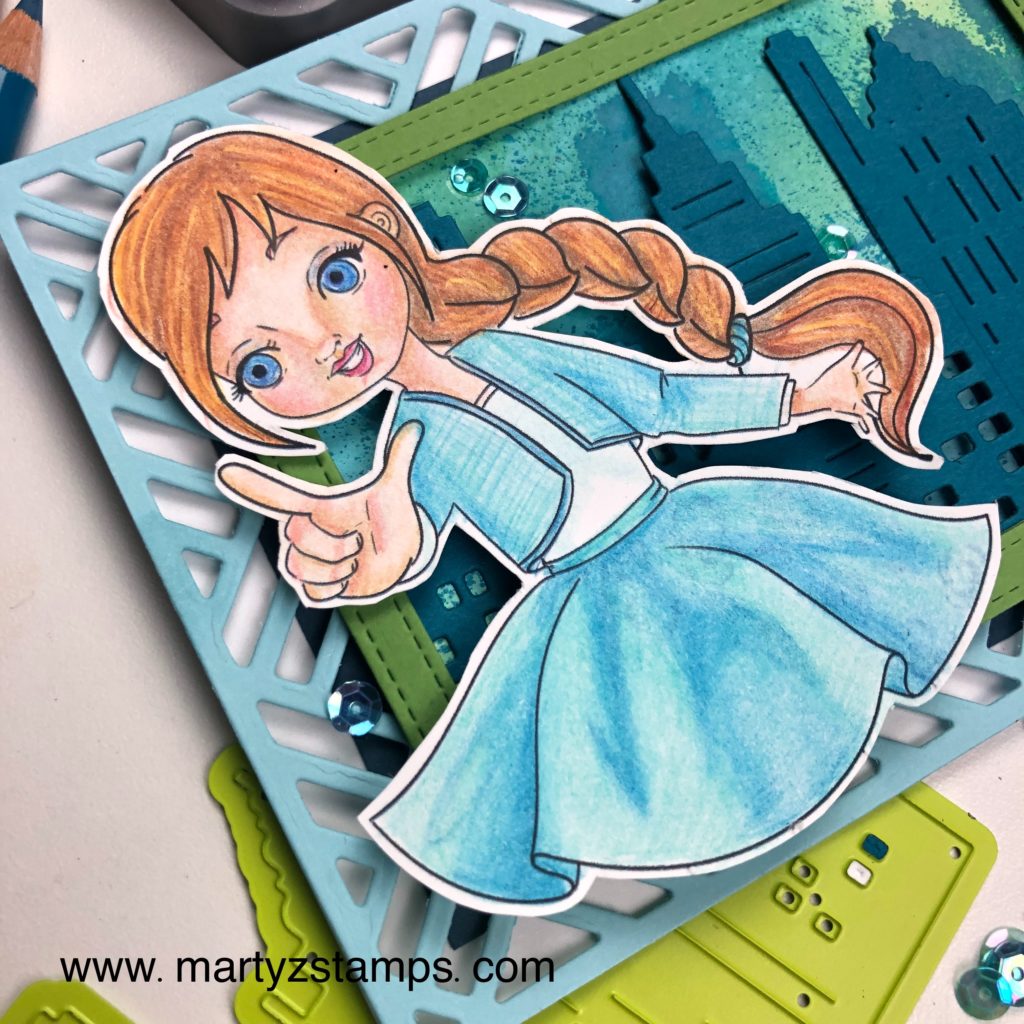
She’s sassy, she’s cute, living it up in the big city. It’s a night on the town and she’s ready to have some fun. But, first she has to grab a cab. Hey you? Yes, you! I have places to go and people see!
This card uses a lot of creative elements. I used Distress Oxide inks for the sky background and took the negative of the cut out cityscape and spritzed FSJ Blue Lagoon Splash to create the skyline shadow. The FSJ Hero City die set is cut from Blue Lagoon cardstock. The frame is die cut from Lemongrass cardstock using a MFT stitched die set I have had in my stash for many a year. Pink and Main Basket Cover Die is cut from Pool Play cardstock with a Denim Days mat peeking out from under the Pool Play.
The LBBS, Hey You, girl is colored using Faber-Castell Polychromos and FSJ Color Burst pencils. She is popped up with foam squares. The final touch of glitz is Journey Sequins Blue Skies.
I am so excited you are hopping along with us for the December FSJ Creative Team Blog Hop! This month’s theme is anything but a card. I couldn’t wait to create a 3D Seasonal gift that works well for Christmas and into the Winter months. There are also a couple of tag ideas and I had to include a coordinating card.
If you get lost along the way, click the Creative Team Image below and you will be directed to the FSJ Blog.
If you’re not lost and just hopping along, follow the trail of designers below:
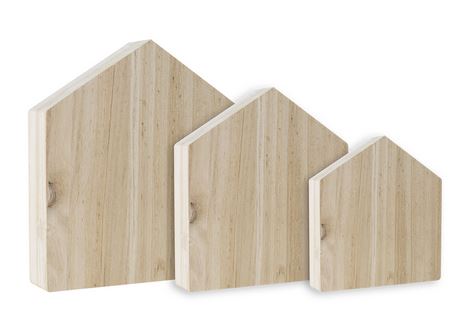
The first project features the medium and small house from the House To Home Wooden Houses.
House to Home Trio of Wooden Houses
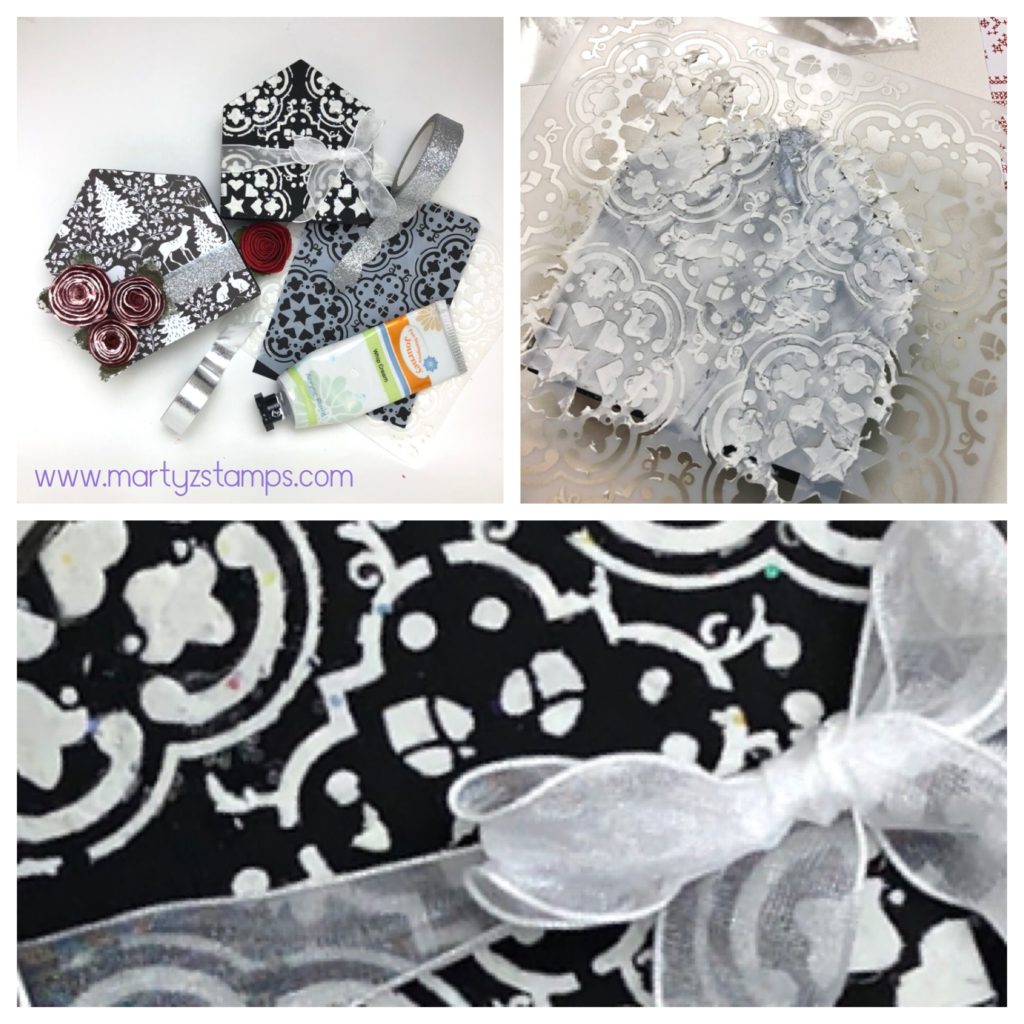
What a great gift for the mantle, dining table or side board. These were so easy to create. Here’s what you need. The Cozy Prints printed paper, Black Licorice and Whip Cream acrylic paint, Shimmer Silver Color Splash, Love Buds Paper Flowers, Cement Tile Stencil, Journey Modeling Paste, Sparkle Tape, Classic Elegance Washi Tape, Sparkle Cuts glitter, Journey Craft Glue, Square Paint Brush, Spatula, Crease Tool, Heat Gun and Special Day Organza Ribbon.
Make this gift by applying Black Acrylic paint to the wooden houses. Once they are dry, cut a piece of patterned paper a little bigger than the house you want to cover and gather your supplies to stencil the coordinating house.
Apply the patterned paper to the house using Journey Craft Glue.
Tip: To make spreading the glue easier, spritz with a little water.
Smooth the paper onto the house and using the edge of your crease tool, press out any trapped air pockets. Turn the house upside down and trim excess paper.
Tip: The glue dries really fast, make sure to position your paper quickly; otherwise, you’ll have a mess.
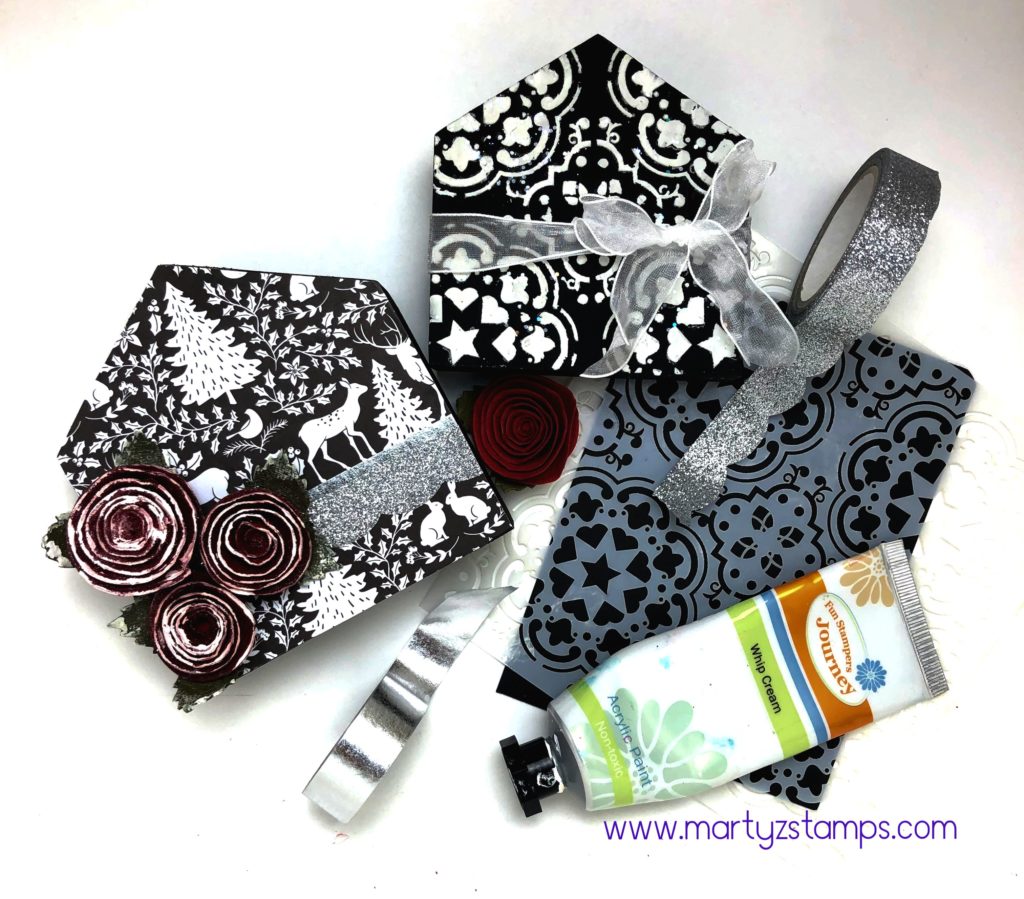
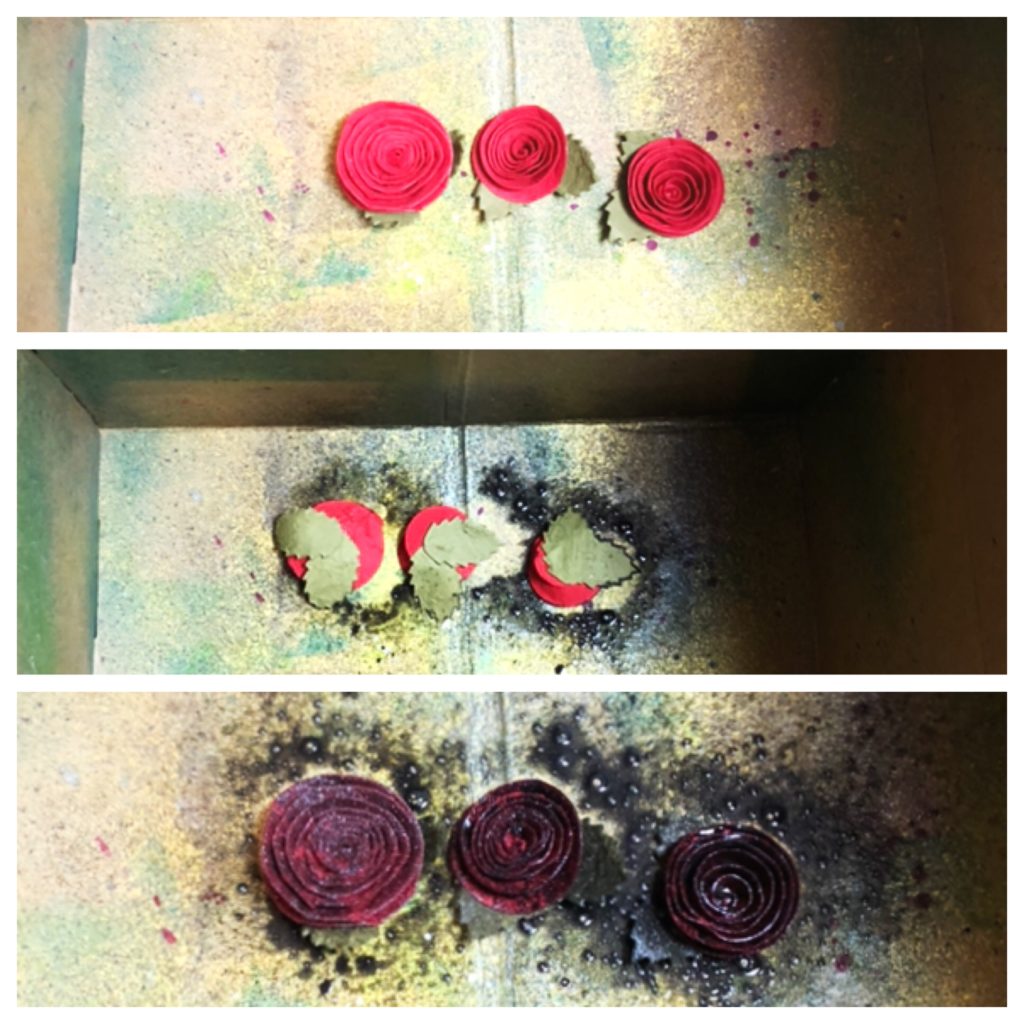
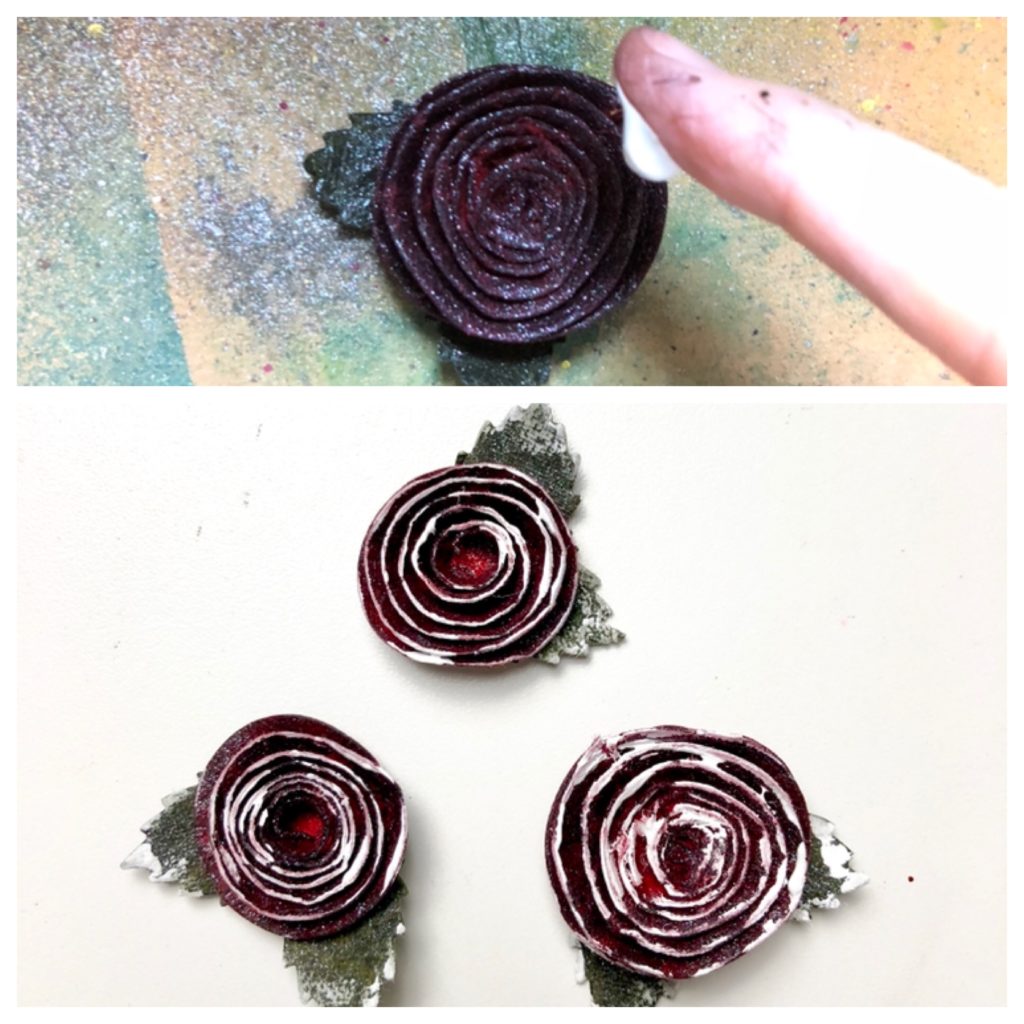
Choose three Love Buds Paper Flowers (large, medium and small). Place the flowers in a box to spray them with the Shimmer Silver Splash. Apply the Splash to the front and backsides of the flowers.
Once they are thoroughly dry (you may have to use your heat gun), place a small amount of White Acrylic Paint onto the tip of your finger and gently apply the paint to the edges of the flowers and leaves.
Take your silver and sparkle washi tapes and layer them onto the house. Adhere your flowers with Journey glue to the house and you’re done with the first house!
Moving to house number two, place some Journey Medium onto a non-stick surface that can be thrown away or cleaned. Mix in some Sparkle Cuts glitter.
Tip: Make sure to put the top back onto the Journey Modeling Paste to keep it from drying out.
Place the stencil onto the painted house. Apply the Journey Modeling Paste evenly over the stencil making sure to cover every opening. Pull the stencil off. You may want to apply more Sparkle Cuts directly to the paste. When the paste is a little dry, use the palm of your hand to gently tap the paste. This will create a smooth stencil look to the design.
Wrap the Special Days Organza ribbon around the house and tie a bow.
TIP: For a really cool look, apply heat using a heat tool which will cause the ribbon to crinkle in a delightful way.
So easy and so fun!
Coordinating Card
You shouldn’t give a gift without a card, right? How about a coordinating card for the gift? Let’s do it.
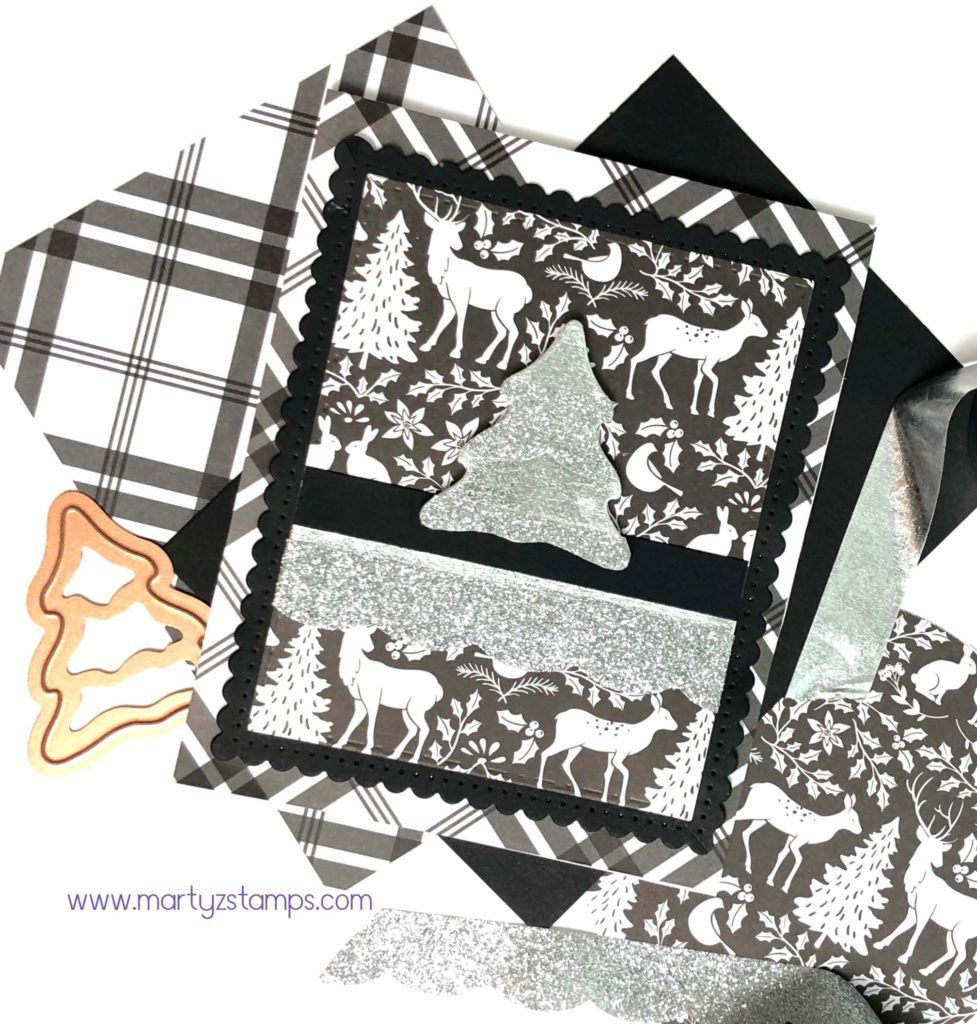
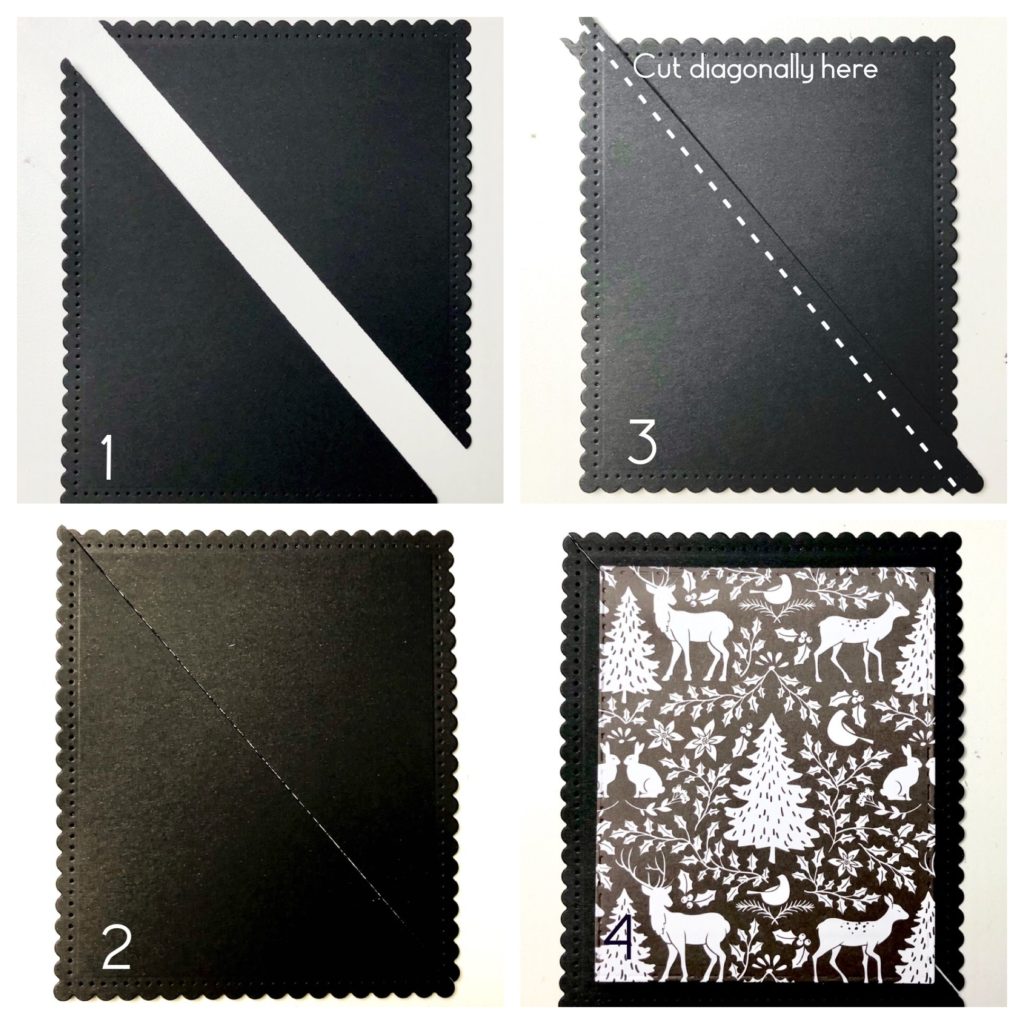
What a simple but elegant card to coordinate with the gift. This card uses a great technique to adjust the size of the scallop mat, but I’m getting ahead of myself. Start by cutting a base from Whip Cream cardstock 4 1/4″ x 10 1/2″. Next, cut a plaid mat from the Cozy Prints paper at 4 1/4″ x 10 1/2″ (it will cover the entire card front). Die cut a Black Licorice mat from Nestabilities Fancy Edged Rectangle Dies (second to largest). This is where we make an adjustment to the size of the mat.
Place the Black Licorice scallop mat on a paper trimmer. Cut from one corner to the other (#1 & 2). Overlap the cut pieces to desired width or height (#3). Adhere the overlapped edges together. On the corners with the overlapped edges, cut diagonally.
TIP: Before cutting make sure the corner scallops line up to make one full scallop. This will allow a seamless mat. The printed mat was cut with FSJ Rectangles die (#4).
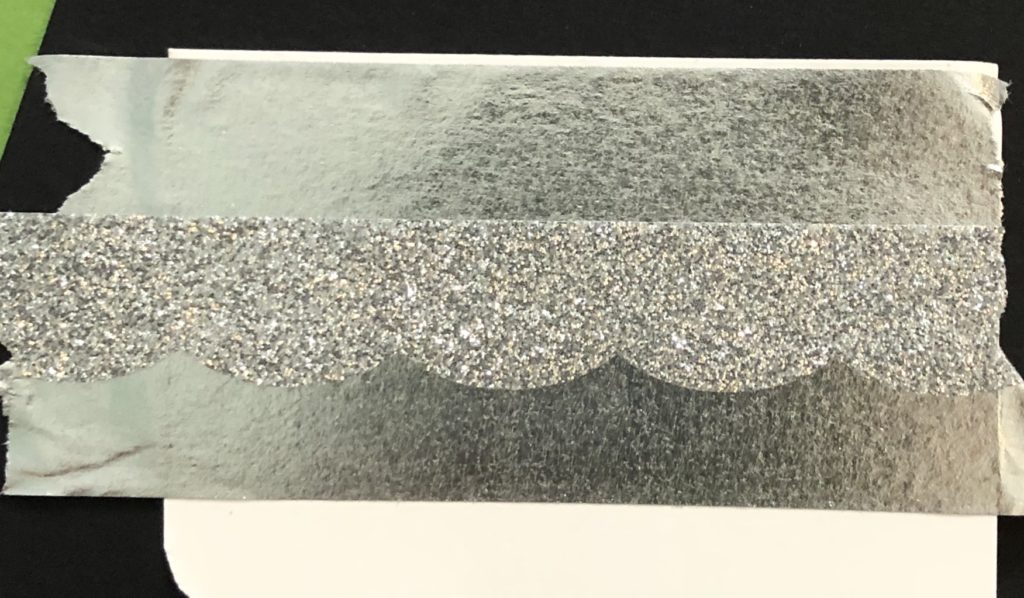
Adhere a black strip of Black Licorice cardstock to the top mat along with the silver and sparkle washi tape.
The last technique for this card is to create the Christmas tree. Apply strips of the silver and sparkle washi tape to a scrap piece of cardstock (overlap as necessary).
Create as many layers as needed.
I die cut a tree using a tree die from the Holiday/Christmas 2015 Card Making Kit. If you don’t have this kit, any tree or ornament die will work.
Adhere all mats with White Liner Tape. Pop up the Christmas Tree with FSJ Medium Foam Squares. Finally, add your personal sentiment inside the card.
Tag Time
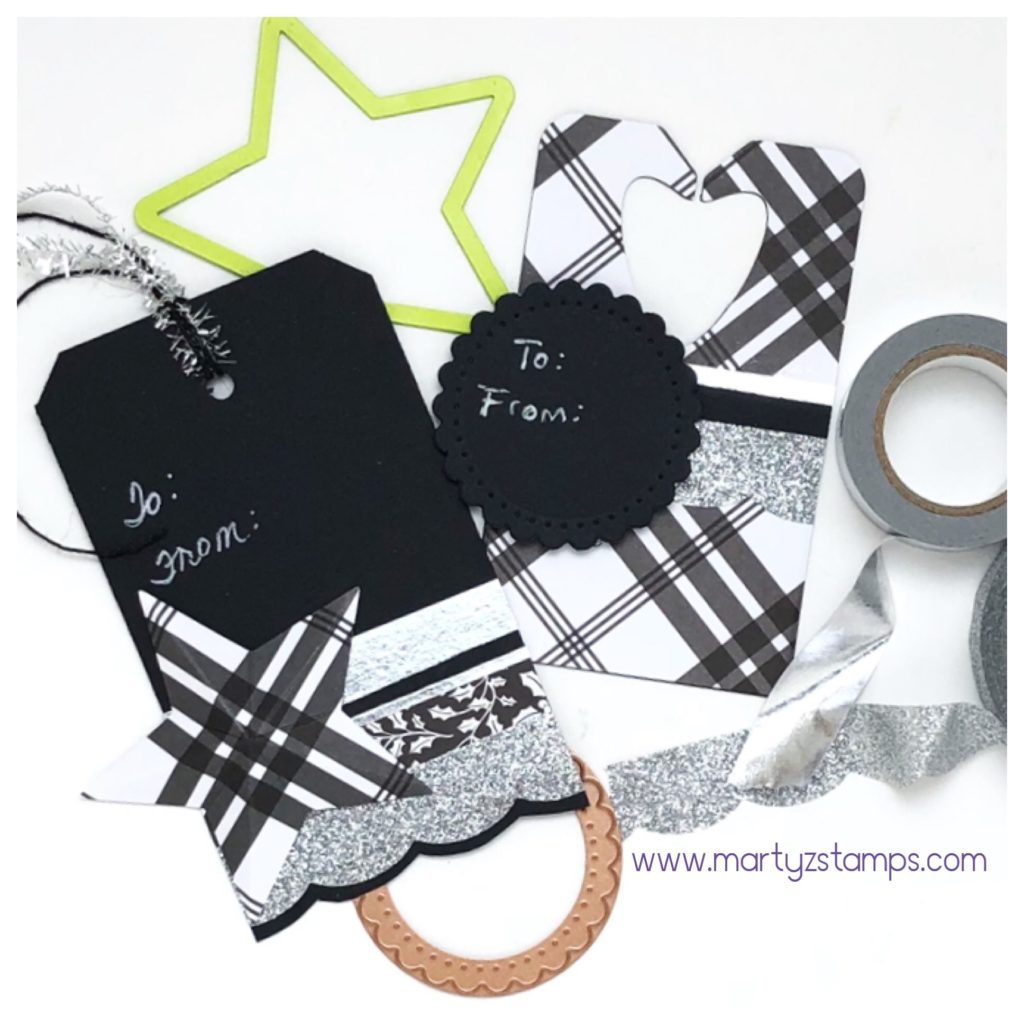
Last but not least are some incredible gift tags to set off your Christmas wrapping.
The Black Licorice tag is a rectangular piece of cardstock with trimmed corner and a hole punched at the top. A combination of washi tape and cardstock layers accent the bottom of the tag. The scalloped bottom was accomplished using Details Pro Shears and following the outline of the Sparkle Tape.
The accent piece is a 3D star cut from FSJ Star dies and scored from the top of the point straight down to the inverted point below. To create the 3D affect, crease each score line and manipulate the score lines into mountains and valleys. The top is adorned with Black Licorice Twine and Silver Sparkle Tinsel. It is as simple as that, really!
The plaid tag is cut from FSJ Bread Tag die. Strips of washi tape and Black Licorice cardstock break up the plaid pattern. The scalloped circle was die cut from Spellbinders Fancy Edged Circles. Both the “To and From” were written with a white gel pen.
All of these projects were such fun to make. Let me know in the comments what is your favorite out of the three projects.
Supplies:
Disclaimer – By clicking on an image you will be redirected to Spellbinders + FSJ website. When you purchase through my website link, I will receive a small commission. This helps to keep me crafting and inspiring others.
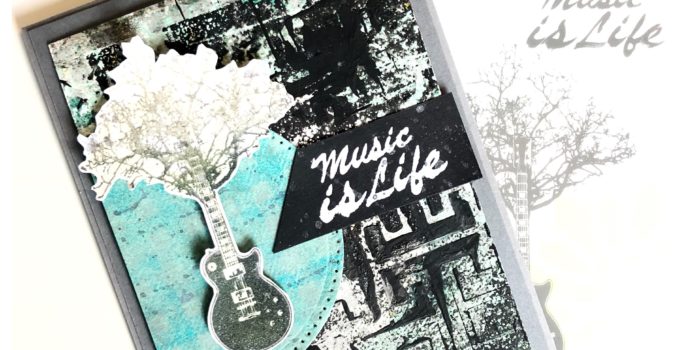
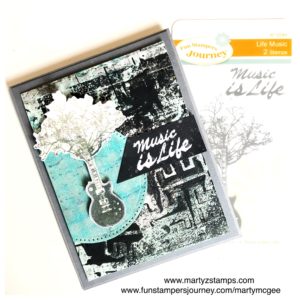
Here is Round Two of the Gel Press Throwdown between Carrie Rhoades and myself. Just a brief review, we sent each other what we considered “ugly” Gel Press pulls and our challenge was to make something beautiful out of the “ugly ducklings”. So, make sure to check out her blog carriestamps.com to see the creations she has made from my “ugly” Gel Press pulls. Here is the link for Round one on my blog http://martyzstamps.com/2018/08/27/gel-press-challenge-round-one-fms351-sketch-challenge/.
I forgot to take a picture of the pull before I started adding to it. Carrie was gracious enough to send me a photo of a piece of the original pull. It is not the actual piece but it will give you and idea of what I started with. Here it is.
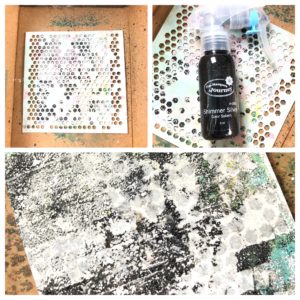
I took the original pull and placed it in my spraying box (a box to use silks, splashes and splattering to contain any over mist). I placed our Vintage Screen on top of the pull. I then spritz it with our Shimmer Silver Splash. You can see the design on the bottom photo.
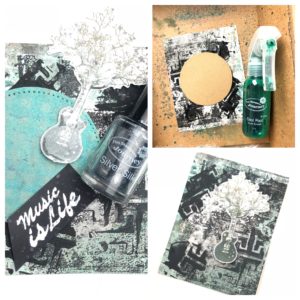
I stamped the guitar/tree with River Stone at the top and Rock Candy at the bottom using my Misti to get the right amount of ink onto the paper. I used Journey Glaze to create a sheen on the guitar and once the glaze was dry, I painted some Sparkle Silk onto the guitar and tree branches for a hint of glitz. I placed the guitar on the Gel Press background to decide what I wanted to do next. Since there was already a hint of Cool Pool acrylic paint on the pull, I decided to spritz the card with the Cool Pool Splash. At first I wanted to keep a circular space in the middle free of Cool Pool color; so I placed a piece of scrap paper on the background and spritzed the paper. Once this was dry, I happened to spy some Cool Pool cardstock and thought that would make an awesome mat. I grabbed it and put some Blue Lagoon ink on the Flannel Life background stamp and stamped the image on the circle which I ran through the die machine with the piercing die to give it some interest. I took the circle and spritzed it with the Shimmer Silver Splash. While all of this was drying, I stamped the sentiment in Whip Cream onto Black Licorice cardstock and embossed with White Embossing Powder. Then, a little splatter of Silver Silk.
After everything was dry, I began assembling the card. I chose River Stone as the base with a Rock Candy mat. I cut down the Gel Press background, added the circle and sentiment with the guitar popped up using foam squares. This was adhered to the base with foam squares. I think this turned into an amazing card. Remember, there are no “ugly” pulls!!!!
I am so excited to let my readers know, I am the Guest Designer on The Paper Girls Challenge Blog featuring a Rainbow Theme designed card. The challenge begins the week of April 15th.
Before I created the card I submitted as a guest designer, I had fun creating a rainbow cake happy birthday card, which is featured below:
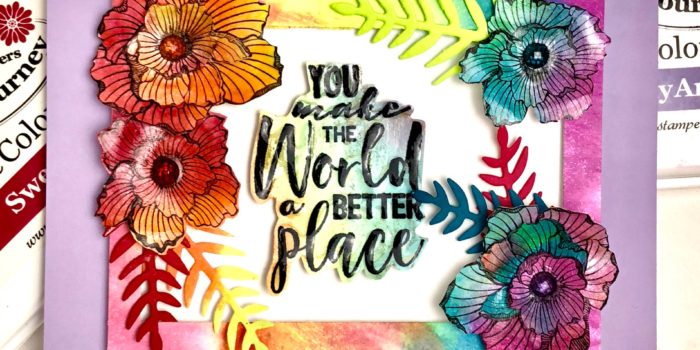
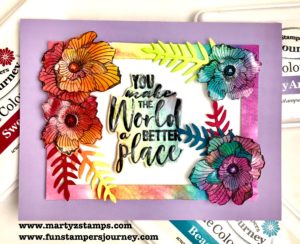
I really love this card, but I wasn’t satisfied with the results. So, I moved on to another idea. I went to my collection of stamps and chose the “A Better Place” stamp set (this was featured in a previous post, Black and White – A Better Place). It is our new host exclusive stamp set for parties that reach $600 or more dollars in orders. I sat and looked at all the stamps in this two set collection, I browsed many card collections on Pinterest and finally decided to create a floral card awash with the colors of the rainbow.
As many of you know, this month’s product promotion feature our silks and splashes. Since they are 20% off, I wanted to showcase what could be down with them. I went with the splashes since I had all the colors to create a rainbow on hand. I began with a large, clear block (think background sized) and drizzled a good amount of water from my media blender brush onto the block prior to adding the splash colors. Normally, you spritzed color with the splashes, but I unscrewed the cap and using the pipe that pulls the color through to the nozzle, placed each color in a vertical row making sure to keep each color separate from the next. I, also, screwed the cap back onto each bottle as I used it (trust me, you want to do this or you could have a “real” mess on your hands). After all the colors were on the block, I gently pulled the colors into the one beside it, keeping white space to a minimum. Next, I placed a piece of 5 1/4″ x 4″ Whip Cream card stock onto the rainbow of colors. I pulled the paper off and repeated the entire process with a second sheet. I let my paper air dry, or a heat tool can speed up the process. I took two of the floral stamps from the set and stamped them several times onto one of the colored pieces of paper. I used the Journey Rectangles Die and cut a frame and stamped the sentiment on the leftover piece. I used the Mystic Fern die to cut leaves out of several pieces of card stock. To create a more dimensional look, I fussy cut inner petal pieces and manipulated all the petals with an embossing tool (thing Heartfelt Creation flowers). I added foam squares to everything, popping them up off the card to create dimension. The color filled mat was adhered to a base of Pretty Amethyst card stock. The final touches included Rainbow Drops to the center of the flowers and Journey Glaze.
Thank you Paper Girls Challenge Blog for asking me to be your guest designer.
If you would like to order any of the supplies to create this card, please click here, or contact me through my Fun Stampers Journey website to host a party (www.funstampersjourney.com/martymcgee).
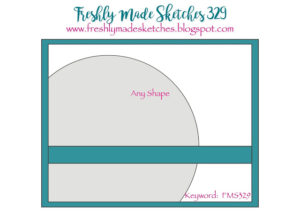
I love bold and bright colors. They catch my eye and shout “HAPPY,” “JOYFUL,” “FUN,” and the list goes on. This week’s Freshly Made Sketch 329 challenge features a large circle with a sentiment. I couldn’t wait to create a card for this challenge using their card design.
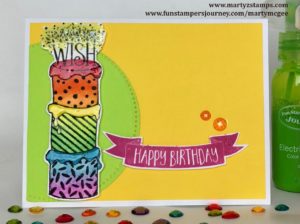
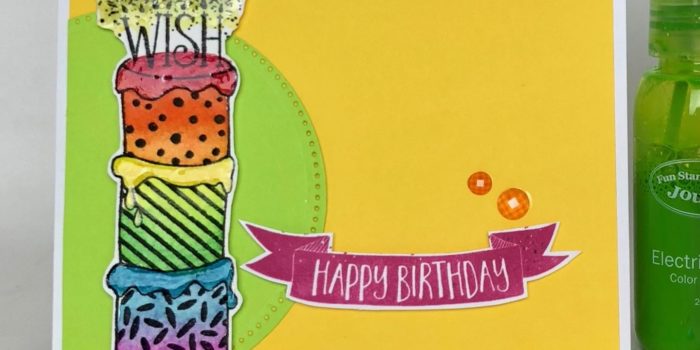
Last night I was playing around with my Fun Stampers Journey splashes using them to watercolor. I wanted to incorporate this month’s promotion, Over The Rainbow, and next month’s promotion featuring our splashes and silks into one amazing card. I began by stamping the three tier cake from my new stamp set “Let’s Eat Cake” (SS-0555) in Black Licorice (IP-0041) onto watercolor paper. I placed a dab of each of the splashes onto a clear acrylic stamping block and pulled my colors with a Journey Blending Brush (TO-0097). I selected the following splashes for my project: Sweet Berry (IP-0086), Citrus Cooler (IP-0079), Sour Lemon (IP-0124), Electric Lime (IP-0121), Blue Lagoon (IP-0084), and Cosmic Grape (IP-0120). To add a little depth and richness to the rainbow cake, I took my Color Burst Pencils (JM-0077) and went over the icing portion of the cake as well as the glow from the candles and topped them off with some Journey Glaze (AD-0002). The glow from the candles did require a little Journey Sparkle Cuts (AC-0151) for that hint of glitz. The sentiment is from the same stamp set, and it was stamped with Watermelon Fusion ink (IP-0027) using my MISTI to add color upon color giving a rich, deep color.
The base of the card is Whip Cream card stock (CS-0040), the mat is Lemon Drop card stock (CS-0018) and the circle was die cut out of Electric Lime card stock (CS-0123). The cake and the sentiment were popped out with foam squares. The final accent were orange Rainbow Drops (AC-0178). A perfect card for a perfect birthday.
If you would like to order any of the supplies I used to create this card, click here.
Other supplies: Circle Die Set DI-0039, adhesives, trimmer, etc.
This website uses cookies to improve your experience. We'll assume you're ok with this, but you can opt-out if you wish.AcceptRead More
Privacy & Cookies Policy
Privacy Overview
This website uses cookies to improve your experience while you navigate through the website. Out of these, the cookies that are categorized as necessary are stored on your browser as they are essential for the working of basic functionalities of the website. We also use third-party cookies that help us analyze and understand how you use this website. These cookies will be stored in your browser only with your consent. You also have the option to opt-out of these cookies. But opting out of some of these cookies may affect your browsing experience.
Necessary cookies are absolutely essential for the website to function properly. This category only includes cookies that ensures basic functionalities and security features of the website. These cookies do not store any personal information.
Any cookies that may not be particularly necessary for the website to function and is used specifically to collect user personal data via analytics, ads, other embedded contents are termed as non-necessary cookies. It is mandatory to procure user consent prior to running these cookies on your website.