Tag : Holiday

7 posts

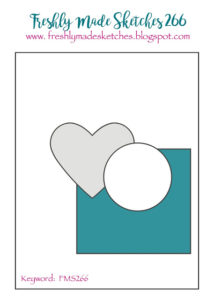
For this week’s Freshly Made Sketches #278 challenge, I made a variation of this month’s Make It Class card to meet the sketch challenge (I will post this month’s Make It cards on another post). Here is the FMS #278 sketch:

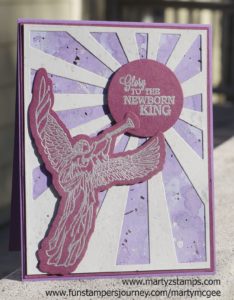
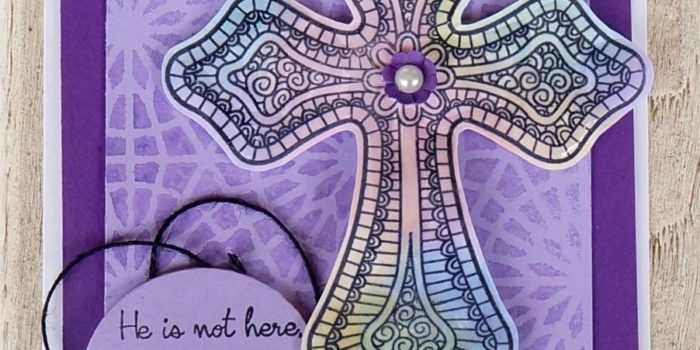
I had created a cross card from a video/demo Richard Garay had for FSJ coaches using a special technique to create a stained glass effect. I began by stamping the cross from FSJ Color Cross stamp set onto FSJ Whip Cream cardstock using Black Licorice ink. After I stamped the image, I took the solid flower stamp from FSJ Be Happy stamp set (note: any solid shape would work) and stamped it into various colors of ink (one at a time) then stamping onto the cross (you can go out of the lines because the cross will be cut out). I used the following Fun Stampers Journey inks to create this stained glass effect (Bubble Gum, Sweet Pear, Banana Cream, Pool Party, and Pretty Amethyst). Note: If you try this technique, make sure to clean your stamp off after each inking because the black ink sometimes comes off onto the stamp. This will help eliminate any frustration if colors bleed and become muddy/murky). Once I finished stamping, I cut the cross out and applied Journey Glaze to give it a little shine. Set the cross aside to dry.

I created the patterned mat by placing the FSJ Starburst stencil on top of the piece of FSJ Pretty Amethyst cardstock. In a FSJ Media Mister, I combined one squirt of FSJ Sweet Berry Splash and one squirt of FSJ Blue Lagoon Splash and filled with water to create the purple mist. I spritzed the paper with the purple mist and immediately applied a paper towel to the stencil to soak up any excess liquid. This created another stained glass effect for the card.

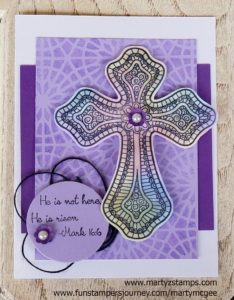
I used FSJ Deep Lilac for the back mat. I layered the patterned mat on top. I adhered the cross with FSJ Foam Squares (medium). I stamped the sentiment onto FSJ Pretty Amethyst cardstock and die cut a circle from the stamped cardstock. I placed a loose loop of black twine behind the circle sentiment and adhered the sentiment with FSJ Foam Squares (medium) as well. For the final touch, I punched two small flowers from the FSJ Summer Pretties punch. I curled the edges and applied a peal accent to the middle. They were adhered to the card project with FSJ liquid glue.

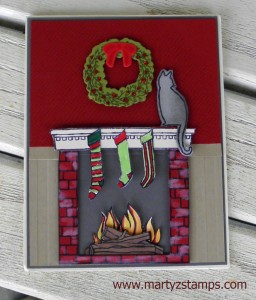
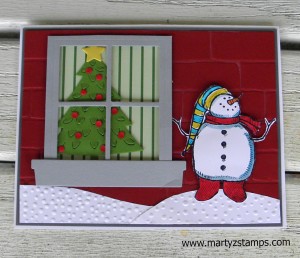
Here is the final project.

Supplies:

Fun Stampers Journey (click here to order)

Stamps: Color Cross Bundle, Be Happy
Cardstock: Whip Cream, Pretty Amethyst, Deep Lilac
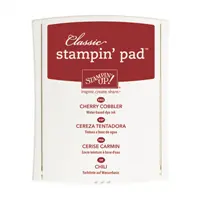
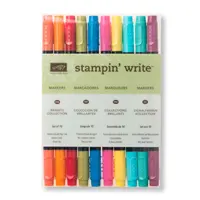
Inks: Black Licorice, Bubble Gum, Pool Party, Pretty Amethyst, Banana Cream, Sweet Pear
Accessories: Black Twine, Journey Glaze, Pearl Accents, Circle Die, Starburst Stencil, Media Mister, Sweet Berry Splash, Blue Lagoon Splash

I can’t say this enough, but I really, really love Fun Stampers Journey Bloom Box monthly card kit. I have made a variety of beautiful cards with the December kit. Of course, my group of Bloom Box Girls take the step-by-step instructions and make our own version of the card designs provided in the kit. The official promotion picture of the assembled cards from the December kit is below:

Each kit provides a unique technique, which is a great way to expand your creativity and apply this knowledge to other amazing creations you make.

Here is our first card we made with our December kit:

We decided to add another two branches to the bough, and a small pinecone to the this card. We used the Just Because ATS to add a sentiment.

Card #2:

We used our FSJ Color Burst Pencils to color the stamped wreath image. The only change is the sentiment of “Hello” from the FSJ Be Amazing stamp set.

Card #3:

Using vellum over the stamped card images adds a touch of elegance to an already beautiful card. We changed the sentiment and used the “So Cute” from the ATS So Cute stamp.

Card #4:

This is such a cute card. We stamped our wreath onto the base and stamped another image onto some FSJ Whip Cream cardstock. We fussy cut it out (the center and the outside), added some Journey Glaze to the berries and made a double bow. Oh yes, by the way, I love the wow factor a double bow gives a card creation.

Here are two more cards I made using this set. The wreath on the Oatmeal Cookie and Cranberry Bliss background was a Top 3 pick at Paper Craft Crew website. The other card I made using a SU! woodgrain background stamp and the Christmas sentiment from the FSJ Holiday Script. I did have to use my MISTI to stamp the sentiment about 5 to 6 times to get a good enough impression on the busy background.


It is not too late to sign-up for the December Bloom Box and  5 more months of Bloom Box card making kits.  You can go to my website and order the kit here.

It is another week with a wonderful card sketch challenge from Freshly Made Sketches #266. Here is their challenge sketch:

I wanted to take advantage of the Christmas season, yet again. I pulled out my Fun Stampers Journey (FSJ) Frosty Fun ATS and coordinating die to use on this challenge. As I was pulling this card together, I tried various colors of cardstock for the background, but every color I chose took away from the Frosty Snowman stamped image. I realized I had the perfect background die I received this past Friday from Fun Stampers Journey. It is the Persian Gardens die. I cut the base and the background die cut out of FSJ Whip Cream cardstock. I adhered the die cut onto the base using FSJ Craft glue which dries in a matte finish.

In place of the heart image, I took a large snowflake from the FSJ Snowflake Elements and applied Journey Glaze to the snowflake and then covered it with Sparkle Dust. I burnished the Sparkle Dust onto the snowflake with my finger. I cut the square piece out of FSJ Cool Pool cardstock with the FSJ Square pierced dies. I adhered both of these accents to the card with the FSJ craft glue. I stamped Frosty Fun onto FSJ Whip Cream with Black Licorice ink and colored him with FSJ Color Burst Pencils. For the circle element, I replaced it with some FSJ Tinsel Trim. I popped Frosty out with Journey Foam Squares (medium). I stamped the Christmas sentiment from FSJ Holiday Script with coordinating die in Cranberry Bliss ink and die cut it out. I adhered it with Journey Foam squares.

This is a cute card to give to a friend or family.


Supplies:

Fun Stampers Journey (all products used can be ordered through my FSJ website – click here).

Stamps: FSJ Frosty Fun (ATS – artist trading stamp) with coordinating die
Cardstock: FSJ Whip Cream, FSJ Coo Pool
Ink: FSJ Black Licorice, FSJ Cranberry Bliss
Dies: FSJ Square Pierced Dies, FSJ Persian Gard Die, FSJ Frosty Fun die
Coloring: FSJ Color Burst Pencils
Ribbon: FSJ Tinsel Trim
Miscellaneous: FSJ Foam Squares, FSJ Snowflake Elements, FSJ Craft Glue, FSJ Journey Glaze, FSJ Sparkle Dust

Every year I host an opportunity for my stampers to make Christmas cards to give to friends and family. This year was no different. I chose three Fun Stampers Journey stamps to highlight for this Make-It opportunity. The first card was featured in a previous card challenge post. I chose the Frosty Fun ATS (Artist Trading Stamp) and coordinating die set for this card. I used a card layout I saw on YouTube by Christy Gets Crafty 2015 card tutorial. There is one difference between the previous post and this card. The blue mat to which Frosty is adhered. My FSJ Catalina Splash cardstock came in and I changed the blue mat to the Catalina Splash cardstock mat.


The second card features the Stay Wild ATS. The inspiration for this card came from another FSJ Coach, Sara Hoogendoorn. She took the Stay Wild ATS and stamped it multiple times across her neutral cardstock to create a stunning wooded landscape making sure the deer are not stamped with the second and third generation of the image. I used torn paper along with sponge daubers using FSJ inks – Cool Pool, Lavender Fusion, and Hazelnut Blend. The water and sky are lightly accented with the Silver Pan Pastel. Black Licorice twine and a silver bow are adhered in the top left corner of the card. The sentiment comes from the FSJ stamp set Holiday Script. Love This CARD!


The last card was created using the FSJ Angel Herald stamp set with the Sun Rays Die. This card is a mixture of FSJ cardstock and other cardstock I had on hand. Yes, I’m working on filling my FSJ paper gaps. The angel and words are embossed using silver embossing powder. The mat behind the die cut cardstock was created by blending Blue Lagoon and Sweet Berry Splashes with water onto an acetate sheet; then, Silver and Dark Roast silks were added to accent the mat. Love this technique!


My stampers created 15 cards with these designs (5 cards of each design). These are quick, simple cards to create. It took them on average about 3 1/2 hours to complete these projects. I hope this inspires you to Create and Share your own cards.

This is the third and final card I entered on the SUO Challenge #136. See previous posts for Card 1 and Card 2.


This is one of three cards my stamping group will be making at the next make-n-take. It is based on an October challenge card (see below). The card I created in October was going to be one of the make-n-take cards, but I felt it was just too big and used up too much paper (a little worried I wouldn’t have enough similar paper for everyone). I decided; if I could make a double window, I, certainly, could make a six-paned window using the Hearth and Home thinlit, and I was successful. Just make sure you hold the plates as they come out the other side of the Big Shot, because they are quite the projectile. I could see someone busting a window to bits or knocking somone in the head. I wanted to keep the sleigh ride scene from the original card; so, I carefully pulled apart the original card, cut down the window scene, made a new window, adhered the dimensionals, added the glitter, and then . . . . What a nightmare! I made the shaker card based off of a shaker card tutorial on YouTube. Note to self: DO NOT place the window on the table, put the glitter on the window sheet and then place the card upside-down onto the window. Ha! It wasn’t exactly where I wanted it, and well, you know, when you try to reposition something with dimensionals you are asking for a mess; especially, if glitter is involved. Needless to say, the glitter got on the adhesive part of the dimensionals and made it not adhere well; therefore, when the card was shaken, glitter filtered out the sides of the window. We certianly, DON’T want glitter snow in our house. So, if you make this card, be advised, put the card on the table, put the glitter on the card, and then place the window where it needs to be and DON’T put too much glitter either. I’m sure you can’t see the miniscule amount of glitter in this card, but there is still some left. And, no, I didn’t want to remake the card. No, no, no! I was so frustrated by the time I got it right, I wanted to pull my hair out. My friend, Cheyenne was over here making her card with me, and she had a good laugh at my expense. (Note: make sure to rub the embossing buddy on the side of the window sheet that will make contact with the glitter to get rid of the static electricity.)

Anywhoo, we felt the card needed a little bling. We took the wreath framelit from the Festive Fireplace set and cut out wreaths in silver glimmer paper; then, cut them in half to make boughs. We added EVEN MORE bling by making lights for me and berries for Cheyenne on the boughs with Cherry Cobbler Dazzling Details. Real Red bows accent each bough. The bottom of the card looked so stark when we finished, I added joy in Cherry Cobbler cardstock from a retired SU! die (it’s really old).

And least I forget, the scene was made on Whisper White paper. I cut a circle out of copy paper and placed it on the background piece of cardstock. I sponged Coastal Cabana and Midnight Muse to create the night sky. The trees are from the SU! Wonderland set stamped in Midnight Muse. The sleigh thinlit was used for the sleigh rider and horse, cut in Whisper White cardstock. The background mats are Night of Navy and Whisper White, with the Whisper White embossed with the Stripes folder.


PCCCS165October Card

I think the revised version of the first card is much more to my liking. Either way, I really love this card.

Supplies: SU! retired Joy die. Note – it looks like Midnight Muse ink is not available, you can substitute Night of Navy (I listed it in the supplies).


Price: $110.00

Supply List

Built for Free Using: My Stampin Blog

If you read the first post for the first card I entered for the SUO Challenge #136, you will recognize this is the second entry based on the title of the blog. Sometimes, I come up with original ideas for my Christmas make-n-takes and sometimes I use Pinterest when my brain just can’t be creative anymore. This is an original card based on many cards on Pinterest. There’s not too many ways you can have a fireplace with stockings on a card other than changing the color scheme. This is my favorite card out of all seven designs offered at my make-n-takes.


Again, if you read my first post, you can see Cherry Cobbler is a central focus of this card as it is one of my favorite SU! colors. I think the Crumb Cake wainscoat really sets the card up to make the fireplace/mantel really pop. Since you can’t hold this card in your hand and see all of the 3D detail, I’ll give you the run down on what is popped and what is not. Everything has dimensionals on it except the background mats, the inside of the fireplace and the bow on the wreath. I used SU! Festive Fireplace Photopolymer Bundle to make this card. I stamped the fireplace with Staz-on black ink onto Cherry Cobbler and went back through with Whisper White and Pretty in Pink Craft inks to highlight the bricks (I used a q-tip). I cut the center of the fireplace out and placed a piece of Basic Gray in the opening (I think it makes the flames stand out). The flames are watercolored and the logs are stamped onto Chocolate Chip paper with some watercolor shading. The stockings were colored with Stampin’ Write Markers. The wreath was stamped using Mossy Meadow on Pear Pizzaz (I think – better double-check that before my class this Saturday or I used Garden Green ink) and has a splash of glitz using the Cherry Cobbler Dazzling Details from SU! The cat was stamped on Smoky Slate and sponged with Basic Gray. I love the cat, It makes me think of my friend Cindy Hilton and her love for ALL things cats. I did use the framelits to cut out the fireplace, mantle, and cat, but I didn’t like having a “huge” border; so, I either trimmed all the way down to the stamped line or trimmed very close to the stamped image. I can’t forget to mention the top background mat of Cherry Cobbler is stamped with the SU! retired background stamp Netting; it just gives the top part of the card a little depth. The bottom background of Crumb Cake was embossed using the SU! Stripes embossing folder.

Well, I think the above description of how I made the card sums it up. Love it!

Supplies: Note – to make a pink craft ink combine a drop of Cherry Cobbler reinker to a spoon size amount of Whisper White Craft re-inker and blend – adjust as necessary to get desired color.
SU! reitred background stamp Netting


Price: $110.00

Supply List

Built for Free Using: My Stampin Blog

It has been a few weeks since I last posted. In that time, I had a Christmas Stamp-a-Stack make-n-take, our group of stampers had our four day weekend Stamp Camp, and my family had Thanksgiving at my daughter’s new home with family and friends. On top of this, I will be having a Christmas card make-n-take featuring more detailed cards, which take a good bit longer to make than the stamp-a-stack cards (I will have separate posts on all these card events I have mentioned).

I have been wanting to post to a card challenge in this time, but I have been very busy and didn’t have time to come up with a “this week” idea. So, I was very pleased to see SUO Challenge 136 where I could enter some of my original Christmas (favorite holiday colors) card ideas. The first card I’m going to feature is a snowman card. I have to have at least one snowman card every year for my Christmas make-n-take classes.


SUO 136

I think the Hearth and Home thinlits are one of the most versatile thinlits EVER! I combine this thinlit with the Perfect Pine Framelits, the Softly Falling embossing folder, Brick Wall Texture embossing folder, and the retired SU! stamp set Snow Much Fun. Some of my favorite colors to use for Christmas cards are Cherry Cobbler, any of the SU! green card stocks, Whisper White (of course), and Real Red. This card took a little bit of time to make, but I think it was worth the effort. Ooops, I forgot to mention this was one of the Christmas Stamp-a-Stack cards. Just too cute!

Supplies: SU! Retired Snow Much Fun (not pictured)


Price: $110.00

Supply List

Built for Free Using: My Stampin Blog

PAGE TOP
[dealsbar preview] Amazing Deals: !!toolbar-deal-title!! - !!toolbar-deal-merchant!!