Tag : silks

7 posts

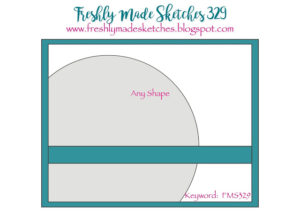
I love bold and bright colors. They catch my eye and shout “HAPPY,” “JOYFUL,” “FUN,” and the list goes on. This week’s Freshly Made Sketch 329 challenge features a large circle with a sentiment. I couldn’t wait to create a card for this challenge using their card design.

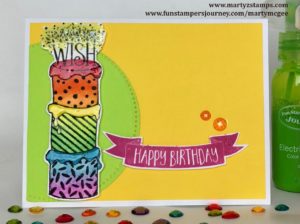
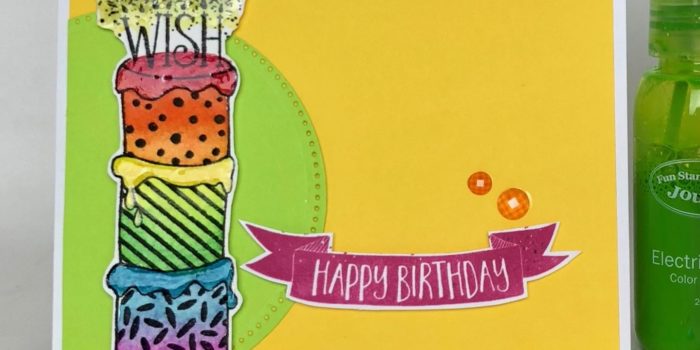
Last night I was playing around with my Fun Stampers Journey splashes using them to watercolor. I wanted to incorporate this month’s promotion, Over The Rainbow, and next month’s promotion featuring our splashes and silks into one amazing card.   I began by stamping the three tier cake from my new stamp set “Let’s Eat Cake” (SS-0555) in Black Licorice (IP-0041) onto watercolor paper. I placed a dab of each of the splashes onto a clear acrylic stamping block and pulled my colors with a Journey Blending Brush (TO-0097). I selected the following splashes for my project: Sweet Berry (IP-0086), Citrus Cooler (IP-0079), Sour Lemon (IP-0124), Electric Lime (IP-0121), Blue Lagoon (IP-0084), and Cosmic Grape (IP-0120). To add a little depth and richness to the rainbow cake, I took my Color Burst Pencils (JM-0077) and went over the icing portion of the cake as well as the glow from the candles and topped them off with some Journey Glaze (AD-0002). The glow from the candles did require a little Journey Sparkle Cuts (AC-0151) for that hint of glitz. The sentiment is from the same stamp set, and it was stamped with Watermelon Fusion ink (IP-0027) using my MISTI to add color upon color giving a rich, deep color.

The base of the card is Whip Cream card stock (CS-0040), the mat is Lemon Drop card stock (CS-0018) and the circle was die cut out of Electric Lime card stock (CS-0123). The cake and the sentiment were popped out with foam squares. The final accent were orange Rainbow Drops (AC-0178). A perfect card for a perfect birthday.

If you would like to order any of the supplies I used to create this card, click here.

Other supplies: Circle Die Set DI-0039, adhesives, trimmer, etc.


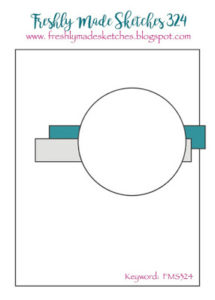
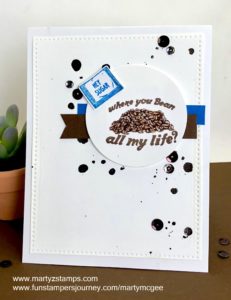
I just received the cutest stamp set from Fun Stampers Journey this week. It is Fun Stampers Journey, Hey Sugar (SS-0301) and it includes 9 stamps. I decided to use it for Freshly Made Sketches 324 card challenge this week. Here is this week’s sketch:

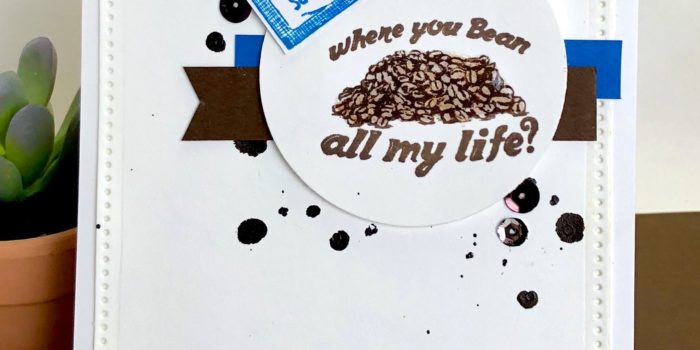
This is a quick and simple card to make when you are in a hurry and need a special card for a special person. The base and mat are Fun Stampers Journey Whip Cream card stock (cs-0040). The “where you bean all my life?” was stamped using FSJ Hazelnut Blend Fusion Ink (IP-0012) and the “hey sugar” was stamped using FSJ Blue Lagoon Fusion Ink (IP-0002). The two strips of paper behind the circle are Catalina Splash (cs-0114) and Hazelnut Blend (cs-0013) card stocks. I splattered some Dark Roast Silk (IP-0095) onto the pierced mat and carefully placed a piece of plastic on top and gently pressed the splattered ink to spread it out. I added some brown and silver sequins onto the card and applied FSJ Journey Glaze to the beans to make them pop (AD-0002).

Supplies not mentioned above: Foam Squares (AD-0085), Journey Craft Glue (AD-0111), Journey Circle Dies (DI-0039) and Journey Rectangles (DI-0041).

If you would like to order any of these supplies to create your own card, please click here.


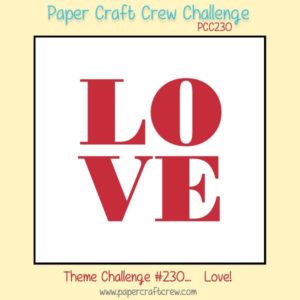
The theme challenge for Paper Craft Crew #230 is “LOVE”.

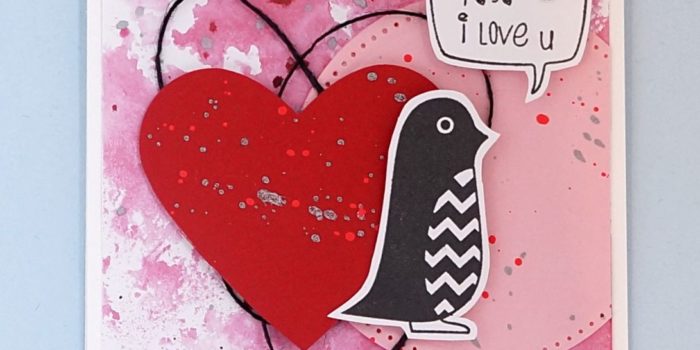
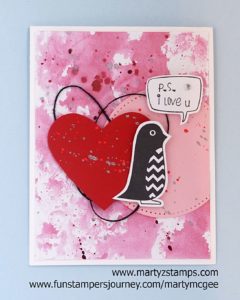
I have the perfect card for this theme. It is super cute and adorable. It features a cutie patootie peguin with the sentiment “P.S. i love u.”
This card was created for my Make-It Card Class, and it was a favorite design. The base of the card is FSJ Whip Cream. The background mat was created using FSJ Sweet Berry splash, Cranberry Bliss, Outrageous Pink, and Silver silks. To the background mat, I added a FSJ Bubble Gum pierced circle mat with a FSJ Cranberry Bliss die cut heart splattered with the same silks used on the background mat. The heart is accented with a looping of FSJ Black twine. The penguin is a FSJ P.S. ATS (Artist Trading Stamp). Both images were stamped using FSJ Black Licorice ink onto FSJ Whip Cream cardstock. They were both fussy cut leaving a 1/8″ border around the images. The heart, the penguin, and the sentiment are popped up with FSJ Medium Foam Squares.

This was a quick and simple Wow card creation.

Supplies:

Fun Stampers Journey products – To order click here.

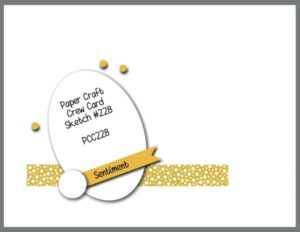
This week’s Paper Craft Crew Challenge #228 is such a great and unique card sketch. It really allows a papercraft artist to think beyond the box. I decided to enter two cards I recently designed for my January Make It based on is this week’s sketch:

I had created a heart card for January’s Make It class, but one of my good friend’s, Julianne, really needed a card design for a friend on the mend. Her friend has been a garden club member for a long time, and we decided to take the heart card design, change the cardstock colors and change the stamped image.

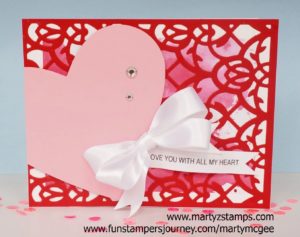
Here is the Make It heart card:

The card base is Fun Stampers Journey Whip Cream, there is a 3 1/2″ x 4 3/4″ Whip Cream mat with a watered down application of FSJ Sweet Berry Splash. The red mat is cut from FSJ Cranberry Bliss cardstock using the FSJ Persian Garden die (note: it’s best to use a precision plate to have the die cut efficiently). The heart is die cut from FSJ Bubble GUM cardstock. The bow is SU! white silk ribbon tied into a double knot (yes, I love those double knots). The wording was printed onto Whip Cream cardstock from a Word documents and cut into a banner. The heart is accented with FSJ rhinestones.

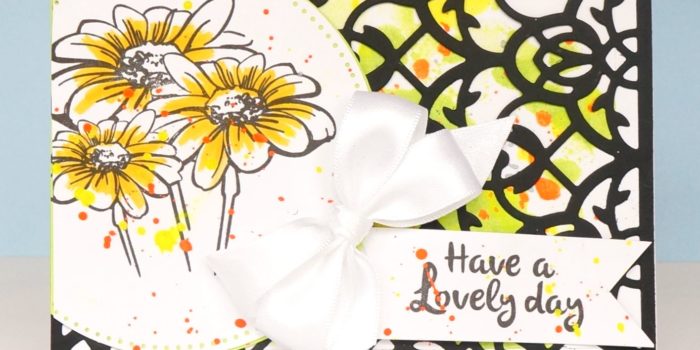
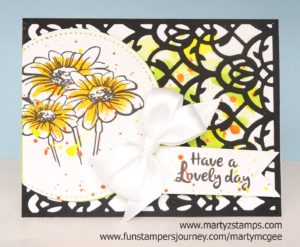
The Daisy card is below:

The base is FSJ Whip Cream with the same Whip Cream Mat mentioned in the heart description, but it was created using the FSJ Electric Lime Spash and then accenting with FSJ Sour Lemon and Orange Rave Silks. The cardstock used with the Persian die is Black Licorice. I stamped the Lovely Day Daisy in Black Licorice on Whip Cream cardstock and ran it throught the Platinum machine using the Pierced Circle dies. The double bow was created out of SU! white silk ribbon, and the sentiment was stamped onto Whip Cream and cut into a banner. The stamped images are accented with Orange Rave and Sour Lemon Silks. I LOVE those silks.

I know Julianne’s friend will love this card when she receives it.

If you would like to purchase any of these products, please click here.

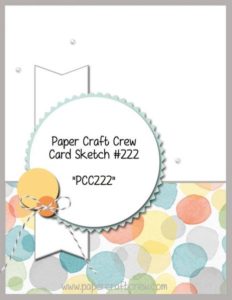
This week’s Paper Craft Crew Card Sketch #222 challenge inspired me to use Fun Stampers Journey December Bloom Box stamp set Welcome Wreaths. Here is their card sketch:


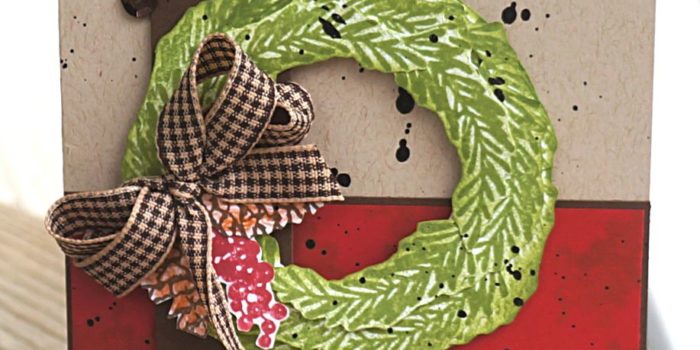
I think wreaths are a great way to welcome in the holidays and the FSJ December Bloom Box Welcome Wreaths stamp set is the perfect set to create a welcoming card featuring a wreath. I began this card with an base using FSJ Oatmeal cardstock. The bottom portion of the card has a FSJ Hazelnut Blend mat with a FSJ Cranberry Bliss mat. The Cranberry Bliss mat is stamped with the berry cluster from the stamp set in FSJ Cranberry Bliss ink. I cut a banner out of FSJ Hazelnut Blend cardstcok and cut out a “v” shape in both ends. The entire card was sprinkled with FSJ Dark Roast silk.

The wreath was a “work in progress while creating”. LOL You know what I mean. You start off with one idea of how to make something unique; and, well, . . it kinda doesn’t turn out like you expected . . . .so, you begin experimenting with different ways to create something beautiful out of a …. pig’s ear …. lol.  I started off with the branch stamp and using FSJ Lemon Grass ink went about stamping the curved branch into a wreath shape (o.k. a circle). This took multiple turns around the circle because I wanted a full and bushy wreath. When I was finished stamping, I thought the wreath look flat and dull. Hmmm,….. what can I do to make it “pop”. I thought, why not fussy cut lots of branches and layer them onto the flat, dull base. Oh, yes I did! And, I think it created the look I was trying to get from the beginning. I must say, it really didn’t take that long to fussy cut the branches (it really didn’t and it was so worth it). I stamped the small pine cones in FSJ Hazelnut Blend and colored them with my FSJ Color Burst Pencils and fussy cut them out. I stamped the berry cluster with FSJ Cranberry Bliss (all of this was stamped onto FSJ Whip Cream cardstock). I fussy cut the berries out as well. No, booing and hissing from the peanut gallery – it’s those little extra steps that make a super cute card. I took some FSJ Cocoa Gingham Ribbon and made a double bow and adhered everything onto the wreath with glue dots. I then put the card together using craft glue and I popped out the wreath and banner using Journey Foam Squares (medium). For a little extra touch, I flicked Dark Roast silk onto the wreath. Last but not least, I added a little bling by placing some dark chocolate sequins onto the card.

Here is the finished card:


Supplies: All product used can be ordered from my FSJ website. Click here. Note: Everything is Fun Stampers Journey except as noted.

December Bloom Box – Welcome Wreaths
Cardstock: Cranberry Bliss, Whip Cream, Oatmeal Cookie, Hazelnut Blend
Ink: Hazelnut Blend, Cranberry Bliss, Lemon Grass
Coloring: Color Burst Pencils
Silk: Dark Roast
Ribbon: Cocoa Gingham Ribbon
Miscellaneous: Sequins (not FSJ)

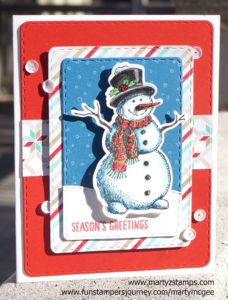
Every year I host an opportunity for my stampers to make Christmas cards to give to friends and family. This year was no different. I chose three Fun Stampers Journey stamps to highlight for this Make-It opportunity. The first card was featured in a previous card challenge post. I chose the Frosty Fun ATS (Artist Trading Stamp) and coordinating die set for this card. I used a card layout I saw on YouTube by Christy Gets Crafty 2015 card tutorial. There is one difference between the previous post and this card. The blue mat to which Frosty is adhered. My FSJ Catalina Splash cardstock came in and I changed the blue mat to the Catalina Splash cardstock mat.


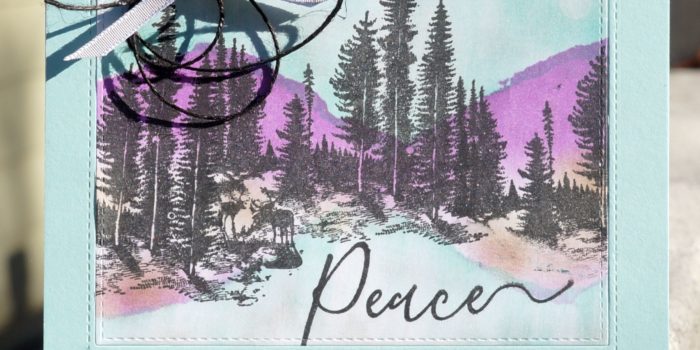
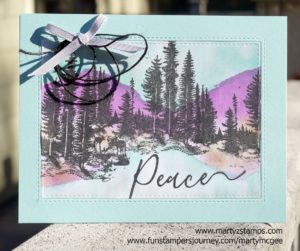
The second card features the Stay Wild ATS. The inspiration for this card came from another FSJ Coach, Sara Hoogendoorn. She took the Stay Wild ATS and stamped it multiple times across her neutral cardstock to create a stunning wooded landscape making sure the deer are not stamped with the second and third generation of the image. I used torn paper along with sponge daubers using FSJ inks – Cool Pool, Lavender Fusion, and Hazelnut Blend. The water and sky are lightly accented with the Silver Pan Pastel. Black Licorice twine and a silver bow are adhered in the top left corner of the card. The sentiment comes from the FSJ stamp set Holiday Script. Love This CARD!


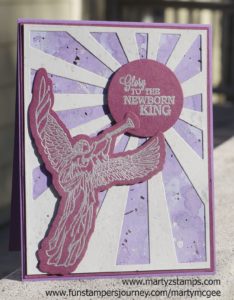
The last card was created using the FSJ Angel Herald stamp set with the Sun Rays Die. This card is a mixture of FSJ cardstock and other cardstock I had on hand. Yes, I’m working on filling my FSJ paper gaps. The angel and words are embossed using silver embossing powder. The mat behind the die cut cardstock was created by blending Blue Lagoon and Sweet Berry Splashes with water onto an acetate sheet; then, Silver and Dark Roast silks were added to accent the mat. Love this technique!


My stampers created 15 cards with these designs (5 cards of each design). These are quick, simple cards to create. It took them on average about 3 1/2 hours to complete these projects. I hope this inspires you to Create and Share your own cards.

Next weekend, I along with three other friends will be at the Fun Stampers Journey – The Amazing Tour. We are super excited to go and experience all the “Amazing” energy and creativity. I have been to many papercrafting events throughout my 13 years of papercrafting, usually, involves taking cards I have made and trading them with other event participants. We call them swaps. The swaps should be exclusive to the company presenting the event. So, for this trip, my friend – Debbie Kissel – came over and we re-made some swaps we used for a Coach meeting.

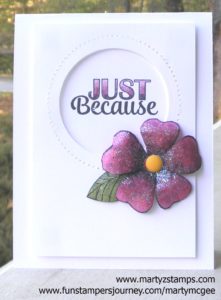
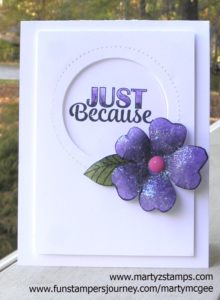
I wanted to feature an Artist Trading Stamp (ATS) keeping the price point low for papercrafting beginners and those on a limited budget.  Although the card featured in this post looks labor intensive, it is a super simple and quick card to make. This card definitely has a WOW factor. Hello – you can create awesome cards without breaking the bank. 
OLYMPUS DIGITAL CAMERA


Here is how I made these cards:

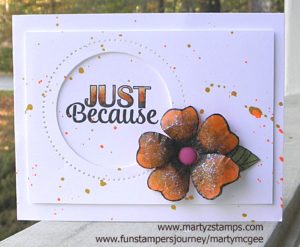
  1. I used Fun Stampers Journey (FSJ) Black Licorice ink to stamp the flower and leaf images. I stamped directly on Watermelon Fusion and Lavender Fusion cardstocks. I stamped the leaf on colored cardstock as well (Sweet Pear or Limeade Splash both would make a wonderful leaf).
  2. I used the Candy Apple ink pad for the Watermelon Fusion flower and the Lavender Fusion ink pad for the Lavender Fusion flower. Using sponge daubers (one for each color) and starting in the middle of the flower, I applied the ink in a circular motion and stopped about 1/4″ from the tip of the flower petals. Do this until you are satisfied with the shading.
  3. I fussy cut the flowers and the leaf (a die is available, but the flower and leaf need to be cut next to the stamped image for the best effect). 
  4. I placed the flowers on a foam mat that is firm but not too firm (you want it to have a little give). I took the large stylus on the Journey Bloom Tool; starting in the center of each petal, I applied pressure and moved the stylus in a circular motion out to the edges of the petal and back toward the middle of the flower until the petal began to curl in on itself. I did this to each petal. Note: For this second round of flowers, Debbie was the stylus operator.
  5. I turned the flower over, cut the petals apart about 1/4″ from the center. I placed the flower on the mat; using the stylus, I pressed down hard and move in a circular motion in the center only. Note: The petals should pull in toward the middle. You can squeeze and shape the petals with your fingers. The leaves are done the same way but only working on the backside of them.
  6. I placed all the flowers that were created (10 in all) in a box and made a solution of 1/2 Journey glaze and 1/2 water (I saw Richard Garay do this on a video to make a sparkling background for a snowman card). This solution was created in a spray bottle I had in my craft room. I sprayed the flowers; then, sprinkled them with Journey Sparkle Dust (I used a small glitter shaker bottle). I should have sprayed the flowers again to set the glitter, but so far the glitter hasn’t come off.
  7. I cut a circle in the top mat ( top mat measurement 5″ x 3 1/2″) using the pierced circle dies. I placed the pierced circle die on the outside of the circle I wanted to create, and nested the cutting circle die inside the pierced die. I saved the cut circle and set it to the side.
  8. I popped out the mat with the medium Journey Foam Squares and adhered it to the Whipped Cream cardstock base.
  9. I used the circle that was left over from cutting out the mat to stamp the sentiment. I colored the sentiment with the Color Burst pencils in a color that coordinated with the flowers. I placed liquid glue on the back of the circle and pressed it into the circle and directly onto the cardstock base.
  10. I adhered the flower and petal with liquid glue and placed a Spring Accent Dot in the middle of the flower.

One of the mats had the circle cut off-center; so, instead of wasting the cardstock, I looked at it and thought . . . hmmmm. . . . I could make the same card in a horizontal position. I created an additional WOW factor using Orange Rave and Gold silk accents on this card. Note: I left the first two cards “clean”, because I didn’t have the silks I wanted to use with those flowers,. I think having two different ways to complete a card shows the versatility of our amazing products. Some of my stampers like “clean” and others do not – they want Wow, Wow, Wow.

Here is the mistake turned into a raving beauty:
Supplies:

All Fun Stampers Journey – all products can be purchased through my website.

Cardstock: Whipped Cream CS-0040, Lavender Fusion CS-0017, Watermelon Fusion CS-0039, Orange Creamsicle CS-0024
Ink: Black Licorice IP-0009, Lavender Fusion IP-0036, Candy Apple IP-0017, IP-0043
Die: Pierced Circle DI-0039    Use a Bloom Tool to separate the pierced die from the paper TO-0073
Adhesives: Journey Glaze AD-0003 or AD-0002, Journey Foam Squares AD-0085, Craft Glue AD-0111
Embellishments: Journey Sparkle Dust AC-0013, Spring Accent Dots AC-0179
Silks: Orange Rave IP-0118, Gold IP -0096
Suggested Silks for first two cards: Cosmic Grape IP-0117 and Outrageous Pink IP-0109

PAGE TOP
[dealsbar preview] Amazing Deals: !!toolbar-deal-title!! - !!toolbar-deal-merchant!!