Tag : love

5 posts

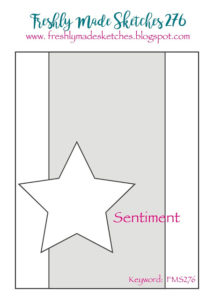
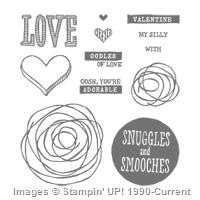
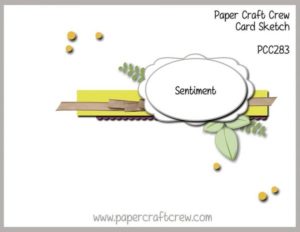
“I love you a bushel and a peck” was something my mother used to tell me and my sister all the time. So, when Fun Stampers Journey stamp set Bushel and A Peck was revealed in the most recent FSJ Live Bundle, I couldn’t resist getting it. I think this is the perfect set for the Paper Craft Crew Card Sketch PCC283 challenge.

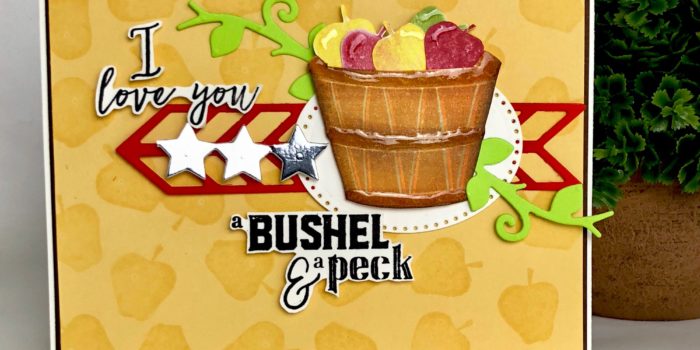
I began the card making process by taking my Pigment ink and stamping a background of apples onto Pineapple Smoothie cardstock which I matted onto Hazelnut Blend mat. I cut out all my die pieces the arrow type banner out of Rich Coral, the leaves out of Electric Lime, the stars out of Silver Mirror and the oval out of Buttercream cardstocks. I stamped the words and fussy cut them out and placed foam squares to add dimension.

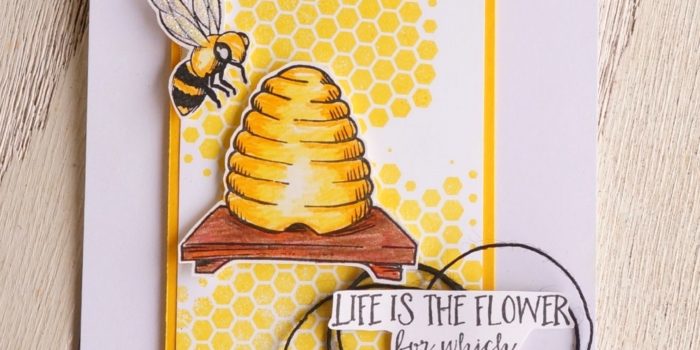
To create the blend of colors on the bushel basket, I first pulled out my MISTI and placed the stamp onto the acrylic board and held down a piece of Whip Cream cardstock with the magnets. I started with Oatmeal Cookie fusion ink on the entire stamp and repeated three times (note: I cleaned the stamp between each color change). The next color was Lemon Drop fusion ink. I stamped this color about 3-4 times before I moved onto Citrus Cooler which I stamped about 2 times. The last step was taking a small sponge dowel and applying Pumpkin bread only to the sides and the horizontal strip areas of the basket. I did this about 3 times giving the basket a rich weathered feel.

The apples were stamped in Rich Coral, Lemon Drop and Lemongrass stamping off onto a clear block before stamping my images onto the Whip Cream cardstock. I fussy cut the basket (removing the handles) and the apples leaving no white border.

I assembled all the mats and pieces onto a Buttercream base. The sentiments, stars and basket with apples are popped out using foam squares. Last but not least I applied Journey Glaze to the horizontal strips on the basket and highlights onto the apples. This is one of my favorite cards to date.

All Supplies are Fun Stampers Journey cardstocks, inks, stamps, and accessories. If you are interested in ordering any of these items to create this card, please click here (note: The stamp set is in our new Spring to Summer Trend Catalog. It will not be available until April 1, 2018).

You know how you purchase a stamp set because it’s so cute; and, then it sits unopened, unused for several months? Well, if you don’t, I do. The stamp set I used today was purchased back in September 2016, and I just pulled it out and used it for the Freshly Made Sketch #276 card challenge. Here is this week’s sketch:

I chose Fun Stampers Journey Hey Honey stamp set to create this simple and quick adorable card. I stamped the images on FSJ Whip Cream cardstock using FSJ Black Licorice ink. I colored the beehive and the bee with FSJ Color Burst Pencils. I used for the hive – 015, 016, 017; hive base – 039 with 040 colored on top; bee – 015, 016, 017 and a touch of gray on the wings and eyes. I added a little glitz to the bee’s wings with FSJ Sparkle Dust. The honeycomb background is stamped using FSJ Lemon Drop ink with the FSJ ATS Honeycomb stamp. The center strip is accented on either side with FSJ Summer Days cardstock. All stamped images are popped up using FSJ Foam Squares (medium and small). The sentiment has a looping of FSJ Black Twine behind it. A great card to make for beginners as well as seasoned card makers.

This project was created using Fun Stampers Journey products. If you would like to purchase any of the supplies listed above click here.

SUO Challenges Blog’s challenge is a card created with weddings in mind. This was the perfect timing for a card I created to a friend’s son’s engagement party.  They are both missionaries in Hong Kong. She is here preparing for their June wedding, but he is still in Hong Kong and will travel here closer to the wedding date. My friend told me her future daughter-in-law LOVED elephants. So, when I could pre-purchase the new Love You Lots SU! hostess stamp set, I didn’t hesitate to purchase it just for the elephant.

There is only one elephant in the stamp set, but I wanted two elephants kissing each other with their trunks; so, I looked up a couple of techniques on YouTube for stamping reverse images. I found one where you turn a large enough polymer stamp upside down on a block and then stamp your image onto it and then quickly stamp it onto the card stock – no successful – in fact, epic failure. I, then, saw a Jennifer McGuire tutorial where she stamped onto a sheet of acetate and then restamped onto the card stock. I tried it and I got a good enough image to work with. I did have to take a fine tip sharpie and fill in some of the outline.

I then took Basic Grey and Smokey Slate and added some shading onto the elephants. I gave a wash of color onto the elephants using an aqua painter with some Smokey Slate. I stamped the heart in Real Red from the SU! stamp set Wood You Be Mine? Then as an accent to the bottom of the page, I used a stamp from the new SU! stamp set Swirly Bird. I stamped off using Basic Grey ink. The sentiment stamp is from a SU! card kit Watercolor Wishes. The stamped portion of the card is raised with Stampin’ Dimensionals.

I think this is the perfect engagement card for elephant lovers:

SUO Challenge #149

Update to Initial Post: Last night 5/27/16, I had an email Pinterest alert for the cutest card ever. It was like mine but different. Here is the link: http://swathicrafts.co.uk/love-you-lots/pinkies-blog-hop-card-featuring-affectionately-yours-speciality-designer-series-paper/  Why didn’t I think of making the other elephant PINK!!!!! And, on top of that, she had great instructions on how to transfer the image from the acetate to the card stock. She used a bone folder to press down on the acetate to make a crisper, fuller image. I wish I had ran across this tip when I was doing my card!

Supplies:

Stamp Sets (All SU!): Love You Lots, Wood You Be Mine?, Watercolor Wishes
Inks: Basic Black, Basic Grey, Real Red, Smokey Slate
Card Stock: Whisper White
Accessories: SU! dimensionals, black Sharpie fine tip marker, SU! blocks, SU! paper trimmer

Last year I had a technique class featuring the Bendi Card fold featuring a birthday card (I guess I didn’t post that card – will do so soon and link up). It was such a fun card technique, I decided to use it for a Valentine’s Day card. I used the Bloomin’ Hearts thinlit dies to create a fun and stunning Valentine’s Day card.

Bendi Valentine's Day Card

This card will unhook and lay flat for easy mailing. The dimensions I used on this card would not allow it to fit into a 5 1/2 x 5 1/2 envelope, but I adjusted the measurements for the one we did in class and it fit quite well in the envelope. Of course, you would want to put a little padding to keep everything intact during the mailing process.

Supplies: love and you thinlits, x-acto knife (not pictured)


Love Bug Card


I am moving earlier blog posts from my old site to this one. This was a card I made based on a variation of a 3-D project. I found the original idea on this web-site http://www.mypapercrafting.com/2012/01/qq-spellbinders-sneak-peek-3.html and had to make this cute bug work with Stampin’ Up! punches (note: I did cut the oval head pieces and the eyes out on my Cricut so the proportions would look great!).

Discontinued Supplies: Scalloped Heart of Hearts Embosslit, Pretty in Pink card stock, Regal Rose card stock, and Pretty in Pink stamp pad.

note: I used one of the itty bitty punch pack circles to punch the nose, but I’m going to include the owl punch which would substitute well for the nose.


Price: $99.95

Supply List

Built for Free Using: My Stampin Blog

PAGE TOP
[dealsbar preview] Amazing Deals: !!toolbar-deal-title!! - !!toolbar-deal-merchant!!