Tag : fun stampers journey

72 posts

When I purchased my Spectrum Noir alcohol markers, I sent out an email letting my group of stampers know I would be providing classes on how to use these wonderful markers. The only requirement was they needed to purchase their own markers to use in class. I had four ladies sign up, and they went ahead and purchased all 168 markers through Consumer Crafts (they have the BEST price on these markers AND they offer 25% site wide regularly – just saying). We have had two classes so far, and I wanted to give a quick update about the progress of our Spectrum Noir alcohol marker colorist group has made as of this past week.

Note: These are NOT Copic markers and quite frankly, some of the YouTube reviews and compairsons do not do the Spectrum Noir Alcohol Markers justice. These markers fit into their own category; they are versatile; produce a great colored image; they are VERY affordable; and if you will watch the Spectrum Noir – Crafter’s Companion tutorials, you will have great success and produce outstanding papercraft projects. That being said, you can find Accreditation Coloring Download at www.spectrumnoir.com .  You can print this off on an inkjet printer and follow along with their YouTube tutorials to learn, to practice, and to turn in to them to receive accreditation as a colorist.

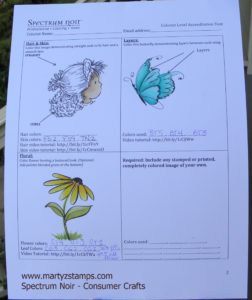
My first class was learning some of the basics. We covered Smooth Coloring, Basic Blending, Palette Blending, Dimension, Layers, and Florals. The class had a GREAT time and came away with a lot of hands-on practice (we colored two images).  Here are the two sheets we have completed so far (note: the second class was skin coloring; therefore, the skin on the girl is colored in on the second sheet):

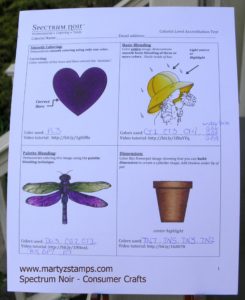
I found it very hard to get a good picture. The heart on the first sheet is a deep purple color and in “real” life, you can see this clearly.


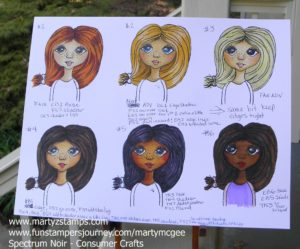
The second class focused on skin tones. I researched Spectrum Noir recipes for skin color on Pinterest and I took those color combinations and either used them, tweaked them, or came up with my own. The cost for classes two and three (skin and hair coloring) included a Fun Stampers Journey stamp called Media Artist (see below).

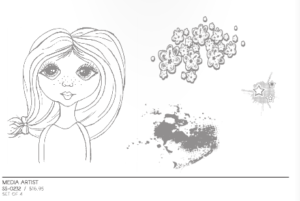
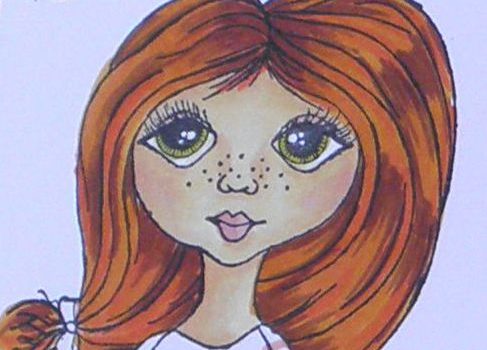
This image of the girl is a fantastic stamp to practice color combinations for skin and hair. I stamped six images of the girl onto Fun Stamper Journey Whipped Cream cardstock. Note: The quality of paper is important when using any alcohol markers. A lower quality product will increase bleeding of your ink color into areas you don’t want to be colored. Stampin’ Up! Whisper White is a great cardstock to use as well. You can also purchase specialty paper through Consumer Crafts for alcohol marker coloring.

We completed our skin tones, and we all made a few mistakes (that includes me). On my #6 girl, I used the wrong base color (I switched my colors) and she was so dark that her nose couldn’t be seen. I was able to correct this with the blender pen chisel tip and going over and over the image until I pushed some color through the cardstock to lighten up the image. You can tell because the coloring is a little mottled. I found that some of the lighter colors in the combo I chose could pull color out (acting like the blender) instead of creating a smooth blend. You will be able to see this in the next picture. But, that’s o.k. because we are all new to this type of coloring and there is always a learning curve when you learn something new.  I will be gong back and stamping more images and honing my skin coloring techniques to share with my group of colorists. Our next class will feature hair coloring. The image below has the hair colored because I decided to play around after class to see what I could come up with. These are not perfect hair colors, but I just felt the girl’s looked a little naked without hair color. Here is the sheet from class:

Once these classes are finished, our group should be able to scan and upload our accreditation pages to Spectrum Noir and receive their stamp of approval. I will, then, develop YouTube tutorials on how to color with the Spectrum Noir alcohol markers. I hope you decide to look into Spectrum Noir alcohol markers and begin to create outstanding colored papercraft projects.

This is the last of my Scrapbook Expo posts. I know I can be addicted to papercraft shopping. O.k., that’s an understatement, but I do have some restraint. So, I planned before I arrived at the Expo to purchase a Misti. I have been watching numerous YouTube channels featuring many papercrafters using the Misti, and I just had to have one. During the Mega Make-n-Take, designated vendors set up shop and offered products at a reduced rate or with a special bundle price. One of the vendors offered such a great deal, I purchased my Misti that night along with the cleaning solution. It is WONDERFUL! You can check out the Mist at www.mysweetpetunia.com.

www.mysweetpetunia.com

www.mysweetpetunia.com

I, also, purchased that night some items from Queen and Company.  On a previous post I featured their make-n-take shaker card. Along with making the card, we had extra epoxy and sequin embellishments left over, enough to complete several more card or scrapbook page projects.

Queen and Company embellishments

Queen and Company embellishments

They offered a special on shaker card component purchases. I chose a zig-zag die which came with two foam shaker pre-cut card components. These are awesome. All you have to do is pull the adhesive off the backside of the shaker component and adhere it to your card. You can add embellishments or if the design allows, you could stamp images on the card stock before placing the foam. Next, you remove the adhesive from the front of the foam and place the window sheet (acetate) on top. Once this is completed, you apply adhesive to a pre-cut piece of thicker than regular cardstock and place it on top of the window sheet to finish the project. The cost for these complete kits minus the embellishments runs around $3.00. Instead of purchasing the shaker card components by themselves, I purchased a bundle which included the die. The die allows to me create as many cards as I would like. One way is to purchase “fun foam” sheets from a craft store. I was able to find some with adhesive on one side, and I purchased mine from Michael’s with a 50% off coupon. You would need to cut approximately three sheets of foam to have enough height to allow the embellishments to move around and shake.

Queen and Co. zig-zag die with black fun foam

Queen and Co. zig-zag die with black fun foam

Queen and Co. shaker card components

Queen and Co. shaker card components

We received during the Mega Make-n-Take some adhesives and rhinestone embellishments. I cannot remember who supplied them, but it was a great freebie.

Glue dots, rhinestones, one bottle of adhesive not shown

Glue dots, rhinestones, one bottle of adhesive not shown

It’s Cheaper Than Therapy gave each make-n-take attendee a FREE embossing folder. My folder is Christmas themed.

It's Cheaper Than Therapy embosing folder

It’s Cheaper Than Therapy embossing folder

The next two days after the Mega Make-n-Take are designated workshop and shopping days at Scrapbook Expo. Most of the workshops offer free products when you take a vendor’s workshop. Heartfelt Creations offered a free stamp set up to a $19.95 value for each of their workshops. I took two workshops with them; therefore, I received two stamp sets.

Heartfelt Creation Free Stamps

Heartfelt Creation Free Stamps

There are various vendors in the exhibit hall offering free make-n-takes as well as make-n-takes with a nominal charge. I had been looking forward to Fun Stampers Journey exhibit all year. We had to wait about 30 minutes for a seat to come available, but it was worth it. We made a cute card and received a stamp set for FREE! I have pictured the make-n-take card along with an extra design they offered. I made that card for my make-n-take class.

Fun Stampers Journey Card

Fun Stampers Journey Card

FSJ Card 2

FSJ Card 2

After making the shaker card the night before at the make-n-take, I wanted to purchase some sequins, but I didn’t want to spend a lot of money. I stopped by the Tall Mouse booth www.cre8tiveartz.com and purchased a selection of sequins along with some rhinestones all under $20.00.

www.cre8tiveartz.com

www.cre8tiveartz.com

www.cre8tiveartz.com

www.cre8tiveartz.com

After a wonderful experience with Heartfelt Creations and their flower shaping class, I went by a booth that offers 3D dies for flowering creations. I wanted a hydrangea die and Elizabeth Craft Designs had one. I had my friend, Debbie, go back the next day and purchase the flower shaping tool kit.

Elizabeth Designs

Elizabeth Craft Designs

Last but not least, Debbie went back to the Heartfelt Creations booth and purchased the Berry Cafe 12×12 paper pack (not pictured). All in all I had a great time and came away with some great products and new papercrafting skills. Next year, I plan on taking more workshops and attending the exhibit hall two days in a row. We didn’t have time to stop at all the booths to compare prices and purchase more crafting supplies. I hope you enjoy this post.

PAGE TOP
[dealsbar preview] Amazing Deals: !!toolbar-deal-title!! - !!toolbar-deal-merchant!!