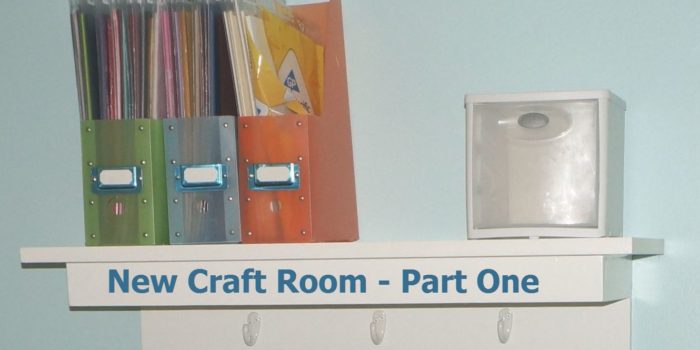
Yes, I have a new craft room, and it’s dedicated to only papercrafting. There is not my computer with paper clutter from bills, office work (I work from home), printers, other computers, etc., etc., etc, . . . .  So refreshing!

It all began when my son moved out. I had initially wanted his and Ryan’s old room because it has built-in shelves and drawers (my husband made them – he’s sooo talented at woodworking), and I thought this would be perfect to store all my crafting supplies, but the room is the smallest room in our house and I wanted a little stretching room; so, I took over my daughter’s old room, which had become my son’s room when she married and moved out; therefore, the Electric Lime walls you will see in the before pictures below (Josiah never cared about repainting – such a guy thing).

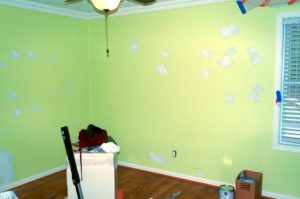
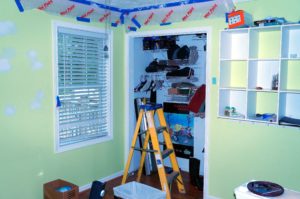
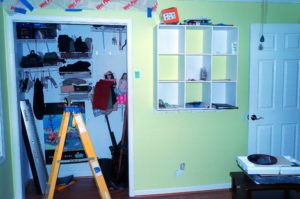
As you can see in the closet photos, it was still full of his things and he has been moved out for several months.

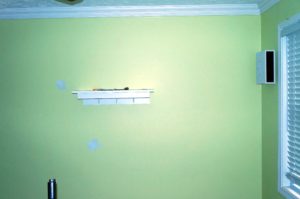
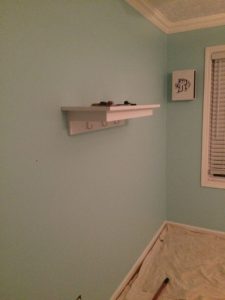
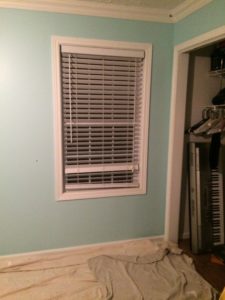
Josiah, my son, has been painting as a side job for the last year; so, I paid him to repaint my walls a nice light blue/green color. In real life it looks more light blue (FSJ Pool Party). I was aiming more for FSJ Cool Pool, but I am definitely not good at determining what pain chip colors will look like on a wall and in different lighting. Even though, it’s not the color I thought I was choosing, I really like it. It is light and bright and invites you to come in and create.

He painted the room while I was on vacation so the room could air out before I got back.

Here are the pictures of right after Josiah painted.

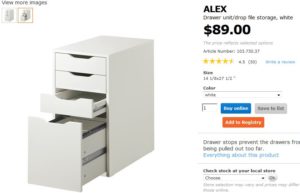
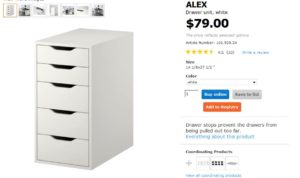
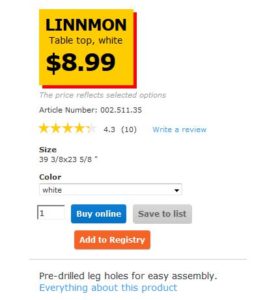
Once the room was painted. I got my son, Josiah, to go with me to The Container Store to purchase the desk tops. I chose these because the comparable ones at Ikea were a little too wide and when two desks are back to back you cannot easily pass supplies to the person across from you. Then, we went to Ikea to purchase the file cabinets, legs and small desktop. Here are the items I purchased:

Ikea has a corner desktop for $49.00 I may purchase in the future, and I will probably purchase another desk top from The Container Store as well. Note: If you have any chemical sensitivities, the Ikea table top and file cabinets give off a chemical smell that could trigger an asthma attack or cause bronchial issues. I had to have my husband seal the underside of the Ikea table top and as many of the desk drawer bottoms as he could – he had already put together one whole file unit before I asked him to seal any exposed areas.

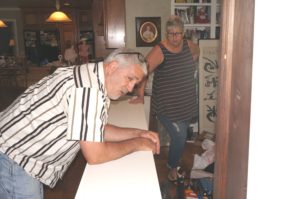
Once my husband put everything together for me, the process of moving crafting supplies began. Here are some moving into the room pictures.


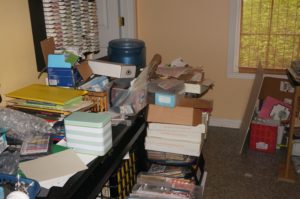
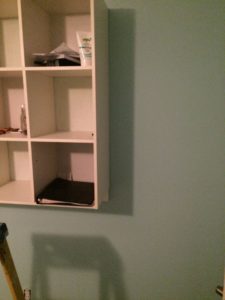
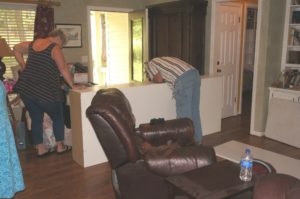
The stacks of paper, trimmers, shelves, die-cutters, etc., is a result of my friend, Cheyenne, deciding I needed my bookshelf my husband had made for me years ago in the closet of the craft room. I told her it could not be placed in the room because we have a right angle turn and the shelves are ceiling height. That did not deter her. Before I knew it, she had taken everything off; thus, the stacks of supplies, and had Kenneth helping her to move it to the room. Here is the picture where they decided it couldn’t fit through the hallway into the room.

Well, never to be hampered by any obstacles, Cheyenne asked Kenneth to cut the shelves in half and then we could stack them on top of each other in the Craft Room closet. Bless his heart, this was one of the few and rare days he had off and there he was sweating to death in the blazing heat cutting the shelves in half. He is the best!

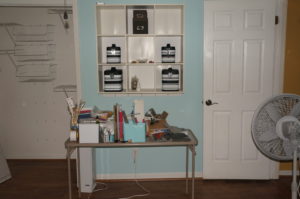
I did not get a picture of Kenneth in the process of re-imagining the shelves, but here is a picture of them in the closet.

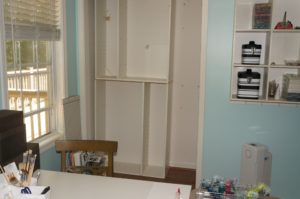
I took the top one and flipped it upside down to add a little interest to unit.

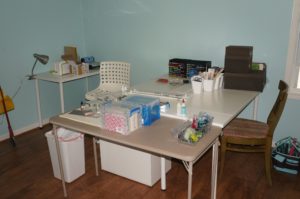
I will be taking more pictures of the room in a more finished version. I still need to have either my daughter or husband spray paint my stamp pad holder white and I want to purchase some pvc gutter pipe and make a few ribbon holders. I am very pleased with how the room has developed. If you look at the closet picture above and to the right of the bookshelf is un-used wall space. I need to spackle the holes in the wall (where the previous shelves were hung) and paint the wall white; then, I’ll have my husband make a few more shelves. My goal is to have nothing on the floors; everything on a shelf.

Make sure to keep an eye out for New Craft Room – Part Two.


This post will feature another FSJ (Fun Stampers Journey) May 2017 Bloom Box card re-imagined for the Fab Friday Card Challenge 113. Here is the card sketch for this challenge:

The original design in the FSJ May Bloom Box featured an elegant doily themed Well Wishes card accented with a silk bow and neutral button with natural twine.

Again, I wanted to incorporate some flowers into the design. I created the blue flowers using the technique mentioned in this post Well Wishes Doily Elegance using FSJ Pool Party ink, FSJ Sweet Pear, FSJ Lemongrass, dauber dowels, and the FSJ stamp set Summer Garden. The doily images were stamped onto FSJ Rock Candy cardstock using Butter Cream ink. The base is FSJ Banana Cream cardstock, with FSJ Rock Cany, and FSJ Butter Cream mats. The “Thinking of You” sentiment was stamped onto the Butter Cream cardstock using FSJ Rock Candy ink.

The second doily from the sentiment focal point, is raised up using FSJ Small Foam Squares. The circular center of this doily is die-cut out and the sentiment sits flush with the first doily (it’s hard to tell in the photo – I have a close-up below). The green leaves were created using FSJ Sweet Pear cardstock and the FSJ Bloom Cluster die. The flower bouquet was popped-up with Foam Squares. The final touch was adding FSJ Journey Glaze to the flowers (the sheen does not show up in the photo). I made a boo-boo and some of the glaze got onto the cardstock with the sentiment. Instead of freaking out, I decided to add some more dots of glaze to mimic dewdrops.

Supplies:

All supplies can be ordered by clicking here.

I am in the middle of a very hectic schedule and turning my son’s old bedroom into a craft room. The craft room change over has been slow but steady. This transition has hampered my creativity due to my current craft room being a MESS! I’m in the process of determining what must stay, what must go on Ebay or Etsy to be sold, and what can be moved to the new room so far. I still need to get desk tops and Ikea drawers to complete the transition. I will have a blog about this at some point in the near future.

When I saw this week’s Paper Craft Crew Cared Challenge #245, I knew I had the perfect card to meet the tic-tac-toe challenge:

My Bloom Box stampers met this past Monday and made our cards from the kit, BUT I thought they needed a little something more. So, prior to our meet-up, I had ordered the FSJ SS-0078 Summer Garden stamp set along with our new dauber dowels and sponges (TO0137 – small and TO0138 – large). I have a picture of the card from the kit below:

I took the basic card design and added to it along with changing the sentiment to Well Wishes. The initial card consisted of FSJ Butter Cream cardstock base, FSJ Banana Cream mat, and final piece of FSJ Rock Candy. The doilies are the featured stamp set in this month’s Bloom Box kit. They were stamped onto the Rock Candy cardstock using FSJ Butter Cream ink. I think the stamped images turned out wonderfully well. I changed my sentiment to Well Wishes and stamped it onto the pre-cut tag using FSJ Rock Candy ink. I popped it out using FSJ Foam Squares. The flower and leaves were created using a technique Richard Garay shared on one of his Facebook Live tutorials. I took a sponge dauber dowel and picked up some FSJ Rich Coral ink onto the sponge and I applied the ink to my cardstock in a circular motion. I did this same technique using FSJ Sweet Pear and FSJ Lemongrass. I, then, took my stamps and stamped the images onto those sponged areas using FSJ Black Licorice ink. The flower and foliage were adhered using FSJ Medium Foam Squares. For the ribbon accent, I took the button from the kit and applied FSJ Rock Candy ink straight onto the button edges using the ink pad. I adhered a large diamond rhinestone into its center and adhered it to a double bow made from FSJ twine. Once every thing was adhered to the card, I applied FSJ Journey Glaze to the flower and parts of the leaves. I think this card turned out to be very elegant with a pop of color. I almost forgot – last but not least, a sprinkling of FSJ Silver Silk was applied to the card. Bodda-Bling, Bodda-Boom!

Supplies:

All supplies except for the diamond rhinestone (who knows where I got it from – it was just part of my stash and fit exactly into the depressed area of the button) are available through www.funstampersjourney.com/martymcgee. Note: The stamp set is only available with the Bloom Box Kit. It must be purchased before the end of May and then a commitment of purchasing 5 more kits is required.

This past week, one of my good friend’s daughter had emergency surgery and had to stay in the hospital for about 4-5 days. I met up with my co-colorist, Cheyenne Luken, and we wanted to stamp and color this cute fox holding a basket of flowers with our Spectrum Noir markers. After choosing the printed papers for the mats, cutting them out, and adding a sentiment. I thought this would be the perfect card to give someone on the mend.

Here is the card with the color choices following:

Stamp: Darcy’s (I don’t know the name). Cheyenne purchased this at a Stamp Show back this past fall. But it is a super cute set. It also has a chick and another critter that escapes my mind at the moment.

Spectrum Noir Markers:

Fox Fur: TN9, TN6, TN4, TN3 – TN3 and BP3 combined
Eyes: IG1 and Blender, FS8 with BG5 and blender
Paw: BG8
Leaves: LG5, LG4, LG2, CG2
Flowers: CT4 and OR1, OR3 and OR2, B1 and IB2 and GT1, BP3, PP4, PP1
Basket: IG1 and BT8

Dies: My Favorite Things dies (cross stitched rectangles, clouds, and grass)

Fun Stampers Journey: Glaze

Paper Pack: Pink and Main 6 x 6

I think this turned out to be soooo adorable.

It has been a while since I have posted a card challenge. I have battled two colds since Christmas, and I am finally feeling better after two doctor visits, 2 rounds of antibiotics, and steriods. It is great to back to creating cards using my Fun Stampers Journey products.  Since it is Mondy, I decided to check out the  Freshly Made Sketches Challenge.  This week is a simple sketch that allows creative ideas to pop, pop, pop. Here is the sketch:

I decided to jump off in the deep end of the pool by cutting apart my words for the sentiment portion of this card. I just couldn’t resist. I chose FSJ Denim Days as my base cardstock and wave portion from FSJ Under The Sea Prints (PP-0041) 6 x 6 paper pack. I adhered the printed paper onto the Denim Days base. I used my Misti to stamp the sentiment. Since these stamps are deep etched red rubber, I had to work a bit to get a curve right amount of curve in each strip of words. I dusted the Denim Days with my embossing buddy to eliminate any static cling and I stamped the workd using Versamark ink. I sprinkled some FSJ white embossing powder onto the sentiment and heated with my FSJ heat tool. The sentiment reads In the waves of change we find our (front) direction (inside).

I looked up on YouTube how to tie a sailors knot and chose one I thought would look good on this card and place it at the top. This was a super quick and simple card; great to give someone who needs encouragement.

Here is the completed card:

Supplies: Please click here to order supplies to create this project.

I just love the Bunny set from Fun Stampers Journey called Spring Fling. I thought it was the perfect set to create an easel card along with the Paper Craft Crew Sketch #234.

One of our Fun Stampers Journey Facebook Challenge for coaches is an easel card; so, I combined it with the Paper Craft Crew Challenge card sketch. The base of the card is FSJ Deep Lilac. The focal point of card is the large, super cute bunny. It is stamped in FSJ Black Licorice onto FSJ Whip Cream cardstock and colored with the Journey Color Burst Pencils. The mat it is adhered to was stamped with the FSJ ATS Ink Splat stamp in FSJ Bubble Gum, Banana Cream, Pool Party, and Pretty Amethyst inks. The top of the card and the Pretty Amethyst mat with the sentiment are accented with a strip of FSJ Eggcellent 6×6 paper pack cardstock. The banners were created out of FSJ Deep Lilac and Cool Pool cardstocks. The flower was punched out of FSJ Cool Pool and the Summer Pretties punch and accented with a diamond rhinestone. The sentiment on the FSJ Cool Pool banner was stamped in FSJ Black Licorice ink using the sentiment from FSJ ATS Pocket Pup stamp. The bunny and the sentiment mat are popped out with FSJ Foam Squares (medium). The final embellishment is the bow created from FSJ Lavendar Fusion Satin Ribbon.

I know anyone would love to receive this card.

Supplies:

Fun Stampers Journey (to order click here)

Stamps: Spring Fling, Ink Splat, Pocket Pup
Cardstock: Deep Lilac, Pretty Amethyst, Whip Cream, Cool Pool, Eggcellent paper pack
Inks: Black Licorice, Banana Cream, Bubble Gum, Pool Party, Pretty Amethyst
Accessories: Summer Pretties punch, diamond rhinestone, Foam Squares, Lavendar Fusion Satin Ribbon, Color Burst Pencils


For this week’s Freshly Made Sketches #278 challenge, I made a variation of this month’s Make It Class card to meet the sketch challenge (I will post this month’s Make It cards on another post). Here is the FMS #278 sketch:

I had created a cross card from a video/demo Richard Garay had for FSJ coaches using a special technique to create a stained glass effect. I began by stamping the cross from FSJ Color Cross stamp set onto FSJ Whip Cream cardstock using Black Licorice ink. After I stamped the image, I took the solid flower stamp from FSJ Be Happy stamp set (note: any solid shape would work) and stamped it into various colors of ink (one at a time) then stamping onto the cross (you can go out of the lines because the cross will be cut out). I used the following Fun Stampers Journey inks to create this stained glass effect (Bubble Gum, Sweet Pear, Banana Cream, Pool Party, and Pretty Amethyst). Note: If you try this technique, make sure to clean your stamp off after each inking because the black ink sometimes comes off onto the stamp. This will help eliminate any frustration if colors bleed and become muddy/murky). Once I finished stamping, I cut the cross out and applied Journey Glaze to give it a little shine. Set the cross aside to dry.

I created the patterned mat by placing the FSJ Starburst stencil on top of the piece of FSJ Pretty Amethyst cardstock. In a FSJ Media Mister, I combined one squirt of FSJ Sweet Berry Splash and one squirt of FSJ Blue Lagoon Splash and filled with water to create the purple mist. I spritzed the paper with the purple mist and immediately applied a paper towel to the stencil to soak up any excess liquid. This created another stained glass effect for the card.

I used FSJ Deep Lilac for the back mat. I layered the patterned mat on top. I adhered the cross with FSJ Foam Squares (medium). I stamped the sentiment onto FSJ Pretty Amethyst cardstock and die cut a circle from the stamped cardstock. I placed a loose loop of black twine behind the circle sentiment and adhered the sentiment with FSJ Foam Squares (medium) as well. For the final touch, I punched two small flowers from the FSJ Summer Pretties punch. I curled the edges and applied a peal accent to the middle. They were adhered to the card project with FSJ liquid glue.

Here is the final project.

Supplies:

Fun Stampers Journey (click here to order)

Stamps: Color Cross Bundle, Be Happy
Cardstock: Whip Cream, Pretty Amethyst, Deep Lilac
Inks: Black Licorice, Bubble Gum, Pool Party, Pretty Amethyst, Banana Cream, Sweet Pear
Accessories: Black Twine, Journey Glaze, Pearl Accents, Circle Die, Starburst Stencil, Media Mister, Sweet Berry Splash, Blue Lagoon Splash

I am making it under the wire, yet again, for a Paper Craft Crew (#233) challenge. This week’s challenge is a Tic-Tac-Toe Challenge. I chose the middle, vertical column (shimmer, Shabby Chic, flowers) for my card. Here is the sketch:

This image is a digi stamp I purchased from Sherri Baldy’s Etsy shop. The purchase gave me two digi stamps of the cutest girl. I have a blog post featuring the other image here.

I had decided to try and make dread locks/ringlets on my girl after watching a YouTube tutorial on coloring with alcohol markers (sorry, I didn’t make a note of the video). I will do my best to note the markers I used, but this was one of those creative moments where I was creating and not paying attention to the details of what I used. Anyway, I’ll pull out my Spectrum Noir Hex chart and do the best I can (it will be pretty close).

Spectrum Noir alcohol markers were used on the girl and the flowers. The hair – IG10, IG2, BG6, BG3; skin – HB2, FS2, FS7, BG4, TN3, TN5; lips and cheeks – FS8; dress/headband/pants – LG2, LG3, LG5, LY`, OR1, OR2; eye – LG2, LG5; flowers – CT2, OR2, OR3; leaves – LG2, LG3, LG5; and, the blender pen was used throughout.

The base cardstock is SU! Pistachio. The images were stamped on Spectrum Noir cardstock using Memento Tuxedo Black ink. The base mat is Pink and Main designer paper die cut with Fun Stamper Journey Persian Garden die, The orange mat is FSJ Creamsicle cardstock with a light green mat of designer paper from Heartfelt Creations Sweet Berry 12×12 paper pack (this explains all the flowers – I had to cover up all the strawberries on the mat – LOL), a Spellbinders die was used to create some FSJ Creamsicle swirls. Spectrum Noir clear glitter pen was applied to the hair and skirt to add the SHIMMER. FSJ Journey Glaze was applied to the flowers, skirt waist, skirt trim, and eye. Diamond rhinestones were added to the flower centers, and a triple bow from SU! lace Pistachio ribbon accented the card. Last but not least, everything is popped, popped, popped up. A lot of dimension is going on here.

It is a very busy card, but I like busy and it really yells Shabby Chic.

I really love the way this card turned out. It is one of my favorites.

Yesterday I had a Spectrum Noir Alcohol Marker coloring class, which focused on shading clothing. I had recently ordered from Etsy a Sherri Baldy digi stamp (there were two images to my surprise and delight). I thought this would be a great image to practice clothing coloring. A color palette of blues and pinks was chosen. When she was finished, I knew I had to submit another card to the Fusion Card Challenge – Pretty in Pink Card Challenge.

She was so much fun to color. Here are the markers we used: Hair – base from roots to midway of hair GB11 then GB4 to the ends. TN3, GB 10, TN5, EB4, EB5 (dots throughout hair); skin – EB1, FS7, FS9 and FS8 for cheeks and lips; dress and headband- TB1, TB4, TB5; Pants – LY1, CT4; Flowers PP1 and PP3 and Blender throughout project.

The flowers are from the Heartfelt Creations – Botanical Rose. The base of the card is FSJ Whip Cream with FSJ Watermelon Fusion and FSJ Bubble Gum cardstocks as mats. The oval was cut from Heartfelt Creations Strawberry Fields 12 x 12 paper pack. The pearl accents are FSJ pearls and they were colored with Spectrum Noir PP2 marker to make them pink. A layer of Journey Glaze was added to all the flowers to make them shine and pop. And, finally the bow is SU! silk ribbon made into a double bow.

If you would like to order any products from Fun Stampers Journey, click here.

So excited to show off this Oldie But Cool truck in the Paper Craft Crew Challenge #232. I love the way PCC sketches inspire you to think outside the box. Here is this week’s sketch:

This card was created with a friend after a Make It party she had at her house. We went downstairs to her basement craft room. We were wanting to use our Spectrum Noir Alcohol Markers to color something in shades of red. We decided the Fun Stampers Journey Hit The Road stamp set was the perfect choice. As we began coloring, I can tell you several times I thought I had ruined my truck. But, as alcohol marker colorists know, you have to walk away and let it dry and voila it looks great. I did have to cut the truck out because I kept coloring out of the lines. You know, Mama said there would be days like this – LOL. Once we finished with the truck, the background came about by trial and error.

I began the background mat by wanting to stamp the route 66 outline stamp in FSJ Sour Lemon ink, but I used FSJ Electric Lime by accident (that’s where one of the errors came in). Instead of tossing the stamped background, I thought, “Why don’t I stamp the full coverage route 66 image offset and on top of the outlined route 66 image in FSJ lemon drop?” It looked great. Then, I made another error stamping the one way image and smeared some ink. Oh ho, that wouldn’t do. So, I thought, “Hmm, what would FSJ Huckleberry Fusion look like stamped on FSJ Electric Lime cardstock?” It looked great. Thus the one way stamped images adhered off of the stamped background mat. I finished the background stamping the gas pump in FSJ Candy Apple ink. The final touch was some splatters of FSJ Sour Lemon silk. I love this card! I hope you do too.


Supplies: Fun Stampers Journey supplies can be ordered by clicking here.

PAGE TOP
[dealsbar preview] Amazing Deals: !!toolbar-deal-title!! - !!toolbar-deal-merchant!!