Tag : banner

4 posts

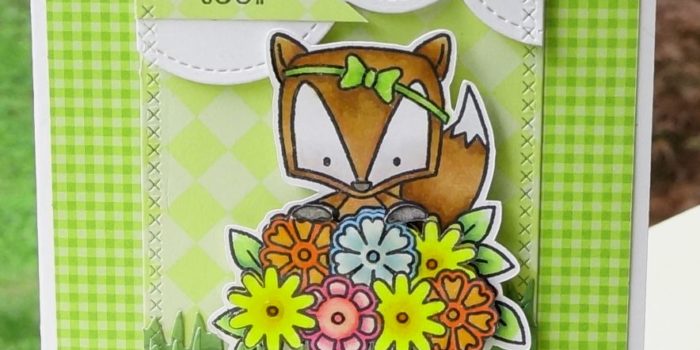
This past week, one of my good friend’s daughter had emergency surgery and had to stay in the hospital for about 4-5 days. I met up with my co-colorist, Cheyenne Luken, and we wanted to stamp and color this cute fox holding a basket of flowers with our Spectrum Noir markers. After choosing the printed papers for the mats, cutting them out, and adding a sentiment. I thought this would be the perfect card to give someone on the mend.

Here is the card with the color choices following:

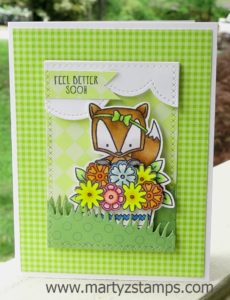
Stamp: Darcy’s (I don’t know the name). Cheyenne purchased this at a Stamp Show back this past fall. But it is a super cute set. It also has a chick and another critter that escapes my mind at the moment.

Spectrum Noir Markers:

Fox Fur: TN9, TN6, TN4, TN3 – TN3 and BP3 combined
Eyes: IG1 and Blender, FS8 with BG5 and blender
Paw: BG8
Leaves: LG5, LG4, LG2, CG2
Flowers: CT4 and OR1, OR3 and OR2, B1 and IB2 and GT1, BP3, PP4, PP1
Basket: IG1 and BT8

Dies: My Favorite Things dies (cross stitched rectangles, clouds, and grass)

Fun Stampers Journey: Glaze

Paper Pack: Pink and Main 6 x 6

I think this turned out to be soooo adorable.

This week’s Paper Craft Crew Card Sketch #222 challenge inspired me to use Fun Stampers Journey December Bloom Box stamp set Welcome Wreaths. Here is their card sketch:


I think wreaths are a great way to welcome in the holidays and the FSJ December Bloom Box Welcome Wreaths stamp set is the perfect set to create a welcoming card featuring a wreath. I began this card with an base using FSJ Oatmeal cardstock. The bottom portion of the card has a FSJ Hazelnut Blend mat with a FSJ Cranberry Bliss mat. The Cranberry Bliss mat is stamped with the berry cluster from the stamp set in FSJ Cranberry Bliss ink. I cut a banner out of FSJ Hazelnut Blend cardstcok and cut out a “v” shape in both ends. The entire card was sprinkled with FSJ Dark Roast silk.

The wreath was a “work in progress while creating”. LOL You know what I mean. You start off with one idea of how to make something unique; and, well, . . it kinda doesn’t turn out like you expected . . . .so, you begin experimenting with different ways to create something beautiful out of a …. pig’s ear …. lol.  I started off with the branch stamp and using FSJ Lemon Grass ink went about stamping the curved branch into a wreath shape (o.k. a circle). This took multiple turns around the circle because I wanted a full and bushy wreath. When I was finished stamping, I thought the wreath look flat and dull. Hmmm,….. what can I do to make it “pop”. I thought, why not fussy cut lots of branches and layer them onto the flat, dull base. Oh, yes I did! And, I think it created the look I was trying to get from the beginning. I must say, it really didn’t take that long to fussy cut the branches (it really didn’t and it was so worth it). I stamped the small pine cones in FSJ Hazelnut Blend and colored them with my FSJ Color Burst Pencils and fussy cut them out. I stamped the berry cluster with FSJ Cranberry Bliss (all of this was stamped onto FSJ Whip Cream cardstock). I fussy cut the berries out as well. No, booing and hissing from the peanut gallery – it’s those little extra steps that make a super cute card. I took some FSJ Cocoa Gingham Ribbon and made a double bow and adhered everything onto the wreath with glue dots. I then put the card together using craft glue and I popped out the wreath and banner using Journey Foam Squares (medium). For a little extra touch, I flicked Dark Roast silk onto the wreath. Last but not least, I added a little bling by placing some dark chocolate sequins onto the card.

Here is the finished card:


Supplies: All product used can be ordered from my FSJ website. Click here. Note: Everything is Fun Stampers Journey except as noted.

December Bloom Box – Welcome Wreaths
Cardstock: Cranberry Bliss, Whip Cream, Oatmeal Cookie, Hazelnut Blend
Ink: Hazelnut Blend, Cranberry Bliss, Lemon Grass
Coloring: Color Burst Pencils
Silk: Dark Roast
Ribbon: Cocoa Gingham Ribbon
Miscellaneous: Sequins (not FSJ)

This scrapbook page was a page I made for my friend as an example of a traditional scrapbook page using Project Life cards. I didn’t want traditional scrapbookers to feel limited by Project Life’s photo sheets, but rather the card sets could be used on a more traditional page.

Her son had gone to some type of swim park with his friend’s and she had captured the moment with pictures she wanted to place in a scrapbook. I didn’t have any 12×12 SU! new 2015-2017 in-color paper (Watermelon Wonder); so, I took a piece of Very Vanilla 12×12 and adhered the solid side of the new envelope paper to the Very Vanilla base. Hey, it worked. I used Project Life cards to add commentary areas and sentiments. I then wanted a 3D effect. I took baker’s twine and punched out banner shapes from the Project Life cards and adhered them to the twine (some with glue dots others with dimensionals. I used Bermuda Bay, Daffodil Delight, and Pool Party card stock as coordinating colors for the mats.

Summer Fun

Supplies:

I missed last week’s card challenge by 5 hours, because I didn’t check the submission time. I have now made an Excel spreadsheet with submission times so I can easily check my spreadsheet and submit card challenges on time.

Pals Paper Arts sketch challenge PPA245 is below:


PPA245 Sketch Challenge


I made a KISS (Keep It Short and Simple) card for PPA245: Pals Paper Arts Sketch Challenge.  It took me less than
30 minutes. This included taking the picture, uploading the picture, posting on my blog, and submitting to Pals Paper Arts website. I think this card would be a really great card for a make-n-take class.

OLYMPUS DIGITAL CAMERA


PAGE TOP
[dealsbar preview] Amazing Deals: !!toolbar-deal-title!! - !!toolbar-deal-merchant!!