Tag : wedding

3 posts

I am in the middle of a very hectic schedule and turning my son’s old bedroom into a craft room. The craft room change over has been slow but steady. This transition has hampered my creativity due to my current craft room being a MESS! I’m in the process of determining what must stay, what must go on Ebay or Etsy to be sold, and what can be moved to the new room so far. I still need to get desk tops and Ikea drawers to complete the transition. I will have a blog about this at some point in the near future.

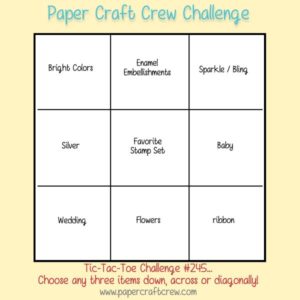
When I saw this week’s Paper Craft Crew Cared Challenge #245, I knew I had the perfect card to meet the tic-tac-toe challenge:

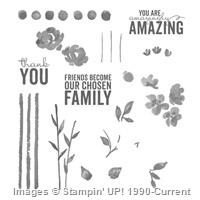
My Bloom Box stampers met this past Monday and made our cards from the kit, BUT I thought they needed a little something more. So, prior to our meet-up, I had ordered the FSJ SS-0078 Summer Garden stamp set along with our new dauber dowels and sponges (TO0137 – small and TO0138 – large). I have a picture of the card from the kit below:

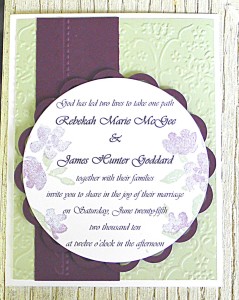
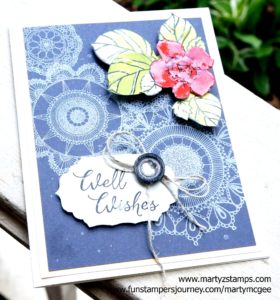
I took the basic card design and added to it along with changing the sentiment to Well Wishes. The initial card consisted of FSJ Butter Cream cardstock base, FSJ Banana Cream mat, and final piece of FSJ Rock Candy. The doilies are the featured stamp set in this month’s Bloom Box kit. They were stamped onto the Rock Candy cardstock using FSJ Butter Cream ink. I think the stamped images turned out wonderfully well. I changed my sentiment to Well Wishes and stamped it onto the pre-cut tag using FSJ Rock Candy ink. I popped it out using FSJ Foam Squares. The flower and leaves were created using a technique Richard Garay shared on one of his Facebook Live tutorials. I took a sponge dauber dowel and picked up some FSJ Rich Coral ink onto the sponge and I applied the ink to my cardstock in a circular motion. I did this same technique using FSJ Sweet Pear and FSJ Lemongrass. I, then, took my stamps and stamped the images onto those sponged areas using FSJ Black Licorice ink. The flower and foliage were adhered using FSJ Medium Foam Squares. For the ribbon accent, I took the button from the kit and applied FSJ Rock Candy ink straight onto the button edges using the ink pad. I adhered a large diamond rhinestone into its center and adhered it to a double bow made from FSJ twine. Once every thing was adhered to the card, I applied FSJ Journey Glaze to the flower and parts of the leaves. I think this card turned out to be very elegant with a pop of color. I almost forgot – last but not least, a sprinkling of FSJ Silver Silk was applied to the card. Bodda-Bling, Bodda-Boom!

Supplies:

All supplies except for the diamond rhinestone (who knows where I got it from – it was just part of my stash and fit exactly into the depressed area of the button) are available through www.funstampersjourney.com/martymcgee. Note: The stamp set is only available with the Bloom Box Kit. It must be purchased before the end of May and then a commitment of purchasing 5 more kits is required.

SUO Challenges Blog’s challenge is a card created with weddings in mind. This was the perfect timing for a card I created to a friend’s son’s engagement party.  They are both missionaries in Hong Kong. She is here preparing for their June wedding, but he is still in Hong Kong and will travel here closer to the wedding date. My friend told me her future daughter-in-law LOVED elephants. So, when I could pre-purchase the new Love You Lots SU! hostess stamp set, I didn’t hesitate to purchase it just for the elephant.

There is only one elephant in the stamp set, but I wanted two elephants kissing each other with their trunks; so, I looked up a couple of techniques on YouTube for stamping reverse images. I found one where you turn a large enough polymer stamp upside down on a block and then stamp your image onto it and then quickly stamp it onto the card stock – no successful – in fact, epic failure. I, then, saw a Jennifer McGuire tutorial where she stamped onto a sheet of acetate and then restamped onto the card stock. I tried it and I got a good enough image to work with. I did have to take a fine tip sharpie and fill in some of the outline.

I then took Basic Grey and Smokey Slate and added some shading onto the elephants. I gave a wash of color onto the elephants using an aqua painter with some Smokey Slate. I stamped the heart in Real Red from the SU! stamp set Wood You Be Mine? Then as an accent to the bottom of the page, I used a stamp from the new SU! stamp set Swirly Bird. I stamped off using Basic Grey ink. The sentiment stamp is from a SU! card kit Watercolor Wishes. The stamped portion of the card is raised with Stampin’ Dimensionals.

I think this is the perfect engagement card for elephant lovers:

SUO Challenge #149

Update to Initial Post: Last night 5/27/16, I had an email Pinterest alert for the cutest card ever. It was like mine but different. Here is the link: http://swathicrafts.co.uk/love-you-lots/pinkies-blog-hop-card-featuring-affectionately-yours-speciality-designer-series-paper/  Why didn’t I think of making the other elephant PINK!!!!! And, on top of that, she had great instructions on how to transfer the image from the acetate to the card stock. She used a bone folder to press down on the acetate to make a crisper, fuller image. I wish I had ran across this tip when I was doing my card!

Supplies:

Stamp Sets (All SU!): Love You Lots, Wood You Be Mine?, Watercolor Wishes
Inks: Basic Black, Basic Grey, Real Red, Smokey Slate
Card Stock: Whisper White
Accessories: SU! dimensionals, black Sharpie fine tip marker, SU! blocks, SU! paper trimmer

Another week has passed and it is time for PPA249: A Sketch Challenge:

6a00e54f95df92883401b7c77db942970b-400wi

One of my daughter’s friend will be married this July. She wanted me to make a wedding invitation using mint and plum as the base color combination. I came up with this design (using different names and a different date) for the invitation.

PPA249 Challenge

I can definitely say this color combo does not photograph well. I probably took eight pictures and I finally got the picture above this afternoon. At least you can tell (somewhat) I used Blackberry Bliss and not Basic Black as the accent color. If you’re wondering, I do have a light box along with lights, but the pictures turn out the best when I take them outside. Of course, my friend’s iPhone 6 takes the best pictures, which I do not own one.

Supplies:

I used an MFT die for the scalloped mat.

PAGE TOP
[dealsbar preview] Amazing Deals: !!toolbar-deal-title!! - !!toolbar-deal-merchant!!