Tag : splashes

6 posts

I am so excited to let my readers know, I am the Guest Designer on The Paper Girls Challenge Blog featuring a Rainbow Theme designed card. The challenge begins the week of April 15th.

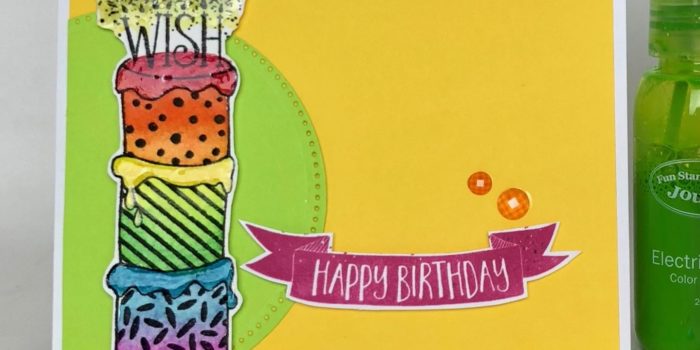
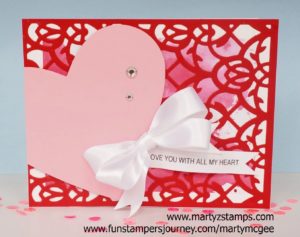
Before I created the card I submitted as a guest designer, I had fun creating a rainbow cake happy birthday card, which is featured below:

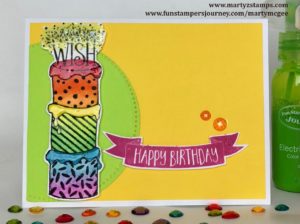
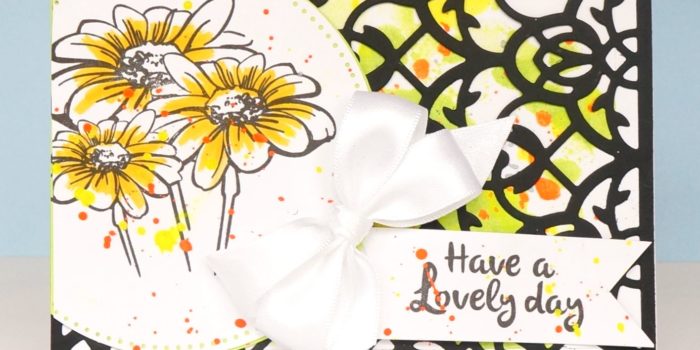
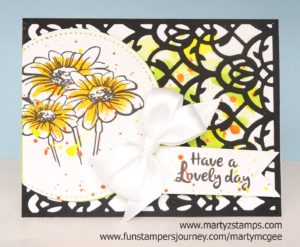
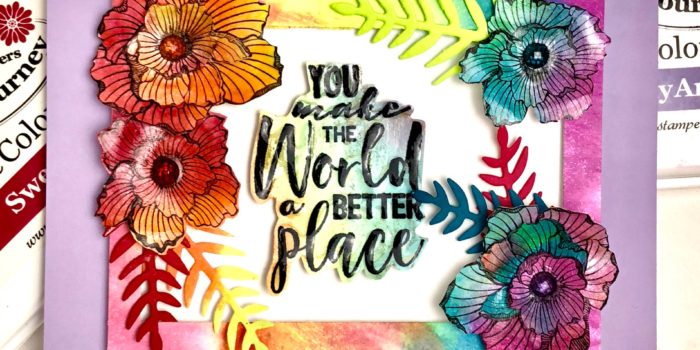
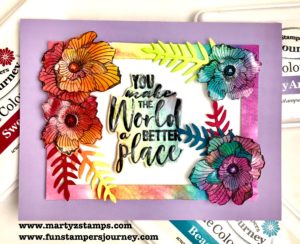
I really love this card, but I wasn’t satisfied with the results. So, I moved on to another idea. I went to my collection of stamps and chose the “A Better Place” stamp set (this was featured in a previous post, Black and White – A Better Place). It is our new host exclusive stamp set for parties that reach $600 or more dollars in orders. I sat and looked at all the stamps in this two set collection, I browsed many card collections on Pinterest and finally decided to create a floral card awash with the colors of the rainbow.

As many of you know, this month’s product promotion feature our silks and splashes. Since they are 20% off, I wanted to showcase what could be down with them. I went with the splashes since I had all the colors to create a rainbow on hand. I began with a large, clear block (think background sized) and drizzled a good amount of water from my media blender brush onto the block prior to adding the splash colors. Normally, you spritzed color with the splashes, but I unscrewed the cap and using the pipe that pulls the color through to the nozzle, placed each color in a vertical row making sure to keep each color separate from the next. I, also, screwed the cap back onto each bottle as I used it (trust me, you want to do this or you could have a “real” mess on your hands). After all the colors were on the block, I gently pulled the colors into the one beside it, keeping white space to a minimum. Next, I placed a piece of 5 1/4″ x 4″ Whip Cream card stock onto the rainbow of colors. I pulled the paper off and repeated the entire process with a second sheet. I let my paper air dry, or a heat tool can speed up the process.  I took two of the floral stamps from the set and stamped them several times onto one of the colored pieces of paper. I used  the Journey Rectangles Die and cut a frame and stamped the sentiment on the leftover piece. I used the Mystic Fern die to cut leaves out of several pieces of card stock. To create a more dimensional look, I fussy cut inner petal pieces and manipulated all the petals with an embossing tool (thing Heartfelt Creation flowers). I added foam squares to everything, popping them up off the card to create dimension. The color filled mat was adhered to a base of Pretty Amethyst card stock. The final touches included Rainbow Drops to the center of the flowers and Journey Glaze.

Thank you Paper Girls Challenge Blog for asking me to be your guest designer.

If you would like to order any of the supplies to create this card, please click here, or contact me through my Fun Stampers Journey website to host a party (www.funstampersjourney.com/martymcgee).


I love bold and bright colors. They catch my eye and shout “HAPPY,” “JOYFUL,” “FUN,” and the list goes on. This week’s Freshly Made Sketch 329 challenge features a large circle with a sentiment. I couldn’t wait to create a card for this challenge using their card design.

Last night I was playing around with my Fun Stampers Journey splashes using them to watercolor. I wanted to incorporate this month’s promotion, Over The Rainbow, and next month’s promotion featuring our splashes and silks into one amazing card.   I began by stamping the three tier cake from my new stamp set “Let’s Eat Cake” (SS-0555) in Black Licorice (IP-0041) onto watercolor paper. I placed a dab of each of the splashes onto a clear acrylic stamping block and pulled my colors with a Journey Blending Brush (TO-0097). I selected the following splashes for my project: Sweet Berry (IP-0086), Citrus Cooler (IP-0079), Sour Lemon (IP-0124), Electric Lime (IP-0121), Blue Lagoon (IP-0084), and Cosmic Grape (IP-0120). To add a little depth and richness to the rainbow cake, I took my Color Burst Pencils (JM-0077) and went over the icing portion of the cake as well as the glow from the candles and topped them off with some Journey Glaze (AD-0002). The glow from the candles did require a little Journey Sparkle Cuts (AC-0151) for that hint of glitz. The sentiment is from the same stamp set, and it was stamped with Watermelon Fusion ink (IP-0027) using my MISTI to add color upon color giving a rich, deep color.

The base of the card is Whip Cream card stock (CS-0040), the mat is Lemon Drop card stock (CS-0018) and the circle was die cut out of Electric Lime card stock (CS-0123). The cake and the sentiment were popped out with foam squares. The final accent were orange Rainbow Drops (AC-0178). A perfect card for a perfect birthday.

If you would like to order any of the supplies I used to create this card, click here.

Other supplies: Circle Die Set DI-0039, adhesives, trimmer, etc.


This week’s Paper Craft Crew Challenge is a color challenge using the following colors:

I received this stamp set in my July 2017 Bloom Box Kit.

I fell in love with these adorable mermaids the moment the first images came out for this kit. I wanted to make a card that gave the feel of the ocean and the playfulness of the mermaids. I began with a base of FSJ Cool Pool cardstock. Both of the mats are Cool Pool cardstock as well. I took the smaller mat and embossed in white the retired FSJ background stamp Catching Waves. I cut out across the edge of one of the waves. To create the watery effect on both mats. I used my FSJ splashes (Blue Lagoon, Electric Lime, and Cool Pool). I gave each of the mats a good spray from each of the colors and moved the cardstock around to allow the different spalshes to blend together. I blotted excess liquid with a baby wipe. It took a good while for the mats to dry (I must have really saturated them. The next step was to stamp the mermaids and color them. I stamped them with FSJ Black Licorice ink onto FSJ Whip Cream cardstock. I colored them with my FSJ Color Splash watercolor pencils. The sentiment was stamped onto Whip Cream cardstock with the Black Licorice ink as well. I fussy cut the mermaids and the sentiment. Once the mats were dry, I contructed the card. The cut off the bottom of the first mat and with the extra piece I cut reversed scallops to create a wave. I adhered the base mat with FSJ White Liner Tape (this is the best adhesive for cardstock that has been wet and dried with the edges pulling up. I placed the liner tape on every edge so the panel would bend. The extra piece of cut cardstock was adhered next. The embossed mat was adhered with White Liner Tape around the edges. By only adhering to the outside edges I created a pocket for my diving mermaid. Before I adhered the sentiment and mermaids I used FSJ Sparkle Silk to sprinkle a little glitz and glamour to the card. The mermaids and the sentiment were popped out using FSJ medium Foam Squares. Before placing the sentiment onto the card, I looped some FSJ Twine onto the base mat where the sentiment would be placed.

I really love this card, and I hope you do to.

This past weekend a few of my fellow stampers and I attended Heirloom’s Lawrenceville Rubber Stamp & Paper Arts Festival. It began with the Design & Treasure Make-n-Take Friday night. We made four cards, visited with a favorite vendor “Pink & Main”, used new products, experienced new techniques, and had a great time. When we were leaving, I noticed a notebook on display with ATC (Artist Trading Card) on display and announcing the ATC contest. I remembered reading about it and wanting to create an entry when I registered, but I had forgotten about it. I decided to make a couple of ATCs which were to reflect the theme of Freedom and enter them the next day.

Saturday morning came bright and early. I had set my alarm the night before, but it didn’t go off; so, I was in a little bit of a rush before my friend, Cheyenne, got here with some stamp sets that were Freedom themed. We were to  head toward the weekend’s shopping event where we were to meet some other friends at the event by 10:00 a.m. Just a note to the alarm issue, I did set it, but for the weekday. LOL

I began the creation process half awake and a head full of cotton, but that could have been a plus since I couldn’t overthink the process. Really, I could barely think. I took the 3 1/2 x 2 1/2 pieces of cardstock and pulled out my Fun Stampers Journey Sweet Berry Splash, Blue Lagoon Splash, Cranberry Bliss silk, Sparkle Dust, Black Licorice Twine, Journey Medium paste along the FSJ spatula applicator along with some post-it note tape. I pulled out my SU! stripes and stars stencils; thus began the card base process.

In a container, I spritzed some Sweet Berry with a mist of water. I used a paint brush and applied a swipe of Sweet Berry across the cards. It wasn’t brillant enough; so, I thought why don’t I add some Cranberry Bliss silk and that did the trick. I reapplied the mixture to the card and it looked gorgeous. Then, I took the Blue Lagoon Splash and did the same process.  I did try to add some Dark Roast to create a more navy blue color and it was a little too much which created a blackish blue. All I did was add more Blue Lagoon splash and pulled a small, small dot of the blackish blue color into it, mixed it a little, and Bob’s your uncle; it looked great. On the soldier ATC I added full blue color, but on the eagle ATC, I masked off some stripes and added the color to this area to provide a little interest.

Next, I applied the medium paste using the stencils to the card base and sprinkled Sparkle Dust onto the wet medium to create some sparkle and glitz. The final embellishment was several loops of Black Twine. I sat the emerging ATC pieces to the side to work on the stamped images.

By this time, Cheyenne arrived with the SU! stamps. I didn’t have any stamps that reflected the Freedom theme, but she had two SU! retired stamp sets (they are very, very retired). They were perfect. I took the soldier stamp and coordinating words from one stamp set and stamped them onto FSJ Whip Cream cardstock using Memento ink. I colored the soldier using Spectrum Noir markers. Each of the words I cut out individually and matted on FSJ Black Licorice cardstock. I took a very light gray Spectrum Noir marker and went over the words to tone down the brightness of the Whip Cream cardstock. I popped the soldier and words out using FSJ Foam squares; and, as a final touch, I sprinkled a little Silver silk onto the ATC. Here is Cheyenne’s iPhone pictures. She liked them better with a woodgrain background:

The cards were judged by the vendors at the show. Here is the winning ATC card:

I created the eagle card by stamping the eagle onto FSJ Whip Cream cardstock using FSJ Black Licorice ink. Cheyenne suggested stamping the coordinating words directly onto the eagle. I thought that was a GREAT idea, and as you can see, it looks gorgeous. I colored the eagle with Spectrum Noir markers. The eagle is popped up using FSJ Foam squares. I punched out three small stars from FSJ Denim Days cardstock. Even though they didn’t have a first, second, and third place winner, the eagle ATC card was the second most chosen card by the vendors.

I think they both turned out beautifully. I won $25 show bucks which meant I could go and purchase products from any of the vendors. Here I am receiving the Show Bucks:

I went back to Creek Bank Creations and purchased two more 3D embossing folders from We R Memory Keepers Next Leveling Embossing folders. These are awesome; they create a 3D embossed look to your cardstock, which adds wonderful dimension and interest to your card. I have three posts coming up featuring these folders. The rest of my winnings I spent at Pink and Main. I purchased a cute, cute frog stamp set (it’s one of the upcoming card creation posts) and a pirate set just for my little buddies to create some cute cards.

Thanks Cheyenne for your stamp sets and your critiques during the creating process.

This week’s Paper Craft Crew Challenge #228 is such a great and unique card sketch. It really allows a papercraft artist to think beyond the box. I decided to enter two cards I recently designed for my January Make It based on is this week’s sketch:

I had created a heart card for January’s Make It class, but one of my good friend’s, Julianne, really needed a card design for a friend on the mend. Her friend has been a garden club member for a long time, and we decided to take the heart card design, change the cardstock colors and change the stamped image.

Here is the Make It heart card:

The card base is Fun Stampers Journey Whip Cream, there is a 3 1/2″ x 4 3/4″ Whip Cream mat with a watered down application of FSJ Sweet Berry Splash. The red mat is cut from FSJ Cranberry Bliss cardstock using the FSJ Persian Garden die (note: it’s best to use a precision plate to have the die cut efficiently). The heart is die cut from FSJ Bubble GUM cardstock. The bow is SU! white silk ribbon tied into a double knot (yes, I love those double knots). The wording was printed onto Whip Cream cardstock from a Word documents and cut into a banner. The heart is accented with FSJ rhinestones.

The Daisy card is below:

The base is FSJ Whip Cream with the same Whip Cream Mat mentioned in the heart description, but it was created using the FSJ Electric Lime Spash and then accenting with FSJ Sour Lemon and Orange Rave Silks. The cardstock used with the Persian die is Black Licorice. I stamped the Lovely Day Daisy in Black Licorice on Whip Cream cardstock and ran it throught the Platinum machine using the Pierced Circle dies. The double bow was created out of SU! white silk ribbon, and the sentiment was stamped onto Whip Cream and cut into a banner. The stamped images are accented with Orange Rave and Sour Lemon Silks. I LOVE those silks.

I know Julianne’s friend will love this card when she receives it.

If you would like to purchase any of these products, please click here.

Every year I host an opportunity for my stampers to make Christmas cards to give to friends and family. This year was no different. I chose three Fun Stampers Journey stamps to highlight for this Make-It opportunity. The first card was featured in a previous card challenge post. I chose the Frosty Fun ATS (Artist Trading Stamp) and coordinating die set for this card. I used a card layout I saw on YouTube by Christy Gets Crafty 2015 card tutorial. There is one difference between the previous post and this card. The blue mat to which Frosty is adhered. My FSJ Catalina Splash cardstock came in and I changed the blue mat to the Catalina Splash cardstock mat.


The second card features the Stay Wild ATS. The inspiration for this card came from another FSJ Coach, Sara Hoogendoorn. She took the Stay Wild ATS and stamped it multiple times across her neutral cardstock to create a stunning wooded landscape making sure the deer are not stamped with the second and third generation of the image. I used torn paper along with sponge daubers using FSJ inks – Cool Pool, Lavender Fusion, and Hazelnut Blend. The water and sky are lightly accented with the Silver Pan Pastel. Black Licorice twine and a silver bow are adhered in the top left corner of the card. The sentiment comes from the FSJ stamp set Holiday Script. Love This CARD!


The last card was created using the FSJ Angel Herald stamp set with the Sun Rays Die. This card is a mixture of FSJ cardstock and other cardstock I had on hand. Yes, I’m working on filling my FSJ paper gaps. The angel and words are embossed using silver embossing powder. The mat behind the die cut cardstock was created by blending Blue Lagoon and Sweet Berry Splashes with water onto an acetate sheet; then, Silver and Dark Roast silks were added to accent the mat. Love this technique!


My stampers created 15 cards with these designs (5 cards of each design). These are quick, simple cards to create. It took them on average about 3 1/2 hours to complete these projects. I hope this inspires you to Create and Share your own cards.

PAGE TOP
[dealsbar preview] Amazing Deals: !!toolbar-deal-title!! - !!toolbar-deal-merchant!!