It has been a while since I last posted a card challenge, but that will be changing soon.
I have several cards to enter into challenges and my 2016 Scrapbook Expo make-n-take
projects, workshop projects, and small but satisfying haul to post as well.

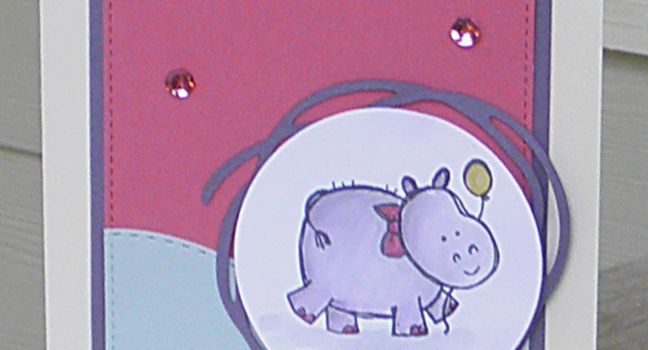
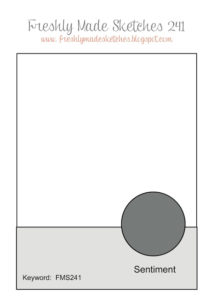
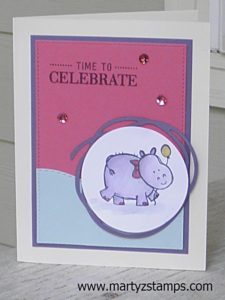
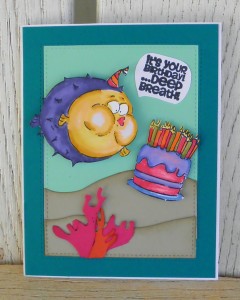
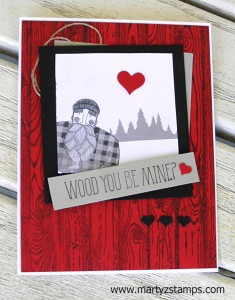
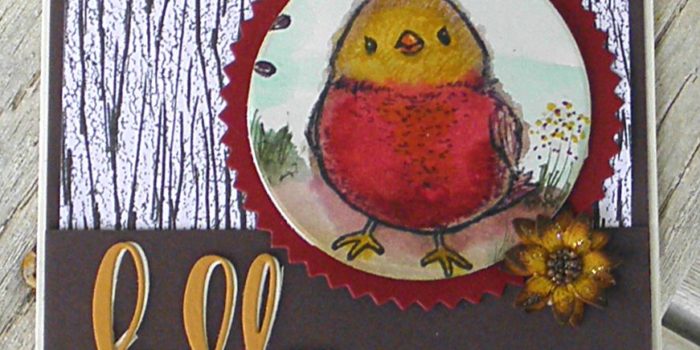
This cute little chick card began as a make-n-take card for one of my classes. I had, originally, used the new SU! square dies and placed it on a piece of Very Vanilla cardstock cut with the hexagon die. It just didn’t pop and I really didn’t like the card. So, when I saw the Freshly Made Sketches challenge #247,the light bulb came on, and I sat down and created this cute card in a matter of minutes.

FMS #247

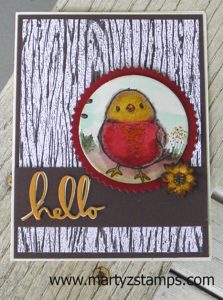
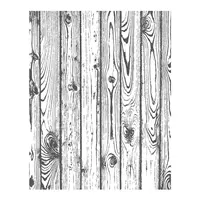
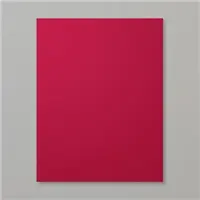
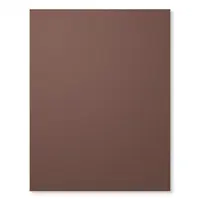
I pulled the bird off of the original card (holding my breath the whole time – you know what I mean. . . . when you don’t want something to be stuck really well to your card, it is, and this was!!!) Whew, I got it off with no damage. I cut it with SU! circle dies and matted it on Cherry Cobbler cut with SU! zig-zag circle dies. I took some retired SU! designer series paper featuring a woodgrain (reminded me of a barn) and matted it on Early Espresso SU! cardstock. I placed a strip of Early Espresso down onto the woodgrain paper and placed the hello die cut on top of it. The white showing beneath is intentional. I wanted a slight shadow behind the Hello Honey paper to make it stand out from the Early Espresson. The last item I wanted to mention was a left over sunflower from a side-step sunflower card a friend and I made (I’ll be posting it soon). It is highlighted with a little dazzling diamonds and prills for the center of the flower.

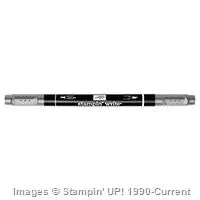
I almost forgot to mention how I created the chick. It came from the SU! stamp set Honeycomb Happiness. I stamped the chick in Staz-on Jet Black onto 140 lb watercolor paper. I watercolored the chick using re-inkers and my aqua-painter. The colors SU! re-inker colors I used were, Pool Party, Hello Honey, Cherry Cobbler, Mossy Meadow, and Soft Suede. Then I went back with a Chocolate Chip Stampin’ Write Marker and added some dimension to the bird by accenting its check with marks to create a feathery look.

This card went from blah to adorable. I hope you enjoy it!

I made this card for a business associate who gave birth prematurely. Her daughter is doing fine but will be in NCIU a few more weeks. Even though Amelia came early, I know Ashley and her family are celebrating her birth and each milestone she accomoplishes as she gets closer to being able to go home.

Freshly Made Sketches #241 card sketch was a perfect sketch to stir my imagination. The hippo from SU! Fun Pun stamp set made an absolutely adorable card for such a sweet girl.

FMS Final 241-001

I started out with SU! Whisper White as the base of the card, but it seemed a little harsh; therefore, I switched the base to SU! Very Vanilla.
I matted the card with SU! card stock Perfect Plum, Strawberry Slush, and Pool Party. I accented the mats with the stitched rectangle dies from Dienamics (love that set of dies). and the Pool Party mat’s top edge was cut using Poppy Stamp die stitched landscapes. I cut a swirly circle out of Perfect Plum card stock from SU! Swirly Scribbles dies as a mat for the cute watercolored hippo. While these are not traditional baby colors, they are muted with just enough punch to make the happy hippo shine.

For the happy hippo, I stamped it with Memento Tuxedo Ink on SU! Whisper White card stock and cut it out with a SU! circle die. I wanted to use alcohol markers but when I tried a few out they were not subtle enough (I don’t have very many to choose from). So, I went with watercoloring.
As a base for the hippo, I put a wash of color from SU! Stampin Write Markers (Smokey Slate, Basic Gray). Then, I added SU! Wisteria Wonder and a very diluted touch of Elegant Eggplant for shadowing. Tip: I scribbled a little of each marker on a plastic surface and picked up the color with an Aqua Painter. You could also use re-inkers if you don’t have any markers. I added a girlie touch of Melon Mambo straight from the marker to the toe nails and bow and colored the balloon with Daffodil Delight. I added some Wink of Stella for a little glitter effect. I stamped the sentiment from a stamp set included in the SU! Watercolor Wishes card kit and accented with some SU! sequins. Voila!

As you enjoy this card, please say a prayer for Amelia to get stronger each and every day and to give her family strength as they walk through this time of healing.

FMS#241 Amelia

Have a Great Day!

I just saw I had made one of the Top 3 for SUO Challenge #149 (click on Top 3 and see the Top 3 cards for this challenge).

Here’s a shout out to Promise Armstrong and Kayla Cansler for providing me an opportunity to create such a cute card. When Margratha (Promise’s mom) told me Kayla loved elephants, I just knew I had to make a card with them included. Congratulations!

Here’s the card:

Top 3 SUO #149

Click here to see the original post.

SUO Challenges Blog’s challenge is a card created with weddings in mind. This was the perfect timing for a card I created to a friend’s son’s engagement party.  They are both missionaries in Hong Kong. She is here preparing for their June wedding, but he is still in Hong Kong and will travel here closer to the wedding date. My friend told me her future daughter-in-law LOVED elephants. So, when I could pre-purchase the new Love You Lots SU! hostess stamp set, I didn’t hesitate to purchase it just for the elephant.

There is only one elephant in the stamp set, but I wanted two elephants kissing each other with their trunks; so, I looked up a couple of techniques on YouTube for stamping reverse images. I found one where you turn a large enough polymer stamp upside down on a block and then stamp your image onto it and then quickly stamp it onto the card stock – no successful – in fact, epic failure. I, then, saw a Jennifer McGuire tutorial where she stamped onto a sheet of acetate and then restamped onto the card stock. I tried it and I got a good enough image to work with. I did have to take a fine tip sharpie and fill in some of the outline.

I then took Basic Grey and Smokey Slate and added some shading onto the elephants. I gave a wash of color onto the elephants using an aqua painter with some Smokey Slate. I stamped the heart in Real Red from the SU! stamp set Wood You Be Mine? Then as an accent to the bottom of the page, I used a stamp from the new SU! stamp set Swirly Bird. I stamped off using Basic Grey ink. The sentiment stamp is from a SU! card kit Watercolor Wishes. The stamped portion of the card is raised with Stampin’ Dimensionals.

I think this is the perfect engagement card for elephant lovers:

SUO Challenge #149

Update to Initial Post: Last night 5/27/16, I had an email Pinterest alert for the cutest card ever. It was like mine but different. Here is the link: http://swathicrafts.co.uk/love-you-lots/pinkies-blog-hop-card-featuring-affectionately-yours-speciality-designer-series-paper/  Why didn’t I think of making the other elephant PINK!!!!! And, on top of that, she had great instructions on how to transfer the image from the acetate to the card stock. She used a bone folder to press down on the acetate to make a crisper, fuller image. I wish I had ran across this tip when I was doing my card!

Supplies:

Stamp Sets (All SU!): Love You Lots, Wood You Be Mine?, Watercolor Wishes
Inks: Basic Black, Basic Grey, Real Red, Smokey Slate
Card Stock: Whisper White
Accessories: SU! dimensionals, black Sharpie fine tip marker, SU! blocks, SU! paper trimmer

Fab Friday’s current challenge is a Color Challenge. Here are the colors:

Fab Friday 96 Color Challenge

Since Mother’s Day is just around the corner, I decided to create a Mother’s Day card using Fab Friday’s color challenge.
I chose SU! Painted Petals and SU! Perpetual Birthday Calendar to create this card. I think this unique color combination turned out well. This will definitely be a wonderful card to receive on that special day! I tried to get the best picture I could, but it does not do the card justice. I had used the hexagon metal die as a mask to add a little Hello Honey to the background and in person, it looks good. But, in the picture it looks like a dirt smudge. I added some bling

Fab Friday Color Challenge 86

Enjoy!

A friend of mine took me to a stamp store, Impressive Ideas, in Norcross, GA. It is like a candy shop. All the stamps and accessories I’ve seen used on YouTube videos and various rubber stamping websites were all in one place! I really didn’t need anything, but ……. I just couldn’t pass up the blow fish blowing out candles on a birthday cake (Art Impressions – unmounted ZooCrew Deep Breath Birthday – 4471); so, I bought it along with a few other things and then….. I went back to the Dienamics aisle and picked up two dies (the stitched rectangles and the rolling hills). There went my budget of not spending anything on stamps until I have a few more make-n-take classes. LOL

Anyway, a girl in my small group from church had a birthday the next week. I thought this would make a great card to give her from the group. I pulled out scraps to make the card along with my Blendabilities and came up with this.

OLYMPUS DIGITAL CAMERA

Jess’ Birthday Card

Enjoy!

Last year I had a technique class featuring the Bendi Card fold featuring a birthday card (I guess I didn’t post that card – will do so soon and link up). It was such a fun card technique, I decided to use it for a Valentine’s Day card. I used the Bloomin’ Hearts thinlit dies to create a fun and stunning Valentine’s Day card.

Bendi Valentine's Day Card

This card will unhook and lay flat for easy mailing. The dimensions I used on this card would not allow it to fit into a 5 1/2 x 5 1/2 envelope, but I adjusted the measurements for the one we did in class and it fit quite well in the envelope. Of course, you would want to put a little padding to keep everything intact during the mailing process.

Supplies: love and you thinlits, x-acto knife (not pictured)


I haven’t posted anything since before Christmas. A lot has happened between then and now. My sister had a major stroke just before Christmas. She actually died, but thanks to the paramedics who resuscitated her she is doing well with some loss of use to her left arm. She stayed with me while she recuperated and she is now back at her home.

I did keep up with my make-n-take classes during January and the most recent class was a Valentine’s make-n-take class last week. The first class sample card I completed was inspired from Connie Collins’ Global Design card challenge entry (see here. . . .). I had the new SU! Love Blossoms paper pack but I had used a lot of it for a technique class (I’ll post that card next) and knew I didn’t have enough full sheets for a background left. This use of scraps from the Love Blossoms paper pack worked well. I took the coordinating Bloomin’ Hearts thinlit die and cut a lacey heart out of Rose Red card stock and placed a Very Vanilla cut out heart behind it to make the heart stand out from the rest of the busy background.  I used retired SU! Well Scripted set for the word phrase “Love You Much”, which was embossed using silver embossing powder. The flower blossoms were die cut out of the Love Blossoms paper and accented with clear rhinestones.


LoveYouMuch 2016


I made another card using some scraps from SU! Stacked With Love paper pack along with the Love Blossoms paper pack and I think it turned out well too.

Valentine 2016


The other card I’m featuring uses last year’s featured SU! stamp set Wood You Be Mine (it was inspired by Cindy Shuster’s card – see here. . . )? I LOVE the lumberjack from this stamp set. I used the Hardwood background stamp with Basic Gray on Real Red card stock. I then layered a Basic Black mat with the stamped image with a hint of Sahara Sand showing from behind accented with some linen thread. I wanted to make the card look like a balck and white photo with the red heart signifying “love.” I used Smoky Slate for the shirt and Smoky Slate and Basic Gray Stampin’ Write markers to accent the lumberjack. The Wood You Be Mine? tag was stamped on Sahara Sand using Basic Gray. And, some tiny Basic Black hearts were placed at the bottom to balance the card using the Confetti Hearts border punch. Love this Card!


Wood You Be Mine 2016


I made another card very similar to this one, but as a shaker card.

WoodYouBeMineShaker 2016

Supplies Used for Bloomin Hearts cards: retired SU! Well Scripted (not pictured)


Supply List

Built for Free Using:My Stampin Blog

Supplies for Wood You Be Mine Cards: basic gray stampin’ write marker, acetate and foam tape (not pictured)

Supply List

Built for Free Using: My Stampin Blog

This is the third and final card I entered on the SUO Challenge #136. See previous posts for Card 1 and Card 2.


This is one of three cards my stamping group will be making at the next make-n-take. It is based on an October challenge card (see below). The card I created in October was going to be one of the make-n-take cards, but I felt it was just too big and used up too much paper (a little worried I wouldn’t have enough similar paper for everyone). I decided; if I could make a double window, I, certainly, could make a six-paned window using the Hearth and Home thinlit, and I was successful. Just make sure you hold the plates as they come out the other side of the Big Shot, because they are quite the projectile. I could see someone busting a window to bits or knocking somone in the head. I wanted to keep the sleigh ride scene from the original card; so, I carefully pulled apart the original card, cut down the window scene, made a new window, adhered the dimensionals, added the glitter, and then . . . . What a nightmare! I made the shaker card based off of a shaker card tutorial on YouTube. Note to self: DO NOT place the window on the table, put the glitter on the window sheet and then place the card upside-down onto the window. Ha! It wasn’t exactly where I wanted it, and well, you know, when you try to reposition something with dimensionals you are asking for a mess; especially, if glitter is involved. Needless to say, the glitter got on the adhesive part of the dimensionals and made it not adhere well; therefore, when the card was shaken, glitter filtered out the sides of the window. We certianly, DON’T want glitter snow in our house. So, if you make this card, be advised, put the card on the table, put the glitter on the card, and then place the window where it needs to be and DON’T put too much glitter either. I’m sure you can’t see the miniscule amount of glitter in this card, but there is still some left. And, no, I didn’t want to remake the card. No, no, no! I was so frustrated by the time I got it right, I wanted to pull my hair out. My friend, Cheyenne was over here making her card with me, and she had a good laugh at my expense. (Note: make sure to rub the embossing buddy on the side of the window sheet that will make contact with the glitter to get rid of the static electricity.)

Anywhoo, we felt the card needed a little bling. We took the wreath framelit from the Festive Fireplace set and cut out wreaths in silver glimmer paper; then, cut them in half to make boughs. We added EVEN MORE bling by making lights for me and berries for Cheyenne on the boughs with Cherry Cobbler Dazzling Details. Real Red bows accent each bough. The bottom of the card looked so stark when we finished, I added joy in Cherry Cobbler cardstock from a retired SU! die (it’s really old).

And least I forget, the scene was made on Whisper White paper. I cut a circle out of copy paper and placed it on the background piece of cardstock. I sponged Coastal Cabana and Midnight Muse to create the night sky. The trees are from the SU! Wonderland set stamped in Midnight Muse. The sleigh thinlit was used for the sleigh rider and horse, cut in Whisper White cardstock. The background mats are Night of Navy and Whisper White, with the Whisper White embossed with the Stripes folder.


PCCCS165October Card

I think the revised version of the first card is much more to my liking. Either way, I really love this card.

Supplies: SU! retired Joy die. Note – it looks like Midnight Muse ink is not available, you can substitute Night of Navy (I listed it in the supplies).


Price: $110.00

Supply List

Built for Free Using: My Stampin Blog

If you read the first post for the first card I entered for the SUO Challenge #136, you will recognize this is the second entry based on the title of the blog. Sometimes, I come up with original ideas for my Christmas make-n-takes and sometimes I use Pinterest when my brain just can’t be creative anymore. This is an original card based on many cards on Pinterest. There’s not too many ways you can have a fireplace with stockings on a card other than changing the color scheme. This is my favorite card out of all seven designs offered at my make-n-takes.


Again, if you read my first post, you can see Cherry Cobbler is a central focus of this card as it is one of my favorite SU! colors. I think the Crumb Cake wainscoat really sets the card up to make the fireplace/mantel really pop. Since you can’t hold this card in your hand and see all of the 3D detail, I’ll give you the run down on what is popped and what is not. Everything has dimensionals on it except the background mats, the inside of the fireplace and the bow on the wreath. I used SU! Festive Fireplace Photopolymer Bundle to make this card. I stamped the fireplace with Staz-on black ink onto Cherry Cobbler and went back through with Whisper White and Pretty in Pink Craft inks to highlight the bricks (I used a q-tip). I cut the center of the fireplace out and placed a piece of Basic Gray in the opening (I think it makes the flames stand out). The flames are watercolored and the logs are stamped onto Chocolate Chip paper with some watercolor shading. The stockings were colored with Stampin’ Write Markers. The wreath was stamped using Mossy Meadow on Pear Pizzaz (I think – better double-check that before my class this Saturday or I used Garden Green ink) and has a splash of glitz using the Cherry Cobbler Dazzling Details from SU! The cat was stamped on Smoky Slate and sponged with Basic Gray. I love the cat, It makes me think of my friend Cindy Hilton and her love for ALL things cats. I did use the framelits to cut out the fireplace, mantle, and cat, but I didn’t like having a “huge” border; so, I either trimmed all the way down to the stamped line or trimmed very close to the stamped image. I can’t forget to mention the top background mat of Cherry Cobbler is stamped with the SU! retired background stamp Netting; it just gives the top part of the card a little depth. The bottom background of Crumb Cake was embossed using the SU! Stripes embossing folder.

Well, I think the above description of how I made the card sums it up. Love it!

Supplies: Note – to make a pink craft ink combine a drop of Cherry Cobbler reinker to a spoon size amount of Whisper White Craft re-inker and blend – adjust as necessary to get desired color.
SU! reitred background stamp Netting


Price: $110.00

Supply List

Built for Free Using: My Stampin Blog

PAGE TOP
[dealsbar preview] Amazing Deals: !!toolbar-deal-title!! - !!toolbar-deal-merchant!!