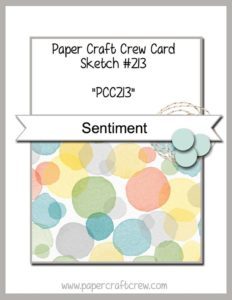
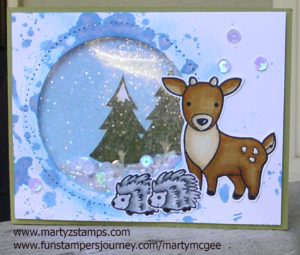
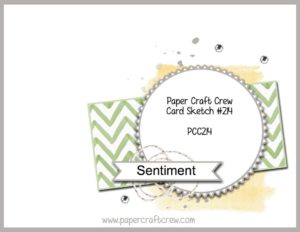
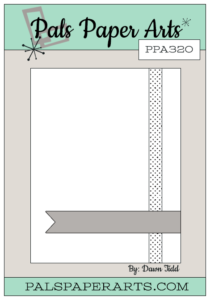
When I saw Paper Craft Crew sketch challenge, I was super excited because I had the perfect card to enter. I have been so busy I would have missed the deadline but PCC extended their usual one week deadline to two weeks. Woo hoo! This is their card sketch:

13925327_10209951237435388_6685491755259514637_n

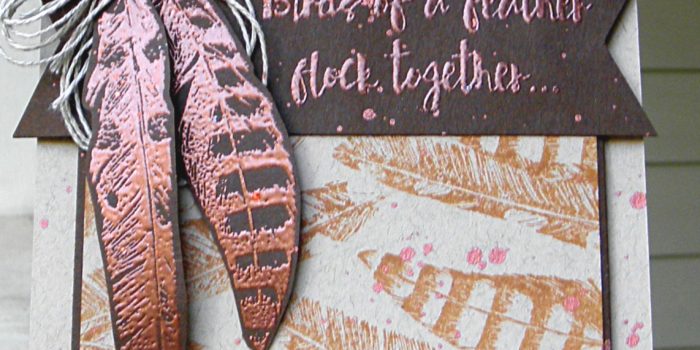
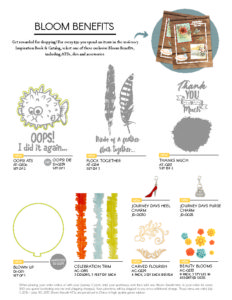
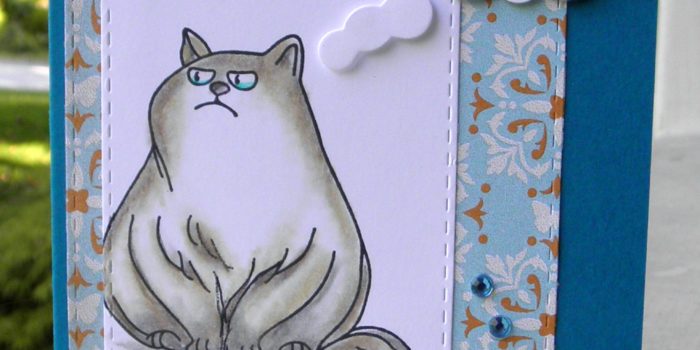
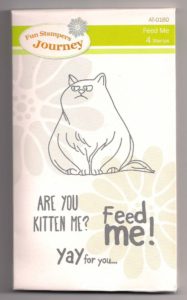
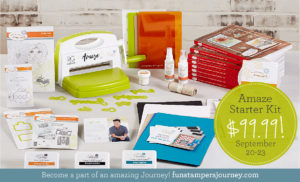
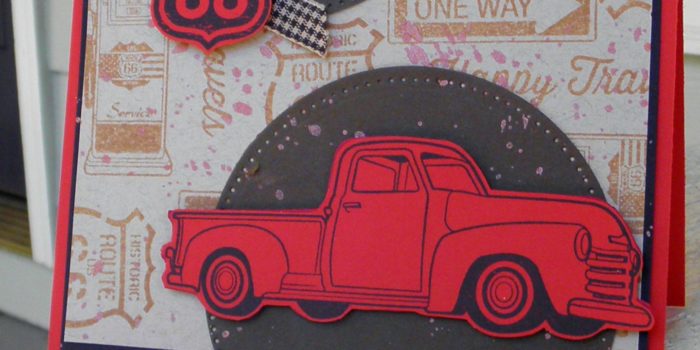
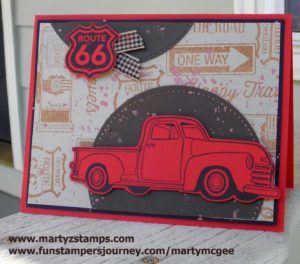
When you order a starter kit with Fun Stampers Journey, you choose three stamp sets and one ATS (Artist Trading Stamp). For one of my three regular stamps, I chose Hit The Road. My group of stampers are always in need of masculine cards, and this set fit the bill. I stamped the truck and road sign in Black Licorice ink onto Candy Apple card stock and fussy cut them out.  The road signs on the Oatmeal Cookie mat are stamped in Pumpkin Bread ink. The stitched partial circle was cut using the Journey Platinum Machine with the Journey Circle dies from Hazelnut card stock (I cut off part of the bottom circle once it was mounted to the Oatmeal Cookie mat and placed the leftover piece at the top of the mat). Before I added the truck, sign, and ribbon, I sprinkled some Bronze Silk onto my mat.  I popped the truck and sign up using small and medium Journey Foam Squares, and I added an accent of gingham cocoa ribbon to the sign with a glue dot.  I matted the Oatmeal Cookie mat onto a Black Licorice mat and then adhered these mats to the Candy Apple base. This card is perfect for a masculine birthday, thank you, get well, etc. I think the truck and sign really make the card pop.

PCC214

Supplies:

Fun Stampers Journey: (You can order any of the listed supplies to create your own Hit The Road card – click here)

Cardstock: CS-0007 Candy Apple, CS-0013 Hazelnut, CS-0023 Oatmeal Cookie, CS-0003 Black Licorice
Inks: IP0044 – Black Licorice, IP-0057 Pumpkin Bread, IP-0091 Bronze Silk
Dies: DI-0039 Journey Circles (these are a group of circles with stitched and plain circle)
Embellishments: AC-080 Gingham Cocoa Ribbon, AD-0084 Small Foam Squares, AD-00875 Medium Foam Squares

I received my Bloom Box last week and my Bloom Box group met Sunday afternoon to complete the kit. We had a great time creating some amazing cards. I love the stamp set and the color palette from this month’s Bloom Box. We used my NEW Color Burst Pencils with a little bit of Fusion Blender solution to make our images dazzle and pop! I am an avid RPG gamer, and know that many times elves and fairies are created in different skin tones. So, I colored my fairies with varying skin tones. Here is my first fairy:

Lila, the house fairy. House fairies have skin tones similar to humans ranging from light to dark skin tones. Their hair is usually a brilliant hue, which is often seen out of the corner of ones’ eye. But, before a closer inspection can be made, they have flitted off to a secret place where no one can find them. They are responsible for moving reading glasses, pens, pencils, keys, important documents causing the home’s occupants to feel they are becoming quite senile.

Our next fairy is a Woodland Fairy:

Heather Moss lives among the deepest parts of the forest. She is friends with all of the forest’s wildlife and many times helps them escape the traps and snares of hunters and poachers. It is extremely rare to see a Forest Fairy because they blend so well with their surroundings. All Forest Fairies can change their skin color to match the seasons. Heather Moss is shown during the summer season, but when fall arrives, she will change from green to an amber orange, and then she will become a light to dark brown during the winter so she can blend in with the tree trunks and branches strown through the forest. When spring arrives she will become a light green and transition into a dark green again for summer. This is one fairy you do not want to cross. They can have a very mean temperament and do not like humans in general.

The next fairy is a Water Fairy:

Water fairies like Crystal, love to race each other while riding the backs of frogs. The winner receives a laurel of water lilies held together by tangled vines. They love to tease fish by luring insects close to the water’s surface, making the fish think an easy meal is to be had; then, they chase the insect away right before the fish jumps from the water trying to enjoy a meal in one easy gulp. These fairies range in various shades of blue, and their skin shimmers like the scales on a fish. They are beautiful to behold, but rarely ever seen. These fairies are indifferent to humans, but like all fairies remain unseen by choice.

The last card is a Mountain Fairy:

Shard like all Mountain Fairies are found at the highest of altitudes. They prefer the starkness of these environs to warmer climates. They are gray which allows them to blend in with snow and rocky mountains. These fairies are the hardiest of all the fairies and are called upon as warriors when any fairy kingdom is threatened. These fairies are the easiest to glimpse, because where they live very few humans dare to tread. Sometimes they hover in plan view in astonishment as to why humans would want to venture into the bleakest and dangerous of environments. They are only vicious when trying to be entrapped and can inflict great physical damage to an unsuspecting human.

It is not too late to order October’s Bloom Box. They are available until the end of the month. Click here to order yours! The Bloom Box card kits require a six month commitment, but I can say, I have not been disappointed and my Bloom Box crafters look forward to each box arriving in the mail! I will be making some of my own layouts soon!

Supplies: Fun Stampers Journey October Bloom Box

I can hardly wait for this month’s Bloom Box. It’s all about fairies. How adorable! September’s Bloom Box was my first Bloom Box, and I didn’t know what to expect. I was delighted with the stamp set, pre-cut card packs, and detailed in-color instruction booklet. My Bloom Box girls meet together to enjoy making the cards together, and we are counting down the days until we have October’s Bloom Box in our hands. Here is October’s Bloom Box:

octoberbloombox

The Bloom Box is::

SIMPLE: Each month enjoy an exclusive red rubber stamp set, pre-cut elements, coordinating embellishments and step-by-step instructions.

FAST: Create 4 eye-catching, unique greeting cards using the supplies we’ve provided. Just add your inks and a few tools, and you’re ready to go!

FUN: Share your creations with friends and family, give a set as a gift, or keep in your personal inspiration library. Better yet, use it to host your own crafting party!

If you would like to order a Bloom Box, please click here to be directed to my Fun Stampers Journey website.

I recently purchased the Fun Stampers Journey (FSJ) Artsy Leaves out of their mini-Trend Catalog (it has since retired as of September 30th). Even though I knew it would not be a stamp set I could demo at parties, I still wanted it. I LOVE the whole collection and it came with a die set that I purchased as well. When I saw the Pals Paper Arts Card Sketch Challenge #320, I thought this set would make a perfect background stamped card with a Thank You sentiment.

ppa-320-sep29I stamped the leaves using FSJ Black Licorice ink. This ink is very versatile. It is a “true” black ink, it doesn’t smear (it’s dry in about 30 seconds), you can use watercolor mediums with it, and it can be used on plastic, glass, etc (some surfaces require the ink to be set with a heat using a heat gun.
I colored the leaves using FSJ Color Burst Pencils. These pencils do not require Gamsol to blend them together; they are infused with oil to make blending without a liquid medium easy. You can purchase blending stubs from FSJ and dry blend them, but I didn’t use the stubs on this project. I outlined each leave with a light blue pencil to make them pop. I used FSJ – Whipped Cream as the base and matted the leaves on FSJ – Black Licorice and FSJ – Deep Lilace cardstocks. The stips of paper accents are in FSJ – Deep Lilac and FSJ – Black Licorice as well. I highlighted the sentiment with FSJ – Twine and stamped the sentiment from one of the Bloom Benefit ATS – Thanks Much. I stamped the “Thank You” in FSJ – Candy Apple Fusion Ink and fussy cut only the “Thank You” out of the full image. The “Thank You” is popped up on dimensionals.

PPA320Supplies:
FSJ – Whipped Cream, Black Licorice, and Deep Lilace cardstocks, Black Licorice and Candy Apple Fusion Inks, Color Burst pencils, twine, dimensionals, liquid glue, white liner tape, and glue dots.

All my close friends know I have transitioned over to Fun Stampers Journey (FSJ) this past September. One of the amazing benefits of purchasing through FSJ are their Bloom Benefits. For every $50 spent, you will receive a Bloom Benefit FREE! This includes ATS (Artist Trading Stamps) as well as dies and embellishments. I have attached a flyer showcasing some of the Bloom Benefits (there are Bloom Benefits in the main catalog as well as the mini-Trends catalogs):

thumbnail of bloom-benefitsv2

I have all the ATS Bloom Benefits from the 2016-2017 catalog. When I saw Paper Craft Crew Card Sketch #213, I knew the Flock Together ATS from the Bloom Benefits would make a perfect card for this sketch.

pcccs213

I used what I had from my FSJ starter Kit and my first order, which is very limited. For the base of my card and the mat I stamped on, I used FSJ – Oatmeal cardstock and matted the stamped portion onto FSJ – Dark Roast cardstock. I used the FSJ – Dark Roast cardstock for the banner and base of the embossed feathers. I stamped the feathers and sentiment in Versa-Mark and embossed with SU! copper embossing powder. I stamped the feathers in FSJ – Pumpkin Bread fusion ink onto the Oatmeal cardstock.  I fussy cut the embossed feathers. I adhered everything together using FSJ – white liner tape and a glue dot. I then added FSJ – twine and sprinkled the Bronze silk onto the card to give it that extra pop. The matted portion of the card is raised with SU! dimensional.

Flock Together

FSJ – Flock Together

Supplies:

Fun Stampers Journey – Oatmeal cardstock, Dark Roast cardstock, Twine, Pumpkin Bread Fusion Ink, Bronze Silk
Stampin’ Up! – Copper Embossing Powder, dimensionals

This past weekend my friends Cheyenne, Mary, Karen, and I attending the Stamp Scrap Art Tour Show’s Make-n-Take at the Gwinnett Infinite Energy Center. It’s like Scrapbook Expo, but different, and we had a great time. Every one of us won a door prize during the make-n-take. I can’t remember what Mary and Karen won, but Cheyenne won a stamp set from Darcie and I won something from the Fun Stampers Journey make-n-take table! I was thrilled. I chose a retired ATS (Artist Trading Stamp) called Feed Me. Here it is:

catalina

It reminded me of my friend, Kevin’s, cat named Catalina. Catalina can be quite the diva.

Saturday and Sunday were shopping days at the show. They had quite a few door prizes. Cheyenne was one of the first to win a door prize and she got $100.00 to spend in “show bucks.” Of course, her dear friend, that would be me, was right there with her helping to spend every last dollar of her prize. LOL  Here we are right after she got her show bucks:

show-bucks

I, also, helped her select various items from the Heartfelt Creations booth. I will be posting our creations we make sometime in the future from those purchases. The best part is she let me pick out a die that went with one of the free stamp sets I received this past July at the Scrapbook Expo. Yay, me! The Darcie booth had the most incredible stamps and shrinky dink supplies. That’s where the show bucks went. You will be seeing those creations soon.

Once we got home, I said let’s make something really quick and use my new Fun Stampers Journey Color Burst pencils. We decided on the cat, and we pulled together a card in about 40 minutes (that’s pretty quick for us). It turned out to be so cute! I can just see Catalina thinking/saying this to Kevin.

You do not need any gamsol or other medium to create a blended image with FSJ Color Burst Pencils. You only need blending stumps. I added a few rhinestones I purchased from Cre8tiveArtz at the Scrapbook Expo. I used a die we purchased from Pink and Main for the stamped image and the DSP mat.  Because we attended the make-n-take, we could purchase the die set (stitched rectangles with rounded corners) for $10; regular price during the show was $20. The die was a GREAT deal! Cheyenne purchased a scarecrow stamp set with coordinating die the next day. It is soooo cute. I will post our creation when we have time to make it.

Supplies:
Stamp – FSJ retired ATS Feed Me
Cardstock – FSJ base (I don’t know all the names yet), FSJ Whipped Cream, SU! DSP paper
Dies – Pink and Main rectangle stitched (rounded corners), SU! Word Play
Inks – FSJ Black Licorice
Color – FSJ Color Burst Pencils
Accessories – FSJ blending stumps, Journey Platinum Die Machine, rhinestones, FSJ white liner tape adhesive


At the end of last month, my cousin, Barbara Helms, celebrated her 40th birthday (her birthday is actually in September). I couldn’t make it to the celebration, but I sent her this card, which was a total CASE from K Werner Designs on YouTube. My friend and cohort, Cheyenne Luken, purchased Lawn Fawn’s So Smooth stamp set, and we went about making a shaker card. We both had to start over from scratch (note here: do not use alcohol markers to blacken the edge of cut cardstock – it bleeds).

Anyway, we completed the card and I thought it was the perfect card to send to my cousin. As many of you know, I don’t send cards, I hoard them. I am trying to get better about this. Here is the card we made and I sent to Barbara:

Supplies: Lawn Fawn So Smooth stamp set
Ink: Memento Ink
Markers: Spectrum Noir Alcohol Markers
Cardstock: SU! Whisper White, the mat is from a designer paper stack Cheyenne bought (don’t know the name), Acetate
Die: Lawn Fawn crosstitched rectangle die
Sequins: Pink sequins from Cre8tiveartz
Adhesive: Insulation Foam Tape

Fun Stampers Journey provides a monthly card kit called the Bloom Box. Since I am new to the Fun Stampers Journey (FSJ) products, I decided to sign up for their Bloom Box card kit. I knew it was a six-month commitment, but after looking at the past Bloom Boxes, I knew this would be a commitment I wouldn’t regret (click here to see past Bloom Boxes). I had one other friend sign-up for this kit. We received our Bloom Boxes on the same day, and we scheduled a day to get together to complete our cards. You might be asking what is the cost and what is included in the Bloom Box. It includes a full stamp set valued at $16-18, pre-cut cardstock and accessories to complete four cards. You use your own ink, scissors, and adhesives. If you live close to Buford, GA, my Bloom Box crafters get together to complete our kits and I provide the ink and other tools you might need. You bring scissors and adhesives.

If any of you know me well, I can’t just follow directions, I have to make my cards unique to my style. That being said. I will post the Bloom Box card example and I will post what we created beside it. I did not have all the FSJ inks, silks, or color splashes, but we were able to use what we had to make some amazingly cute cards. By the way, I will have some silks and splashes by the time we get together for the next Bloom Box.

Here is card number one:

FSJ Sept Bloom Box Card 1

FSJ Sept Bloom Box Card 1

On our card, we kept the sentiment on one line, and we added Journey Glaze to the deer and hedgehog/porcupine. We watercolored the deer and hedgehog using re-inkers.

Bloom Box Card 1 - Marty

Bloom Box Card 1 – Marty

Card Two:

FSJ Sept Bloom Box Card 2

FSJ Sept Bloom Box Card 2

We both wondered why the owl was just hanging in mid-air. It wasn’t like his wings were out indicating flight; so, we took away the owl, added the round-top tree, and changed the sentiment by wording and placing it on a banner tag and clipping to the top left hand corner to balance out the card. We colored the deer using SU! Stampin’ Write markers.

Bloom Box Sept - Marty

Bloom Box Sept – Marty

Card 3:

FSJ Sept Bloom Box Card 3

FSJ Sept Bloom Box Card 3

This card we only added two owls sitting together on more green branches. I guess I’m a little OCD about random things and I just kept wondering why the owls would be flipping through the air (o.k. I can be whimsical, but sometimes I just can’t). We colored these with SU! Stampin’ Write markers. Here is our version. My friend thought this would make a great anniversary card.

FSJ Sept Bloom Box - Marty

FSJ Sept Bloom Box – Marty

Card 4:

FSJ Sept Bloom Box

FSJ Sept Bloom Box

This one we didn’t change anything because I had an appointment to be somewhere; therefore, no extra time to change-up the card.

FSJ Sept Bloom Box - Marty

FSJ Sept Bloom Box – Marty

Extra Card: Before I received my Bloom Box, I came up with this design, and we made this card first when we got together. We used our Spectrum Noir markers to color the animals. It turned out great. I will be ordering a word stamp with coordinating die to make this a Christmas card. I will post an updated picture when this comes in and I have added it to the card.

FSJ Bloom Box Additional Card

FSJ Bloom Box Additional Card

We both LOVE the Bloom Box, and we can’t wait for our October Bloom Box to get to us. If anyone is interested in the Bloom Box, please click here to go to my website and sign up to receive a Bloom Box kit for the next six months. If you are local, we will get together to make the cards. For an additional $3, I will provide two additional designs with prepared cardstock for you to create two more amazing cards. If you are out-of-town, you will love putting this kit together. The kit includes step-by-step instructions with colored pictures. I can mail you the additional pre-cut cards and email you pictures and directions to put it together for $6.00 this includes additional instructions and postage.

When I purchased my Spectrum Noir alcohol markers, I sent out an email letting my group of stampers know I would be providing classes on how to use these wonderful markers. The only requirement was they needed to purchase their own markers to use in class. I had four ladies sign up, and they went ahead and purchased all 168 markers through Consumer Crafts (they have the BEST price on these markers AND they offer 25% site wide regularly – just saying). We have had two classes so far, and I wanted to give a quick update about the progress of our Spectrum Noir alcohol marker colorist group has made as of this past week.

Note: These are NOT Copic markers and quite frankly, some of the YouTube reviews and compairsons do not do the Spectrum Noir Alcohol Markers justice. These markers fit into their own category; they are versatile; produce a great colored image; they are VERY affordable; and if you will watch the Spectrum Noir – Crafter’s Companion tutorials, you will have great success and produce outstanding papercraft projects. That being said, you can find Accreditation Coloring Download at www.spectrumnoir.com .  You can print this off on an inkjet printer and follow along with their YouTube tutorials to learn, to practice, and to turn in to them to receive accreditation as a colorist.

My first class was learning some of the basics. We covered Smooth Coloring, Basic Blending, Palette Blending, Dimension, Layers, and Florals. The class had a GREAT time and came away with a lot of hands-on practice (we colored two images).  Here are the two sheets we have completed so far (note: the second class was skin coloring; therefore, the skin on the girl is colored in on the second sheet):

I found it very hard to get a good picture. The heart on the first sheet is a deep purple color and in “real” life, you can see this clearly.


The second class focused on skin tones. I researched Spectrum Noir recipes for skin color on Pinterest and I took those color combinations and either used them, tweaked them, or came up with my own. The cost for classes two and three (skin and hair coloring) included a Fun Stampers Journey stamp called Media Artist (see below).

This image of the girl is a fantastic stamp to practice color combinations for skin and hair. I stamped six images of the girl onto Fun Stamper Journey Whipped Cream cardstock. Note: The quality of paper is important when using any alcohol markers. A lower quality product will increase bleeding of your ink color into areas you don’t want to be colored. Stampin’ Up! Whisper White is a great cardstock to use as well. You can also purchase specialty paper through Consumer Crafts for alcohol marker coloring.

We completed our skin tones, and we all made a few mistakes (that includes me). On my #6 girl, I used the wrong base color (I switched my colors) and she was so dark that her nose couldn’t be seen. I was able to correct this with the blender pen chisel tip and going over and over the image until I pushed some color through the cardstock to lighten up the image. You can tell because the coloring is a little mottled. I found that some of the lighter colors in the combo I chose could pull color out (acting like the blender) instead of creating a smooth blend. You will be able to see this in the next picture. But, that’s o.k. because we are all new to this type of coloring and there is always a learning curve when you learn something new.  I will be gong back and stamping more images and honing my skin coloring techniques to share with my group of colorists. Our next class will feature hair coloring. The image below has the hair colored because I decided to play around after class to see what I could come up with. These are not perfect hair colors, but I just felt the girl’s looked a little naked without hair color. Here is the sheet from class:

Once these classes are finished, our group should be able to scan and upload our accreditation pages to Spectrum Noir and receive their stamp of approval. I will, then, develop YouTube tutorials on how to color with the Spectrum Noir alcohol markers. I hope you decide to look into Spectrum Noir alcohol markers and begin to create outstanding colored papercraft projects.

I have some super exciting news! I have made a move over to Fun Stamper’s Journey and I am, now, a Journey Coach. You can check out my website www.funstampersjourney.com/martymcgee . I have been considering this move for over a year. I think I have watched every video on YouTube of other coaches and Richard Garay and his team creating simply amazing papercraft projects. I just received my starter kit last week, and I have tried out their paper, inks, and stamps and I must say, I’m super impressed with the quality, designs, and on-trend products they provide the papercrafting community.

One of their best products for beginning and experienced crafters is their Bloom Box .

septemberbloombox

This card kit is $24.95 with a six-month commitment (this does not include shipping and tax). It includes a stamp set valued at $16-18. All the paper supplies to create 4 card projects along with a color instruction booklet giving step-by-step instructions with pictures. You supply the tools, inks, and adhesives. If you live close to me, my Bloom Box crafters meet once a month and use my inks and additional supplies (you bring your basic tools and adhesive). This is a great time together creating simply adorable cards.

September 22nd, 23rd, and the month of October features a $99.00 starter kit (note the Amaze machine (this is their new smaller machine that is being officially introduced in October). Click on the picture below to be redirected to my website with the details.

amaze-starter-kit-9-20-23

I purchased the Blooming Platinum, which includes the FSJ Platinum Machine (this die cutting machine will hold 8 1/2 x 11 cardstock).

bloomingplatinumgrid1-2edit-469384f9642d009b59b2ae4f5ff79261

There is still time to get in on the September Promotion. Fun Stampers Journey is offering their Essential Tools at a 20% discount. This is a great time to invest in their Bloom Tool, adhesive, totes, scissors, and other necessary tools to create amazing projects. Here is the flyer link (click on the picture):

Catalog Banner

If you have any questions about Fun Stampers Journey, please let me know. Thanks! – MartyZ

PAGE TOP
[dealsbar preview] Amazing Deals: !!toolbar-deal-title!! - !!toolbar-deal-merchant!!