Tag : glitter

2 posts

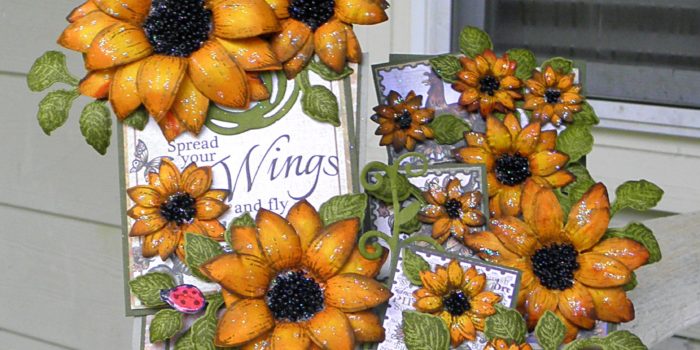
After seeing this past TGIF challenge winner, Bronwyn Eastley’s fancy fold card, I decided to CASE her card and create my own fancy fold card for TGIF #66 Case Your Fave challenge. If you have been keeping up with my previous posts, I attended Scrapbook Expo 2016 held in Duluth, GA. I fell in love with the Heartfelt Creation flowers, dies, and paper stacks. My fiend Cheyenne and I created a side-step card initially featured in Heartfelt Creations gallery but with a few changes (here’s the artist’s post here). We love Marisa Job’s designs! This side-step card creates a unique blend of 3D flowers in a 3D card. I LOVE this card!

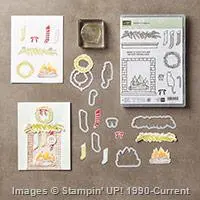
Before I post the picture, I should say this was an all day project. Cheyenne had just purchased the stamps, dies, and paper to create sunflower cards and since we do not have a lot of practice flower shaping, it was a long arduous task but very satisfying. We first stamped our flowers on SU! So Saffron cardstock in SU! Soft Suede ink. I sponge daubed my flowers with SU! Hello Honey in the center of each petal and in the center of the flower. I then sponge daubed the edges and the outer portion of the flower center with Tim Holtz Spiced Marmalade distress ink. The leaves were stamped with SU! Old Olive ink onto SU! Old Olive cardstock. We shaped the flowers and leaves and set them aside to create the card base. We used SU! Crumb Cake cardstock with Heartfelt Creations Sunflower paper matted on SU! Mossy Meadow cardstock. We cut out some Old Olive from the SU! Swirly Bird dies and a Sizzix die Cheyenne picked up from Hobby Lobby. This was one of the design changes due to neither of us having the corresponding die to match their gallery pic. Once the base was created, I added black beads from Hobby Lobby in the center of my flowers and glitter to my flowers. Note: Add glitter first to your flowers, because the beads held the excess glitter and I had to add extra beads to cover the shine. I placed my flowers on my card and adhered everything together. Now, this sounds very straight forward, but . . . . . Cheyenne and I both are perfectionists to a certain degree, and we just weren’t satisfied with the balance of flowers on our cards. We pulled flowers off and re-adhered them many times until we were satisfied. This was not an easy thing to do because Heartfelt Creations glue is a very strong adhesive. I, also, had to pull the large bottom flower off and move it down so the sentiment was not covered up. Here’s another tip: If you decided to watch a YouTube video to created a specialized fold card, make sure to watch it all the way through. We were following along with the video, when the woman creating the tutorial said she messed up. What!!!!???? She didn’t edit that part out or add text prior to the goof? We had to cut more paper and start over. Sweet Shananigans!

#tgifc66

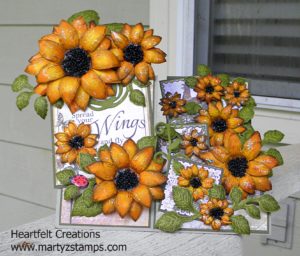
I can’t wait to create more 3D projects using flower shaping!

This is the third and final card I entered on the SUO Challenge #136. See previous posts for Card 1 and Card 2.


This is one of three cards my stamping group will be making at the next make-n-take. It is based on an October challenge card (see below). The card I created in October was going to be one of the make-n-take cards, but I felt it was just too big and used up too much paper (a little worried I wouldn’t have enough similar paper for everyone). I decided; if I could make a double window, I, certainly, could make a six-paned window using the Hearth and Home thinlit, and I was successful. Just make sure you hold the plates as they come out the other side of the Big Shot, because they are quite the projectile. I could see someone busting a window to bits or knocking somone in the head. I wanted to keep the sleigh ride scene from the original card; so, I carefully pulled apart the original card, cut down the window scene, made a new window, adhered the dimensionals, added the glitter, and then . . . . What a nightmare! I made the shaker card based off of a shaker card tutorial on YouTube. Note to self: DO NOT place the window on the table, put the glitter on the window sheet and then place the card upside-down onto the window. Ha! It wasn’t exactly where I wanted it, and well, you know, when you try to reposition something with dimensionals you are asking for a mess; especially, if glitter is involved. Needless to say, the glitter got on the adhesive part of the dimensionals and made it not adhere well; therefore, when the card was shaken, glitter filtered out the sides of the window. We certianly, DON’T want glitter snow in our house. So, if you make this card, be advised, put the card on the table, put the glitter on the card, and then place the window where it needs to be and DON’T put too much glitter either. I’m sure you can’t see the miniscule amount of glitter in this card, but there is still some left. And, no, I didn’t want to remake the card. No, no, no! I was so frustrated by the time I got it right, I wanted to pull my hair out. My friend, Cheyenne was over here making her card with me, and she had a good laugh at my expense. (Note: make sure to rub the embossing buddy on the side of the window sheet that will make contact with the glitter to get rid of the static electricity.)

Anywhoo, we felt the card needed a little bling. We took the wreath framelit from the Festive Fireplace set and cut out wreaths in silver glimmer paper; then, cut them in half to make boughs. We added EVEN MORE bling by making lights for me and berries for Cheyenne on the boughs with Cherry Cobbler Dazzling Details. Real Red bows accent each bough. The bottom of the card looked so stark when we finished, I added joy in Cherry Cobbler cardstock from a retired SU! die (it’s really old).

And least I forget, the scene was made on Whisper White paper. I cut a circle out of copy paper and placed it on the background piece of cardstock. I sponged Coastal Cabana and Midnight Muse to create the night sky. The trees are from the SU! Wonderland set stamped in Midnight Muse. The sleigh thinlit was used for the sleigh rider and horse, cut in Whisper White cardstock. The background mats are Night of Navy and Whisper White, with the Whisper White embossed with the Stripes folder.


PCCCS165October Card

I think the revised version of the first card is much more to my liking. Either way, I really love this card.

Supplies: SU! retired Joy die. Note – it looks like Midnight Muse ink is not available, you can substitute Night of Navy (I listed it in the supplies).


Price: $110.00

Supply List

Built for Free Using: My Stampin Blog

PAGE TOP
[dealsbar preview] Amazing Deals: !!toolbar-deal-title!! - !!toolbar-deal-merchant!!