Category : Spectrum Noir

42 posts

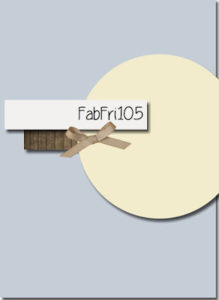
Last week was the second class in how to create beautiful backgrounds using Fun Stampers Journey (FSJ) 8 1/2 x 11 Gel Press (JM-0107) and FSJ Liquid Colors. After we finished creating some backgrounds with the planned class format, we just had fun experimenting with some stencils, bubble wrap, liquid color and the Gel Press. After everyone left, I stacked the backgrounds I created and went about my everyday weekly routine. That is until I saw the Freshly Made Sketches #323 Sketch Challenge.

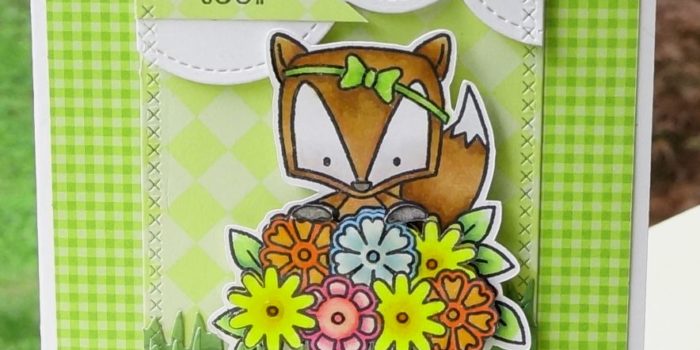
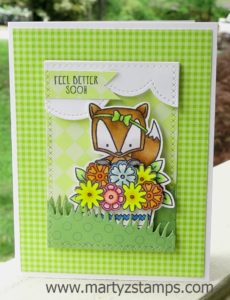
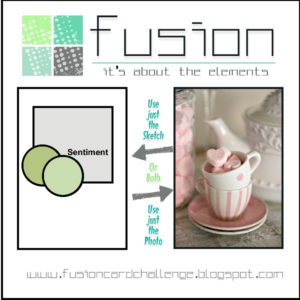
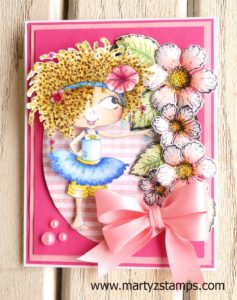
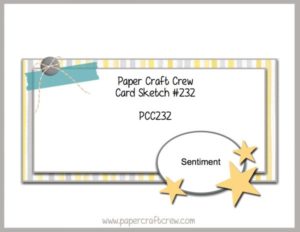
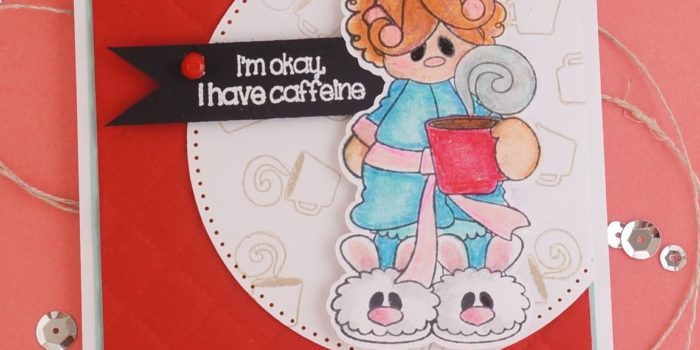
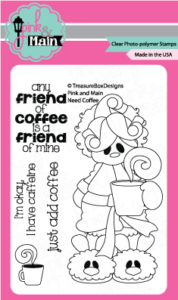
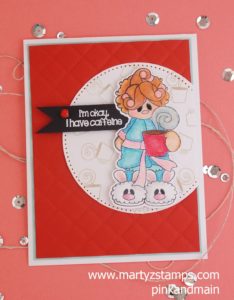
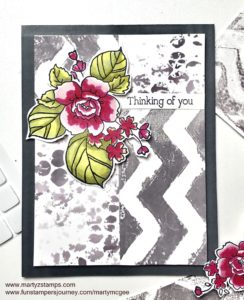
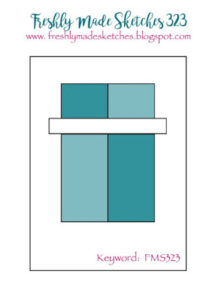
When I saw this sketch, the light bulb went off in my head, and I knew exactly the card I was going to create. One of the Gel Press background pulls I created used the FSJ Chevron Stencil (JM-0011), some bubble wrap and River Stone liquid color (IP-0138). The chevron and the bubble wrap pulls were two separate pulls using FSJ Whip Cream card stock as the base (CS-0040) and for this card, I married them together by cutting each piece into fourths as shown in the sample sketch above. Once I had adhered them to the mat, I knew this was a marriage made in heaven. I then found a floral piece I had colored with Spectrum Noir markers from the FSJ Summer Garden stamp set (SS-0078) and added it to the design with a medium Foam Square (AD-0085). I used the “Thinking of You” sentiment from the Storybook Occasions stamp set (SS-0538), and the finishing touch was to place the mat on a base of FSJ Rock Candy card stock (CS-0031).

I think this card turned out so elegant.

Let me know what you think about this card in the comments below. Feel free to share this with a friend!

If you would like to create this card, you can go to my website and shop (click here).

Supplies not mentioned in the narrative:

Brayer (TO-0087), Craft Glue (AD-0111), Rock Candy Fusion Ink (IP-0028), Block A (TO-0095), Block G (TO-0076), Journey Blooms Paper Trimmer (TO-0039), Grid Paper (NC-0011), Journey Gel Medium (JM-0071)

This past week, one of my good friend’s daughter had emergency surgery and had to stay in the hospital for about 4-5 days. I met up with my co-colorist, Cheyenne Luken, and we wanted to stamp and color this cute fox holding a basket of flowers with our Spectrum Noir markers. After choosing the printed papers for the mats, cutting them out, and adding a sentiment. I thought this would be the perfect card to give someone on the mend.

Here is the card with the color choices following:

Stamp: Darcy’s (I don’t know the name). Cheyenne purchased this at a Stamp Show back this past fall. But it is a super cute set. It also has a chick and another critter that escapes my mind at the moment.

Spectrum Noir Markers:

Fox Fur: TN9, TN6, TN4, TN3 – TN3 and BP3 combined
Eyes: IG1 and Blender, FS8 with BG5 and blender
Paw: BG8
Leaves: LG5, LG4, LG2, CG2
Flowers: CT4 and OR1, OR3 and OR2, B1 and IB2 and GT1, BP3, PP4, PP1
Basket: IG1 and BT8

Dies: My Favorite Things dies (cross stitched rectangles, clouds, and grass)

Fun Stampers Journey: Glaze

Paper Pack: Pink and Main 6 x 6

I think this turned out to be soooo adorable.

I am making it under the wire, yet again, for a Paper Craft Crew (#233) challenge. This week’s challenge is a Tic-Tac-Toe Challenge. I chose the middle, vertical column (shimmer, Shabby Chic, flowers) for my card. Here is the sketch:

This image is a digi stamp I purchased from Sherri Baldy’s Etsy shop. The purchase gave me two digi stamps of the cutest girl. I have a blog post featuring the other image here.

I had decided to try and make dread locks/ringlets on my girl after watching a YouTube tutorial on coloring with alcohol markers (sorry, I didn’t make a note of the video). I will do my best to note the markers I used, but this was one of those creative moments where I was creating and not paying attention to the details of what I used. Anyway, I’ll pull out my Spectrum Noir Hex chart and do the best I can (it will be pretty close).

Spectrum Noir alcohol markers were used on the girl and the flowers. The hair – IG10, IG2, BG6, BG3; skin – HB2, FS2, FS7, BG4, TN3, TN5; lips and cheeks – FS8; dress/headband/pants – LG2, LG3, LG5, LY`, OR1, OR2; eye – LG2, LG5; flowers – CT2, OR2, OR3; leaves – LG2, LG3, LG5; and, the blender pen was used throughout.

The base cardstock is SU! Pistachio. The images were stamped on Spectrum Noir cardstock using Memento Tuxedo Black ink. The base mat is Pink and Main designer paper die cut with Fun Stamper Journey Persian Garden die, The orange mat is FSJ Creamsicle cardstock with a light green mat of designer paper from Heartfelt Creations Sweet Berry 12×12 paper pack (this explains all the flowers – I had to cover up all the strawberries on the mat – LOL), a Spellbinders die was used to create some FSJ Creamsicle swirls. Spectrum Noir clear glitter pen was applied to the hair and skirt to add the SHIMMER. FSJ Journey Glaze was applied to the flowers, skirt waist, skirt trim, and eye. Diamond rhinestones were added to the flower centers, and a triple bow from SU! lace Pistachio ribbon accented the card. Last but not least, everything is popped, popped, popped up. A lot of dimension is going on here.

It is a very busy card, but I like busy and it really yells Shabby Chic.

I really love the way this card turned out. It is one of my favorites.

Yesterday I had a Spectrum Noir Alcohol Marker coloring class, which focused on shading clothing. I had recently ordered from Etsy a Sherri Baldy digi stamp (there were two images to my surprise and delight). I thought this would be a great image to practice clothing coloring. A color palette of blues and pinks was chosen. When she was finished, I knew I had to submit another card to the Fusion Card Challenge – Pretty in Pink Card Challenge.

She was so much fun to color. Here are the markers we used: Hair – base from roots to midway of hair GB11 then GB4 to the ends. TN3, GB 10, TN5, EB4, EB5 (dots throughout hair); skin – EB1, FS7, FS9 and FS8 for cheeks and lips; dress and headband- TB1, TB4, TB5; Pants – LY1, CT4; Flowers PP1 and PP3 and Blender throughout project.

The flowers are from the Heartfelt Creations – Botanical Rose. The base of the card is FSJ Whip Cream with FSJ Watermelon Fusion and FSJ Bubble Gum cardstocks as mats. The oval was cut from Heartfelt Creations Strawberry Fields 12 x 12 paper pack. The pearl accents are FSJ pearls and they were colored with Spectrum Noir PP2 marker to make them pink. A layer of Journey Glaze was added to all the flowers to make them shine and pop. And, finally the bow is SU! silk ribbon made into a double bow.

If you would like to order any products from Fun Stampers Journey, click here.

So excited to show off this Oldie But Cool truck in the Paper Craft Crew Challenge #232. I love the way PCC sketches inspire you to think outside the box. Here is this week’s sketch:

This card was created with a friend after a Make It party she had at her house. We went downstairs to her basement craft room. We were wanting to use our Spectrum Noir Alcohol Markers to color something in shades of red. We decided the Fun Stampers Journey Hit The Road stamp set was the perfect choice. As we began coloring, I can tell you several times I thought I had ruined my truck. But, as alcohol marker colorists know, you have to walk away and let it dry and voila it looks great. I did have to cut the truck out because I kept coloring out of the lines. You know, Mama said there would be days like this – LOL. Once we finished with the truck, the background came about by trial and error.

I began the background mat by wanting to stamp the route 66 outline stamp in FSJ Sour Lemon ink, but I used FSJ Electric Lime by accident (that’s where one of the errors came in). Instead of tossing the stamped background, I thought, “Why don’t I stamp the full coverage route 66 image offset and on top of the outlined route 66 image in FSJ lemon drop?” It looked great. Then, I made another error stamping the one way image and smeared some ink. Oh ho, that wouldn’t do. So, I thought, “Hmm, what would FSJ Huckleberry Fusion look like stamped on FSJ Electric Lime cardstock?” It looked great. Thus the one way stamped images adhered off of the stamped background mat. I finished the background stamping the gas pump in FSJ Candy Apple ink. The final touch was some splatters of FSJ Sour Lemon silk. I love this card! I hope you do too.


Supplies: Fun Stampers Journey supplies can be ordered by clicking here.

Here in Georgia, the weather is fine, the trees are blooming, the birds are building their nests, and wouldn’t you know the most adorable bunnies showed up in my craft room wanting to make a grand entrance as well. They hopped right over and posed for a Pretty in Pink Bunny Delight portrait.

This was perfect timing for the Fusion Card Challenge – Pretty in Pink. Fusion Card Challenges allow three variations to a crafter’s designs. First choice, you can choose just the template layout; second choice, you can choose the color theme; or, you can combine both into one design. I decided to stick with the color theme of PINK.

Once the bunnies were settled down and ready for me to create, I stamped their images onto Spectrum Noir cardstock using Fun Stampers Journey Spring Fling stamp set. I then colored them with the following Sprectrum Noir Alcohol Markers: The bunnies heads and bodies IG1 and IG2; their ears, feet, bellies, cheeks, and noses PP1. This was a very simple and easy coloring project. Great for beginners. They are just too cute.

The base of the card is Fun Stampers Journey Whip Cream cardstock, and the mat with a large oval cut out of it is FSJ Watermelon Fusion cardstock.  I stamped circles with FSJ Watermelon Fusion ink from the FSJ Planner Sketch stamp set. An acetate sheet was placed behind the Watermelon Fusion mat. The zig-zag accent mat is from Pink and Main Spring Fling 6×6 paper stack. The Watermelon Fusion mat is raised using a double layer of foam tape. The bunnies are popped-out using FSJ Foam Squares Medium. The sequins in the oval are assorted sequins from my stash (Note: a horizontal strip foam tape about a 1/2″ up from the bottom of the oval to keep the sequins from “disappearing” when the card is upright). The final touch is a double bow created from SU! pink ribbon.

Such a cute card.

Supplies:
Fun Stampers Journey supplies can be ordered through me – click here

This week’s Freshly Made Sketches #274 card sketch is the perfect sketch to showcase Pink and Main’s Bear Hugs Stamp Set. Here is the sketch:

When I am creating a card for a challenge, I first look at the card sketch and then go through my stamps to determine which stamp would best fit the card sketch design. As I mentioned in the opening paragraph, I chose Pink and Main’s Bear Hug stamp set featuring an adorable boy with his teddy bear.

I stamped the images onto Spectrum Noir cardstock using Memento Tuxedo Black ink. I colored the boy and bear with my Spectrum Noir markers. Here are the color combinations: Hair – LV1, CT4, GB3, GB6, GB10; Skin – Fs2, FS3, FS6, TN2 and FS8 for cheek color; Shirt – LV1, CG1, HB3, HB2; Bear – TN2, TN3, GB6, GB10, TN6, TN9; Pants – TB2, TB3, TB8; Shoes – TN4, TN7, TN9. He turned out so cute.

I cut a FSJ Whip Cream mat to 5 1/8″ X 3 7/8″ and ran it through my Big Shot with a diagonal stripe embossing folder (SU!). I cut a small mat out of FSJ Denim Days and stamped the sentiment on it using VersaMark ink and embossed using white embossing powder. I popped the boy and bear image out using FSJ Medium Foam square. A simply adorable card.

Supplies:

Fun Stamper Journey – www.funstampersjourney.com/martymcgee
Pink and Main – www.pinkandmain.com
Spectrum Noir Markers – www.consumercrafts.com

Here is the post featuring the last of the three cards we made this weekend. I used the card sketch from the Fusion Interlocking Hearts Card Challenge. This design features Pink and Main Rain Frogs stamp set. This set is just too cute. Here is the sketch and the image of the stamps in the Rain Frog set:


The frog and umbrella, rain boots, and sentiment were stamped on Spectrum Noir cardstock with Memento Tuxedo Black ink. The images were colored with Spectrum Noir markers. I will admit I didn’t write down the colors I used but I think I can give a good guess as to which ones I used.

The frog – DG1, DG2, DG3, DG4. The umbrella – TN2, TN3, CT1, CT4, DR1, BP5. The raincoat and raindrops – TB1, TB2, TB3, IB1, IB2. The rainboots – CT1, CT4, DR1, BP5, TB1, TB3, TB8. The words – BP5, TB2. The frog and rainboots were cut out using a Brother Scan n Cut 2. The sentiment was fussy cut. All images were popped up using FSJ Foam Squares. The base printed cardstock and the yellow with white polka dot banner were from a Pink and Main paper pack. Love the designs. The circle mat was cut using a FSJ pierced die from FSJ Whip Cream cardstock. The embossed mat was cut from FSJ Huckleberry Fusion cardstock and embossed with a We R Memory Next Leveling embossing folder. Both mats were die cut with stitched rectangle dies (one from Simon Says and the other from My Favorite Things). The banner was matted on a piece of FSJ Watermelon Fusion cardstock. Last but not least FSJ Journey Glaze was added to the raindrops and puddle as well as the toes of the rainboots.

So cute!

Supplies:

You may purchase Fun Stamper Journey products through my FSJ website – click here.

To purchase the embossing folder click here or Pink and Main click here.

Here I am with another weekend creation from our most recent stamp haul at the Heirloom’s Lawrenceville Rubber Stamp & Paper Arts Festival. This card was created with a Pink and Main stamp set called Need Coffee. Here is the package image containing all the stamps (you can click on Pink and Main or the image to check out their shop).


Isn’t this an adorable stamp set. This stamp set was from Cheyenne’s haul. She has been wanting this stamp set since October when she first saw it at Pink and Main’s booth during a different stamp show weekend. As I mentioned in the last post, I like to design a card around a card challenge and well, why not???

The challenge I chose for this card design is Fab Friday 105 card sketch challenge. Here is the card sketch:


There were four of use working on our own variation of this card. We chose our own color palette and embossing folder. I will post Cheyenne’s card at the end of the post. I don’t have pictures of the other cards.

We took our coffee girl and stamped her onto FSJ Whip Cream cardstock using Memento ink. In hindsight, we should have stamped the image using FSJ Black Licorice because the FSJ Fusion Blender we used to blend the colored pencil areas made some of the ink smear. We colored our images with the FSJ Color Burst Pencils. The FSJ Fusion Blender was used with the Blender stumps to smooth the colors together.

I used the FSJ pierced Circle die to create the circle mat out of FSJ Whip Cream cardstock and stamped the coffee cup in FSJ Oatmeal Cookie to add depth and bring interest. I added a touch of Spectrum Noir clear glitter pen to the bunny noses and ears, the steam from the coffee, and the pink sponge curlers. I applied Journey Glaze to the cofee to add a little shine. The sentiment is stamped with VersaMark ink and embossed with white embossing powder on FSJ Black Licorice cardstock.

Let me take a moment to comment on the mat and the red dot embellishment next to the sentiment. The quilted mat was created from FSJ Candy Apple cardstock using a We R Memory Keepers Next Leveling Embossing folder (this one is Cheyenne’s) purchased from Creek Bank Creations. Under the Candy Apple mat is a FSJ Cool Pool mat giving a hint of light blue. The red embellishment dot was created using Nuvo Red Berry Crystal Drops which was purchased from Sparkle and Sprinkle.

Here is the completed card:


Here is Cheyenne’s card (the base mat is FSJ Deep Lilac, the quilted mat is FSJ Cool Pool, the pierced rectangle mat is FSJ Lavender Fusion cardstocks):

Supplies:

You may purchase Fun Stamper Journey products through my FSJ website – click here.

To purchase the embossing folders or Nuvo Crystal Drops go to the vendor name and click on it.

This past weekend I attended Heirloom’s Lawrenceville Rubber Stamp & Paper Arts Festival. Friday night I attended the Design & Treasure Make-n-Take with some friends. Saturday we went shopping! I was in search of some stamped images for my Spectrum Noir coloring class held at the end of this month which will feature coloring fabric/clothes. I came across the Santoro stamp sets at the Creek Bank Creations vendor booth. The stamps they featured were large with open areas to color and practice blending techniques. Here is the Santoro Tweed – The Friendly Hedgehog stamp set:

Four of us got together Sunday and made several creations using some of our recent stamp haul. While the other ladies finished their Pink and Main cards, I decided to work on my sample of this stamped image for the Spectrum Noir class at the end of the month. I also like to kill two birds with one stone, so I looked at the online card challenges available this week and decided to enter my card creation for CASology Week 234 – Youth challenge.

I had already stamped the images using my MISTI the night before. I chose Spectrum Noir cardstock and inked the images with Memento Tuxedo black ink. The ladies around the table wanted a sepia/lavender colored card; therefore, I chose the following colors. I began with the frame and used Spectrum Noir TN1, TN3, TN9, and GB10. Next, was the hat and clothing on the adorable girl. I used IG1, LV1, LV2, and HB1. As usual, I colored the hair a reddish/auburn color. I didn’t want to go too brunette because I felt the hair would blend in too much with the other colors. I wanted a little pop of color against the muted shades. I chose TN2, TN3, TN4, TN9, and OR1. Last but not least was her face. I used FS6, HB3, TN3, and FS8. The colored images are simply stunning.  Once everything was colored, I cut the images out using Cheyenne’s new Brother Scan and Cut 2. I did have to cut the inside of the frame by hand but I’m sure there’s a way to do this with the cutter.

The finished card ended up being a 5 x 7 card because the frame is almost that large. I took some SU! retired Grape cardstock for the base (I can’t remember the name other than Grape). The mat is SU! Rich Razzleberry which I embossed with one of my new We R Memory Keepers Next Leveling Embossing folder. I LOVE that folder design!!! Contact Creek Bank Creations to purchase one for yourself. The frame is popped up using two layers of foam tape and the girl is adhered using FSJ White Liner Tape.

Here is the finished card. It is just too cute.

Just for comparison, I’ve added Cheyenne’s photo taken with her iPhone before the card was assembled. It’s amazing how colored cardstock and lighting make a difference in the same completed image.

Thanks so much for dropping by!


PAGE TOP
[dealsbar preview] Amazing Deals: !!toolbar-deal-title!! - !!toolbar-deal-merchant!!