Tag : fun foam

3 posts

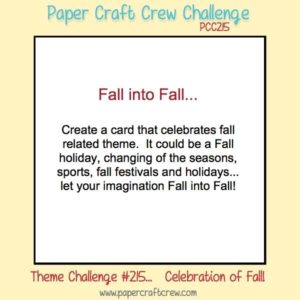
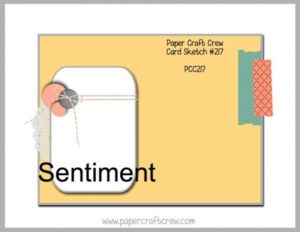
Well, Cheyenne and I got together on Wednesday and made the most adorable card EVER! She had purchased Tim Holtz’s Dog stamp set with coordinating dies. She came over to my house whipped those stamps and dies out of her little black bag, and we got off to a ruff start (ha, ha – do you like the pun). Anyway, she wanted to create a dog with textured hair. She had a picture to go by from a Pinterest pin, and I tried to pick out Spectrum Noir colors that were a close match. We got half of our dog’s faces done and she didn’t like them. They weren’t the correct color. So, upon her insistence, we started with a fresh dog stamped in SU! Smokey Slate. The first one was stamped with Memento Tuxedo Black, but we wanted the hair to over-balance the stamped image’s outline. That’s when I said, let’s make our card using the Paper Craft Crew Challenge #217 (why not kill two birds with one stone). So, she pulled the sketch up on her phone and we began again.


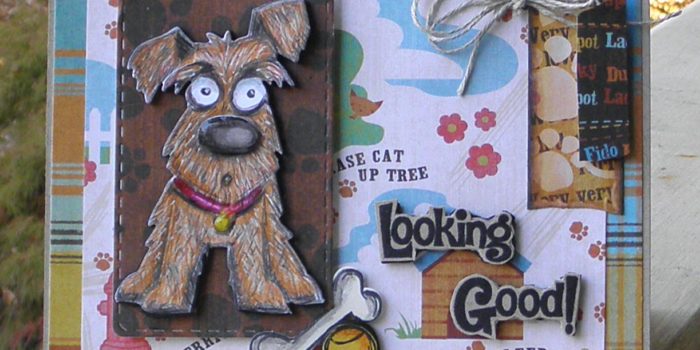
We took our stamped image and gave it a base color of Spectrum Noir EB1 and LV1. Then, we took my Fun Stamper Journey Color Burst pencils and began to create shading (darkest brown) along with several other colors to create lighter shading and depth to the dog. Once all of this was accomplished, we kept our pencils sharpened and began making flicks of color onto the dog image. This took a LONG time. It takes a very light touch, and when you flick the pencil lead, you need to lift at the same time so your hair image looks light and hairy. We used several different colors with the black pencil giving more depth and a white gel pen was used to add light effects on the hair. Cheyenne said my dog looked mad and her dog looked scared.

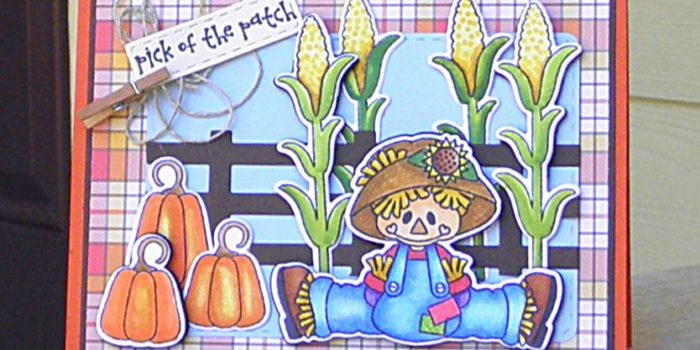
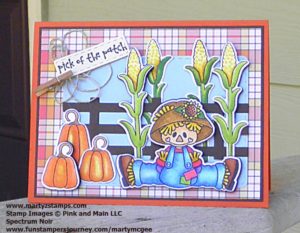
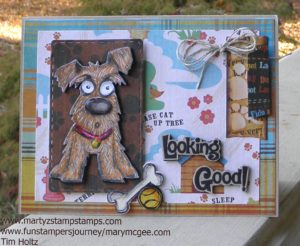
Once we were happy with our hair and color of our dog, we cut out a nose and popped it out and added Journey glaze to give it a nice shine. A bone and ball were added to my card. Cheyenne added a leash to her card, but I couldn’t add one to mine because my matted dog was in a different place on my card than her card. I took the Fun Stampers Journey ATS stamp and stamped the sentiment onto FSJ Oatmeal Cookie cardstock. I made faux washi tape out of cardstock and placed a Journey twine bow up at the top of the card (I did have my twine on the smaller mat as in the sketch, but it pulled your eye away from the focal point – the dog). Last but not least, the dog, the mat the dog is on, the bone, tennis ball, sentiment, and the smaller piece of washi tape are popped out. I used fun foam for everything but the washi tape. All of the printed paper is from The Pets Stack paper stack which was purchased from Hobby Lobby a long, long time ago. The base of the card is FSJ Oatmeal Cookie cardstock. The mat for the dog was cut out using a rounded corner stitched rectangle die from Pink and Main. Here he is. He thinks you are “Looking Good.”


Hope you enjoy!

This past September three friends and I went to the Stamp Scrap Art Tour held in Duluth, GA. Pink and Main was one of the vendors at this show. The owner and illustrator for Pink and Main, Michelle Currie, was at the Friday night make-n-take, and we were able to complete an awesome card, purchase a discounted die set (only available during the make-n-take), and have a great time enjoying her company. We also had the opportunity to see her the next day while shopping for all sorts of goodies. My friend and co-crafter, Cheyenne, purchased their scarecrow stamp set and coordinating dies.

We spent a whole afternoon stamping the scarecrows and coloring them with our Spectrum Noir alcohol markers. We had a great time. Cheyenne ended up putting her card together that evening, but when I am tired I know better than to try to pull together something important. It usually spells disaster. I finally put mine together this weekend. AND, it is gorgeous.

When I saw the Paper Craft Crew #215 challenge today, I knew my Pink and Main Scarecrow card was the perfect match for this challenge. Here is the card challenge:

For our scarecrow card, we stamped the images on Spectrum Noir paper with Tuxedo Black Memento Ink. The images were colored with our Spectrum Noir alcohol markers. See the end of this post for the color combos. Several of the images are raised using black foam. I believe we used Lawn Fawn’s 6×6 plaid paper pack for the printed mat. The blue mat is SU! Bashful Blue (a very retired cardstock), the plaid mat is on FSJ Hazelnut cardstock and the base is a SU! paper (Cheyenne’s paper wasn’t listed but I think FSJ Orange Rave or Tangerine Fusion would work really well). The mini-clothes pin and twine are from Fun Stampers Journey (FSJ). Here is the card:

Spectrum Noir Color Combos (the ones I wrote down):

Jeans – TB5, TB2, TB4, GG1
Corn – CT1, GB9, GB6
Straw – CT4, GB6
Hat – Fl Yellow, TN3, FS1 and Color Burst pencils for crosshatch texture
Pumpkins – CT1, OR2, OR3
Corn stalks – can’t remember the lighter green but I did palette blending with the lighter one and DG3

Supplies:

Pink and Main – Scarecrows and dies, stitched rectangular (rounded corner) dies
Lawn Fawn – plaid paper stack
FSJ – Tangerine Fusion, Hazelnut cardstocks, Color Burst Pencils, twine, clothes pin
Inks and Markers – Memento Black, Spectrum Noir alcohol markers
Misc – Black Fun Foam sheets, fence die (bought a long time ago from My Favorite Things)

This is the last of my Scrapbook Expo posts. I know I can be addicted to papercraft shopping. O.k., that’s an understatement, but I do have some restraint. So, I planned before I arrived at the Expo to purchase a Misti. I have been watching numerous YouTube channels featuring many papercrafters using the Misti, and I just had to have one. During the Mega Make-n-Take, designated vendors set up shop and offered products at a reduced rate or with a special bundle price. One of the vendors offered such a great deal, I purchased my Misti that night along with the cleaning solution. It is WONDERFUL! You can check out the Mist at www.mysweetpetunia.com.

www.mysweetpetunia.com

www.mysweetpetunia.com

I, also, purchased that night some items from Queen and Company.  On a previous post I featured their make-n-take shaker card. Along with making the card, we had extra epoxy and sequin embellishments left over, enough to complete several more card or scrapbook page projects.

Queen and Company embellishments

Queen and Company embellishments

They offered a special on shaker card component purchases. I chose a zig-zag die which came with two foam shaker pre-cut card components. These are awesome. All you have to do is pull the adhesive off the backside of the shaker component and adhere it to your card. You can add embellishments or if the design allows, you could stamp images on the card stock before placing the foam. Next, you remove the adhesive from the front of the foam and place the window sheet (acetate) on top. Once this is completed, you apply adhesive to a pre-cut piece of thicker than regular cardstock and place it on top of the window sheet to finish the project. The cost for these complete kits minus the embellishments runs around $3.00. Instead of purchasing the shaker card components by themselves, I purchased a bundle which included the die. The die allows to me create as many cards as I would like. One way is to purchase “fun foam” sheets from a craft store. I was able to find some with adhesive on one side, and I purchased mine from Michael’s with a 50% off coupon. You would need to cut approximately three sheets of foam to have enough height to allow the embellishments to move around and shake.

Queen and Co. zig-zag die with black fun foam

Queen and Co. zig-zag die with black fun foam

Queen and Co. shaker card components

Queen and Co. shaker card components

We received during the Mega Make-n-Take some adhesives and rhinestone embellishments. I cannot remember who supplied them, but it was a great freebie.

Glue dots, rhinestones, one bottle of adhesive not shown

Glue dots, rhinestones, one bottle of adhesive not shown

It’s Cheaper Than Therapy gave each make-n-take attendee a FREE embossing folder. My folder is Christmas themed.

It's Cheaper Than Therapy embosing folder

It’s Cheaper Than Therapy embossing folder

The next two days after the Mega Make-n-Take are designated workshop and shopping days at Scrapbook Expo. Most of the workshops offer free products when you take a vendor’s workshop. Heartfelt Creations offered a free stamp set up to a $19.95 value for each of their workshops. I took two workshops with them; therefore, I received two stamp sets.

Heartfelt Creation Free Stamps

Heartfelt Creation Free Stamps

There are various vendors in the exhibit hall offering free make-n-takes as well as make-n-takes with a nominal charge. I had been looking forward to Fun Stampers Journey exhibit all year. We had to wait about 30 minutes for a seat to come available, but it was worth it. We made a cute card and received a stamp set for FREE! I have pictured the make-n-take card along with an extra design they offered. I made that card for my make-n-take class.

Fun Stampers Journey Card

Fun Stampers Journey Card

FSJ Card 2

FSJ Card 2

After making the shaker card the night before at the make-n-take, I wanted to purchase some sequins, but I didn’t want to spend a lot of money. I stopped by the Tall Mouse booth www.cre8tiveartz.com and purchased a selection of sequins along with some rhinestones all under $20.00.

www.cre8tiveartz.com

www.cre8tiveartz.com

www.cre8tiveartz.com

www.cre8tiveartz.com

After a wonderful experience with Heartfelt Creations and their flower shaping class, I went by a booth that offers 3D dies for flowering creations. I wanted a hydrangea die and Elizabeth Craft Designs had one. I had my friend, Debbie, go back the next day and purchase the flower shaping tool kit.

Elizabeth Designs

Elizabeth Craft Designs

Last but not least, Debbie went back to the Heartfelt Creations booth and purchased the Berry Cafe 12×12 paper pack (not pictured). All in all I had a great time and came away with some great products and new papercrafting skills. Next year, I plan on taking more workshops and attending the exhibit hall two days in a row. We didn’t have time to stop at all the booths to compare prices and purchase more crafting supplies. I hope you enjoy this post.

PAGE TOP
[dealsbar preview] Amazing Deals: !!toolbar-deal-title!! - !!toolbar-deal-merchant!!