Let’s travel back to July of 2011, July 24th to be exact. It’s my amiga y hermana Bris’ birthday. Cheyenne, Bris, and I make each other REALLY nice cards (meaning detailed) as a birthday present (to a stamper/papercrafter this is a BIG deal).

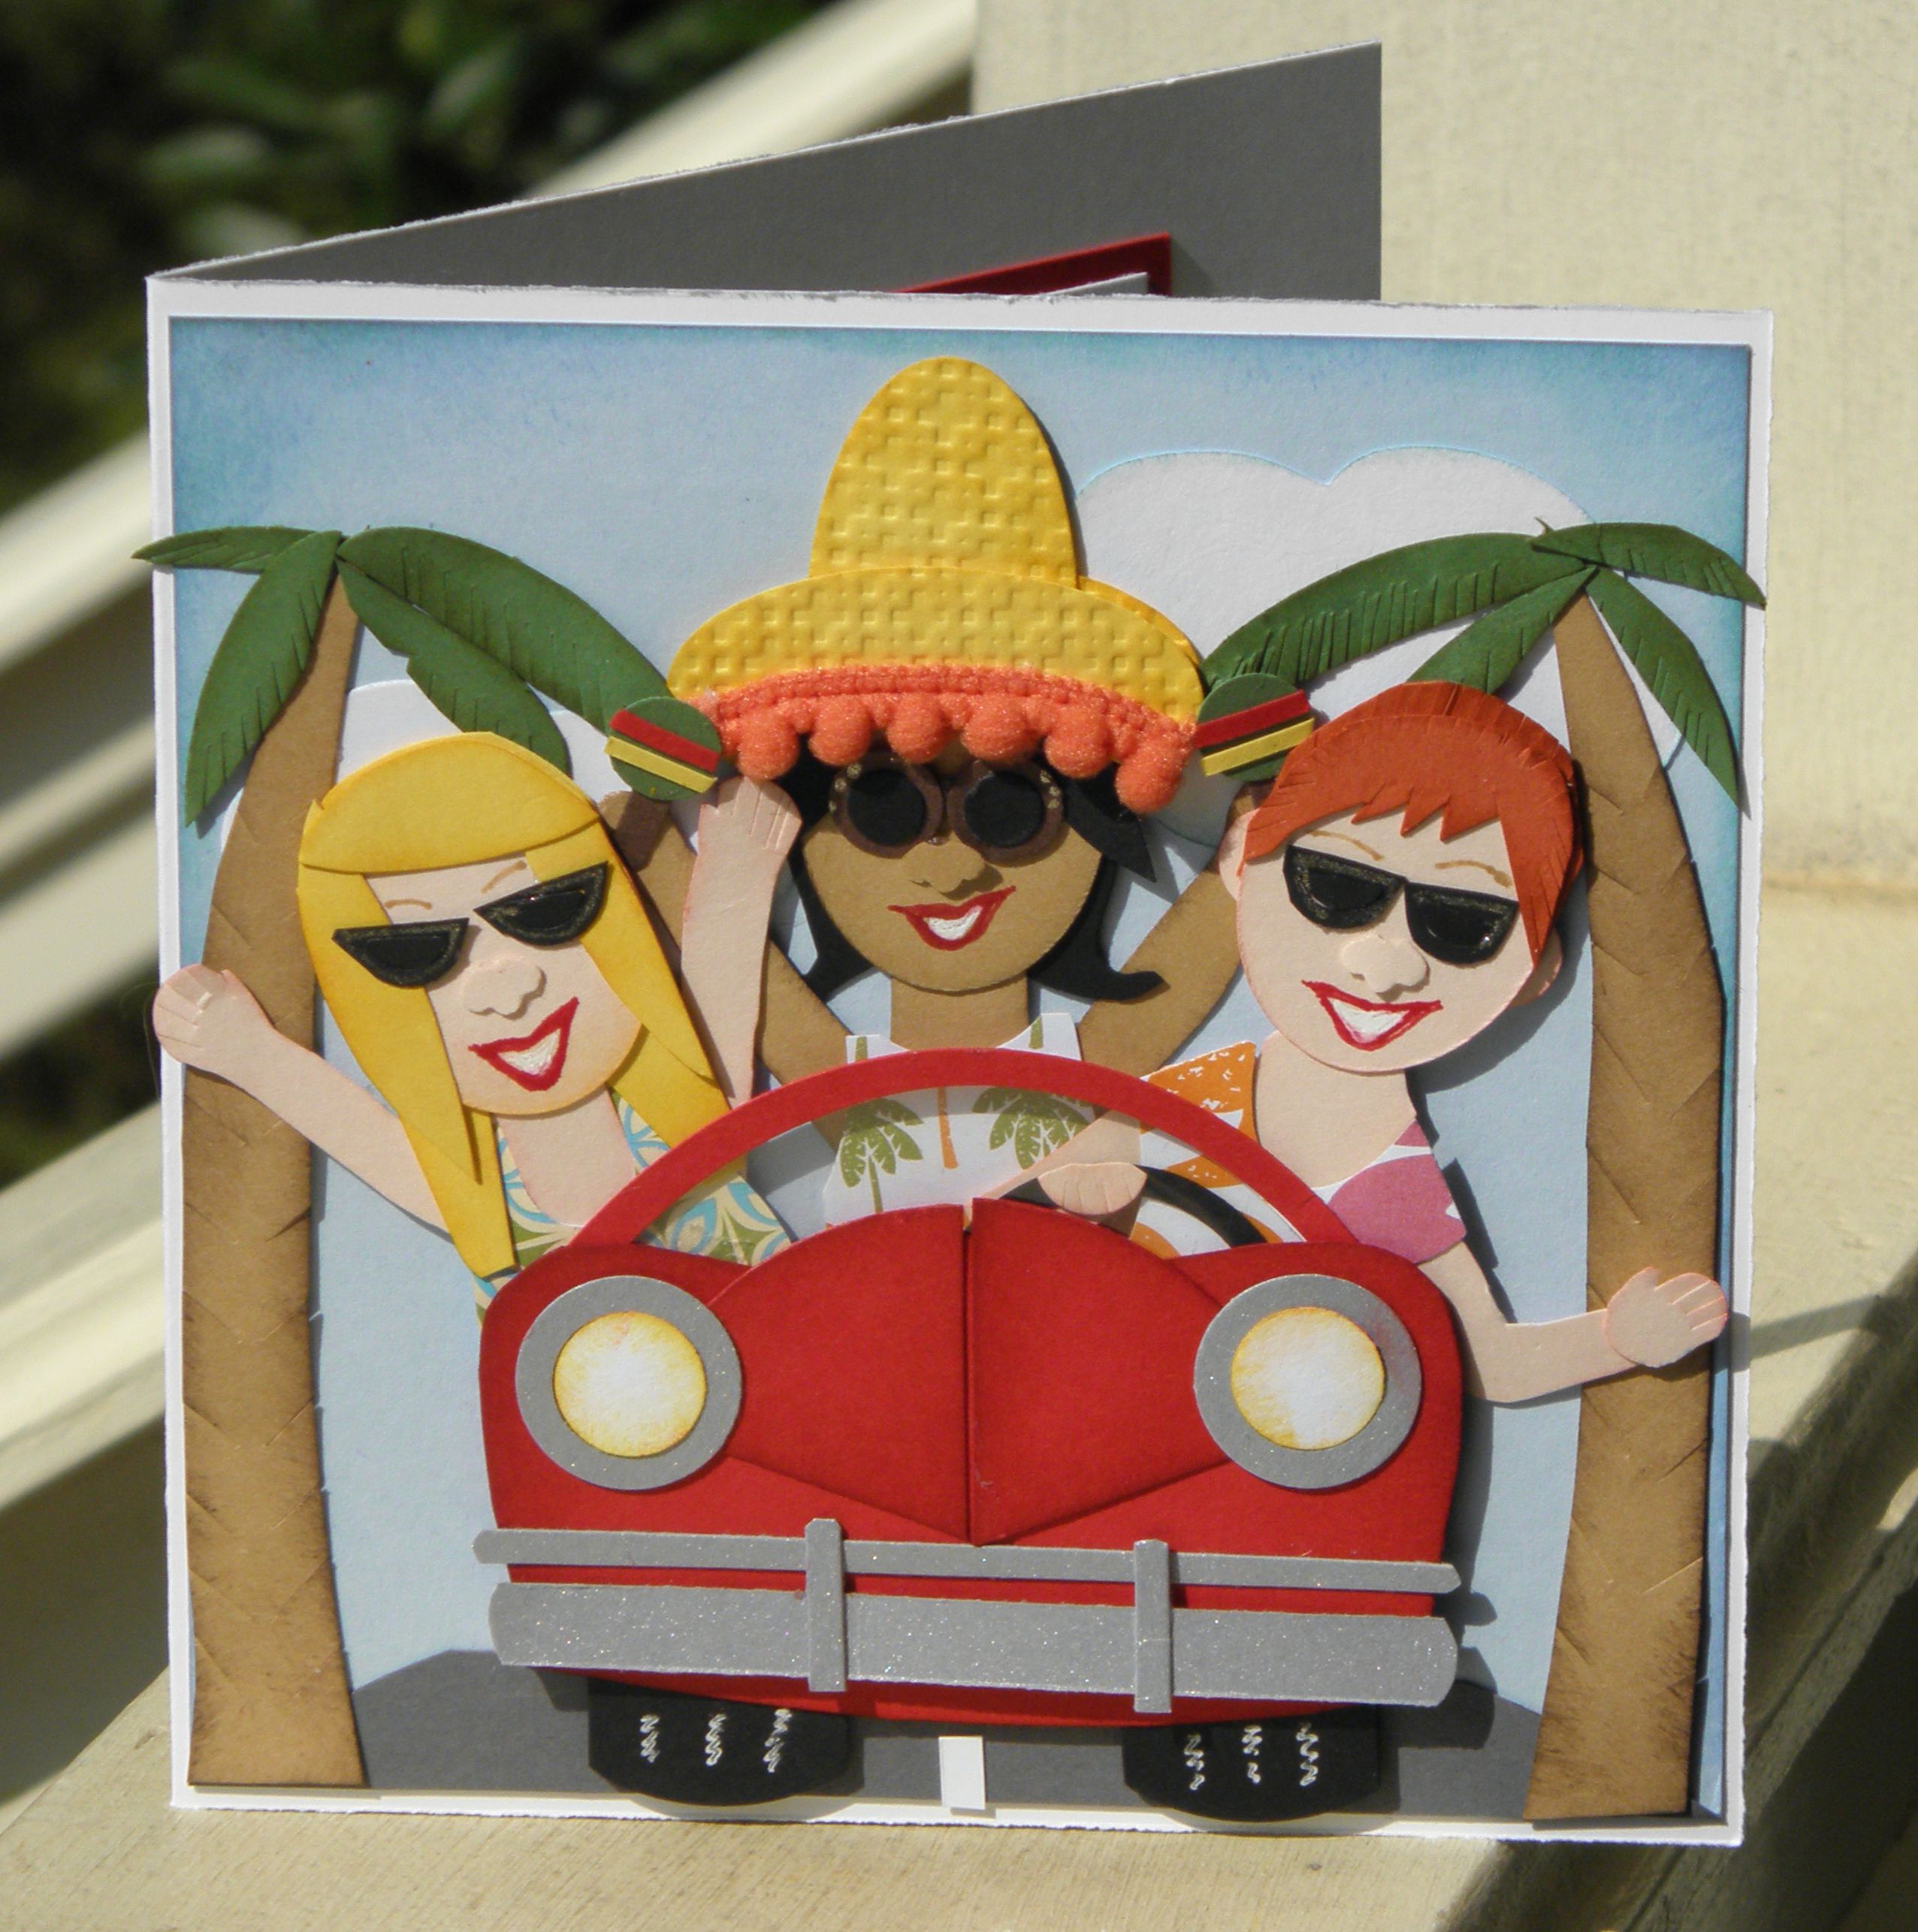
I wanted to make Bris a really fun card that included the three of us going somewhere. Somewhere away from house cleaning, bills, laundry, animals, children, ……… I know what you’re thinking and I’m not going to say it, but you know I left something out of the list. This does not include a tub full of Calgon. LOL

I had seen a variation of this card on a website (no, I don’t remember where, but the gal had some awesome paper pieced cards). So, out came the punches, paper, and inks. Punch, punch, cut,cut,cut, sponge, sponge, glue, glue, and there you have it! We’re riding in a HOT red sports car an unknown tropical location (obviously, no palm trees in North Georgia). No matter where we are, if it’s the three of us, we’re laughing the whole way there and back.

OLYMPUS DIGITAL CAMERA

I really love this card! 🙂

I worked diligently to clean up my big mess (SU! projects scattered throughout the office/craft room into the kitchen, onto the kitchen table and an additional portable table. I was fairly satisfied with my results and then Cheyenne called about 6:00 p.m. and said did I need her to come on over. Sure, I’m not exhausted, yet.

So, she came over with her lovely daughter, Brooklyn, and started cracking the whip (so to speak). She makes me focus on the detail cleaning part, like putting away scraps (I think I forgot to mention – I HATE FILING), asking me questions such as do you really need this, can this be shredded, are you going to finish this card, what is that for, etc. I know exactly how those “hoarders” feel on the reality shows that feature their cluttered dilemma. It is exhausting trying to decide where this goes and that goes, and then I get sidetracked; it goes on and on. I get to the point where I just throw away perfectly good paper scraps. My question is . . . . Why can’t I be rich and hire a personal assistant to do this for me? Wah-Wah 🙁

She, finally, left around 9:45 p.m. and the office/craft room looked great. As I’m typing this the kitchen areas look great as well, but I only took office pics this morning because I hadn’t had my Wednesday make-n-take class and the kitchen areas still looked better but not great. So, for all you ladies that know me personally and have been to my house on numerous occasions, here is the clean office pics below. If you want to see it in person, better get over here quick – I give myself 2 weeks before it starts looking a little disarray. LOL

OLYMPUS DIGITAL CAMERA


OLYMPUS DIGITAL CAMERA


OLYMPUS DIGITAL CAMERA

header_retiredlist15_demo_April2115_ENG

BIG STAMPIN’ UP! DISCOUNTS

It is time to say goodbye to retiring stamps, paper, inks, markers, embellishments, etc. Please click on this link to check out Stampin’ Up! Retired List in PDF format.

CM3077SClick on this picture  or here to access Retiring SU! Stamp Sets with images.


CM3075SClick on this picture or here to access Retiring SU! Accessories with images.


ribbonAd_MDS_OLO_April2115


Click this picture or here for Retiring SU! My Digital Studio downloads with images.

These retiring SU! products:

  • will be available for purchase through May 26.
  • Accessories (punches, paper, dies, etc.) are available for purchase while supplies last and can sell out quickly!
  • An “X” in the far right column of the list means the item has sold out! (for PDF file only)
  • Select retiring products discounted up to 50% off

This retiring products list and discounts begin TODAY and is only available through June 2, 2015 (while supplies last). If you missed out on a product the first time, this is your last chance to get it now (or stock up) before it’s gone for good!

Happy Shopping!


I have to make a confession. I am a clutter-a-holic when it comes to papercrafting and anything to do with paper. I am exposing a hidden area of my life in the attempt to motivate myself to persevere toward a clean and organized craft room that doesn’t spill out into various and sundry places throughout my house. It is my personal belief that many crafters are wired this way.

Please don’t recommend Fly Lady or anyone else. I know all about them and have given “them” a whirl. I’m just a tad bit deficit in the area of keeping my mind focused on one thing (even for 15 minutes – it’s sad but true). I have even resorted to calling my friend and some time co-designer, Cheyenne, to come over and whip me into shape. She doesn’t have a wandering attention span. In fact, if I tend to wander about, she reigns me in by bellowing, “Get in here, we aren’t finished with ___________.” I, usually, after a rebuttal, apply myself to the needed task. Hopefully, she is managing her time so she can make it over here and help out a friend in desperate need.

Anyway, here are my BEFORE pictures (please don’t judge – you could be walking in my shoes one day):

OLYMPUS DIGITAL CAMERA OLYMPUS DIGITAL CAMERA


OLYMPUS DIGITAL CAMERA OLYMPUS DIGITAL CAMERA OLYMPUS DIGITAL CAMERA OLYMPUS DIGITAL CAMERA OLYMPUS DIGITAL CAMERA


And, there you have it! The dining/breakfast table, a temporary table for the Big Shot cutting (I had a class Saturday and I’ll have another one tomorrow), the kitchen bar top/counter, one desk in the office, the paper shelf, the floor, and my desk. Before you ask, I did make both challenge cards and fourteen bible study cards at this very desk yesterday and today. I did misplace quite a few polymer stamps, which were right in front of me, amongst this jungle mess.

I hope you can laugh with me and say a pray. I would like to get this back in order by tonight (LOL). That WOULD be a miracle. Well, if Cheyenne comes over it will happen. I WILL post AFTER pics or in progress updates as they are made.

Have a GREAT DAY!

Paper Craft Crew Card Sketch Card Sketch #140:

PCCCS140 sketch

I liked my original design of a card letting the ladies know in my break-out bible study group that they are
“amazingly AMAZING.”  I decided to make another version of this design for the Paper Craft Crew Card Sketch Challenge #140 . You can view the original design as well as another card challenge which played off the original design here .

I truly recommend SU! Painted Petals as a very versatile stamp set to create a multitude of gorgeous cards. On this card challenge, I enlarged the circle from the original card, added a banner with a rose accent along with two pennant banners attached to the bottom of the sentiment banner. Easy Peasy – another great workshop demo card.


PCCCS140 card


Supplies:

The greenery is a die I purchased from MFT (My Favorite Things stamps). I have no idea what is called. If it is still for sale you will be able to find it under dies.

This week’s PPA248 Sketch Challenge:

PPA248 sketch

I had made cards for a group of ladies in my bible study break-out group for our end of study fellowship last night. I gave each lady in my group one of these cards:

Small Group Card


The design for this card inspired me to translate it into the PPA248 Sketch Card Challenge. This is what I came up with:

PPA248 Card ChallengeThis was such a simple, but Amazing card to create. This would be a great workshop demonstration card featuring just a few of SU! great products. I took a piece of 4″ x 5 1/4″ Whisper White and stamped the striped image from the Painted Petals set in Elegant Eggplant horizontally; then, Daffodil Delight vertically. I added the tulips from Painted Petals to the bottom of the original mat (stems – Wild Wasabi and tulips – Strawberry Slush).  I cut a piece of 4″ x 2 3/4″ Elegant Eggplant to make a mat for the 3 7/8″ x 2 5/8″ Whisper White. I lined up the Whisper White piece with the green stems of the tulips on the main mat and stamped tulip stems onto the Whisper White (don’t forget to use a piece of typewriter paper as a mask – you don’t want to mess up your original mat). I then took the small tulip stems and stamped them across the bottom in Wild Wasabi to create a grass effect). I added some yellow (Daffodil Delight) tulips and some yellow flowers to the bottom Whisper White. I, then, stamped some flowers in Strawberry Slush and Daffodil Delight along with leaves in Wild Wasabi at the top of the card. I stamped the sentiment then cut it down with my SU! Trimmer and cut a “V” shape into each end to make the banner. I adhered the banner with SU! Dimensionals (uh-oh forgot to include them in the supply list), and there you have it!

I LOVE it! I hope you enjoy!

I like Pinterest; no, I LOVE Pinterest. There are SO many awesome card examples along with some amazing techniques. Once I settle down for the evening, I begin pinning and pinning and pinning. I especially LOVE pinning card examples and card techniques. I saw the Bokah technique on several boards and was very intrigued with this technique and the soft, subtle look of cards featuring this technique.

I decided about two month’s ago the April’s Technique Class would feature the Bokeh technique. I knew my group of stampers would love to make a few cards using this AWESOME technique. It is a very uncomplicated technique and there is a wide margin for error. In other words, you really can’t create a “Hot Mess” using this technique.

There were three different variations of this technique I found on Pinterest; thus I decided the class would feature three cards using each variation. Below is a picture featuring all three cards.


Bokeh Technique


This is an absolute “go to” technique to use on cards made for friends and family. I included some up close shots as well.


Bokeh chalk Bokeh Chalk Ink Technique


Bokeh WatercolorBokeh Watercolor Technique


Bokeh Standard Bokeh Standard Technique


Supplies:

Retired Word Play Clear Mount Stamp Set

Price: $29.95

Price: $4.95

Built for Free Using: My Stampin Blog


The Butterflies Thinlits have been delayed in arriving at Stampin’ Up! warehouse in Utah. The Thinlits are expected to arrive at SU! warehouse this Friday. Once the Butterflies Thinlits are “in house,” you will be able to order from the following special offer:  Therefore, from the day Butterflies Thinlits are again available through April 30, we are bringing you two special offers (note- if the Thinlits do not arrive at SU! on Friday, you will not be able to get the special until they arrive):

  1. Get the Butterflies Thinlits at a 15 percent discount–just $21.20!

Supply List

Built for Free Using: My Stampin Blog

  1. Buy any of the Butterflies Thinlits Bundles at the already-discounted price and choose one of three FREE Sale-A-Bration items (only available while supplies last)!

Please refer to your Sale-A-Bration catalog for pictures of the above mentioned items.

Supply List

Built for Free Using: My Stampin Blog

If you would like to order one of these specials, please click on the Shop SU! tab or double click on the special and you will be taken to my SU! ordering website.

I sat down this afternoon to complete a card for the Paper Craft Crew Card Sketch 139 Challenge. The design team created a lot of awesome samples to spur the imagination. The challenge sketch is below:

PCCCS139sketch

I wanted to have a Mother’s Day card to share with my group of stampers; so, to work I did go. I really, really, really, (did I say really???) love the Birthday Bash DSP and its color combinations. I just can’t get enough of Calypso Coral, Daffodil Delight, Old Olive.. It just reminds me of summer. The sample sketch looks like a 6″ x 6″ card, but I whittled mine down to a 5 1/2″ x 4 1/4″ card. I wanted a fresh, clutter free card; therefore, I only stamped one large flower in Calypso Coral and accented the sentiment with a smaller flower in the same color. I accented the card with butterflies and diamond rhinestones tinted with a Blendabilities marker (Wild Wisteria – darkest color). I made a scallop oval mat for the sentiment by punching two oval scallops, cutting them in half (one vertical; the other horizontal). I then placed them behind the oval with the sentiment to create a border. If there was overlapping that showed, which it did, I trimmed off that portion of the scallop.

I think the card turned out just like I envisioned. I didn’t have a “Hot Mess” in this week’s challenge like I did in a challenge I entered last week. LOL

PCCCS139


Supplies:

Note – I listed Well Scripted as a digital download since it is retired (I used the clear mount set).

Price: $99.95

Supply List

Built for Free Using: My Stampin Blog

This week’s Pal Paper Arts’ Challenge is (for me) a real challenge.  The challenge is to make a card featuring the following three colors:PPA247 A Color Challenge

The Pal Paper Arts design team made some wonderful cards using these colors. My favorite is Mike Funke’s card. He really nailed it.

Anyway, I decided to feature the Balloon Bash stamp set, and thus began the card making. I didn’t want to introduce any other colors besides the challenge colors (other than white) just to see if I could pull this off.  In my opinion, this is a hard challenge because the colors can almost look the same depending on the lighting.

Here is the completed card:

PPA247


I must say the “real” challenge was taking a picture that looked halfway like the card. I took outdoor pictures, indoor pictures (a lot of pictures), and I finally decided on this one. So, needless to say, the real challenge was getting a decent picture. LOL

Supplies:

PAGE TOP
[dealsbar preview] Amazing Deals: !!toolbar-deal-title!! - !!toolbar-deal-merchant!!