Tag : floral

24 posts

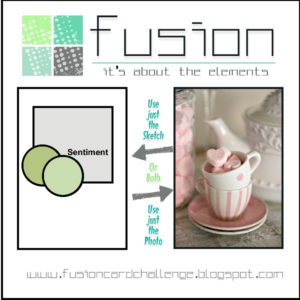
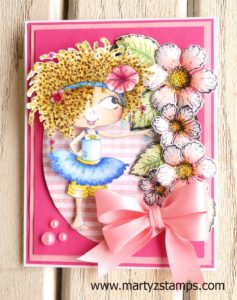
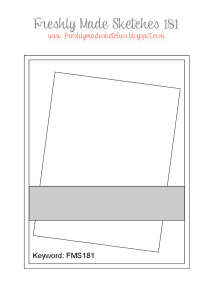
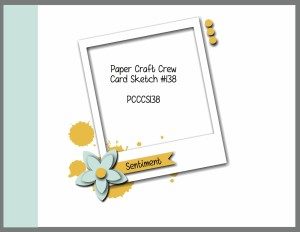
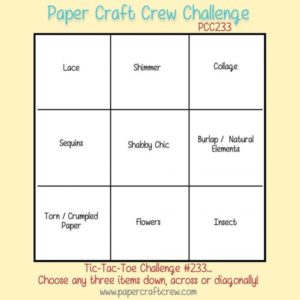
I am making it under the wire, yet again, for a Paper Craft Crew (#233) challenge. This week’s challenge is a Tic-Tac-Toe Challenge. I chose the middle, vertical column (shimmer, Shabby Chic, flowers) for my card. Here is the sketch:

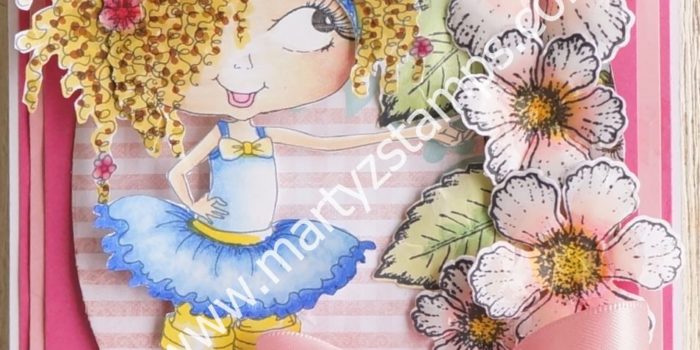
This image is a digi stamp I purchased from Sherri Baldy’s Etsy shop. The purchase gave me two digi stamps of the cutest girl. I have a blog post featuring the other image here.

I had decided to try and make dread locks/ringlets on my girl after watching a YouTube tutorial on coloring with alcohol markers (sorry, I didn’t make a note of the video). I will do my best to note the markers I used, but this was one of those creative moments where I was creating and not paying attention to the details of what I used. Anyway, I’ll pull out my Spectrum Noir Hex chart and do the best I can (it will be pretty close).

Spectrum Noir alcohol markers were used on the girl and the flowers. The hair – IG10, IG2, BG6, BG3; skin – HB2, FS2, FS7, BG4, TN3, TN5; lips and cheeks – FS8; dress/headband/pants – LG2, LG3, LG5, LY`, OR1, OR2; eye – LG2, LG5; flowers – CT2, OR2, OR3; leaves – LG2, LG3, LG5; and, the blender pen was used throughout.

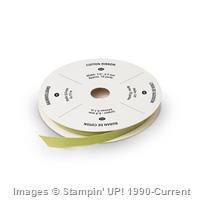
The base cardstock is SU! Pistachio. The images were stamped on Spectrum Noir cardstock using Memento Tuxedo Black ink. The base mat is Pink and Main designer paper die cut with Fun Stamper Journey Persian Garden die, The orange mat is FSJ Creamsicle cardstock with a light green mat of designer paper from Heartfelt Creations Sweet Berry 12×12 paper pack (this explains all the flowers – I had to cover up all the strawberries on the mat – LOL), a Spellbinders die was used to create some FSJ Creamsicle swirls. Spectrum Noir clear glitter pen was applied to the hair and skirt to add the SHIMMER. FSJ Journey Glaze was applied to the flowers, skirt waist, skirt trim, and eye. Diamond rhinestones were added to the flower centers, and a triple bow from SU! lace Pistachio ribbon accented the card. Last but not least, everything is popped, popped, popped up. A lot of dimension is going on here.

It is a very busy card, but I like busy and it really yells Shabby Chic.

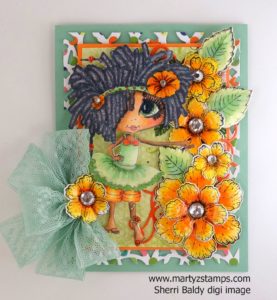
I really love the way this card turned out. It is one of my favorites.

Yesterday I had a Spectrum Noir Alcohol Marker coloring class, which focused on shading clothing. I had recently ordered from Etsy a Sherri Baldy digi stamp (there were two images to my surprise and delight). I thought this would be a great image to practice clothing coloring. A color palette of blues and pinks was chosen. When she was finished, I knew I had to submit another card to the Fusion Card Challenge – Pretty in Pink Card Challenge.

She was so much fun to color. Here are the markers we used: Hair – base from roots to midway of hair GB11 then GB4 to the ends. TN3, GB 10, TN5, EB4, EB5 (dots throughout hair); skin – EB1, FS7, FS9 and FS8 for cheeks and lips; dress and headband- TB1, TB4, TB5; Pants – LY1, CT4; Flowers PP1 and PP3 and Blender throughout project.

The flowers are from the Heartfelt Creations – Botanical Rose. The base of the card is FSJ Whip Cream with FSJ Watermelon Fusion and FSJ Bubble Gum cardstocks as mats. The oval was cut from Heartfelt Creations Strawberry Fields 12 x 12 paper pack. The pearl accents are FSJ pearls and they were colored with Spectrum Noir PP2 marker to make them pink. A layer of Journey Glaze was added to all the flowers to make them shine and pop. And, finally the bow is SU! silk ribbon made into a double bow.

If you would like to order any products from Fun Stampers Journey, click here.

This week’s Paper Craft Crew Challenge #226 is a Birthday theme card. Here is their card sketch:

A week and a half ago, I went over to my friend’s house to help her set up her new Brother Scan-n-Cut. Once we had it working to scan and cut out stamped images, we made a card using the Lawn Fawn fairies we had just cut out. We colored the fairies using Spectrum Noir Alcohol Markers. The designer paper is from a paper stack (I think it is Penny Black – not sure). The “happy BIRTHDAY” is cut from a My Favorite Thing die set out of Fun Stampers Journey cardstock (this was cut out at a later date at my house). The grassy hill and flowers are cut from the Lawn Fawn coordinating dies that work with the Fairy set and the hill is embossed using a SU! embossing folder. The cardstock mat is SU! cardstock as well as the grassy hill and flowers.

As we were working on our cards, I became extremely nauseated and left to go home (not realizing I had left my unfinished card project). My friend, Cheyenne, brought it over and gave it to me to finish, but she didn’t realize I had not stamped the sentiment on my card; so, we had cut out the “happy BIRTHDAY” for a card Cheyenne was making for a friend and it just didn’t fit what she was creating and it was pushed aside. A few days later, I was going through my cards that needed to be completed or updated to sell on my Etsy shop and I thought this “happy BIRTHDAY” would work wonderfully on my card. Voila! It did and here it is:

What a cute, adorable card to give someone special on their special day!

Next weekend, I along with three other friends will be at the Fun Stampers Journey – The Amazing Tour. We are super excited to go and experience all the “Amazing” energy and creativity. I have been to many papercrafting events throughout my 13 years of papercrafting, usually, involves taking cards I have made and trading them with other event participants. We call them swaps. The swaps should be exclusive to the company presenting the event. So, for this trip, my friend – Debbie Kissel – came over and we re-made some swaps we used for a Coach meeting.

I wanted to feature an Artist Trading Stamp (ATS) keeping the price point low for papercrafting beginners and those on a limited budget.  Although the card featured in this post looks labor intensive, it is a super simple and quick card to make. This card definitely has a WOW factor. Hello – you can create awesome cards without breaking the bank. 

OLYMPUS DIGITAL CAMERA


Here is how I made these cards:

  1. I used Fun Stampers Journey (FSJ) Black Licorice ink to stamp the flower and leaf images. I stamped directly on Watermelon Fusion and Lavender Fusion cardstocks. I stamped the leaf on colored cardstock as well (Sweet Pear or Limeade Splash both would make a wonderful leaf).
  2. I used the Candy Apple ink pad for the Watermelon Fusion flower and the Lavender Fusion ink pad for the Lavender Fusion flower. Using sponge daubers (one for each color) and starting in the middle of the flower, I applied the ink in a circular motion and stopped about 1/4″ from the tip of the flower petals. Do this until you are satisfied with the shading.
  3. I fussy cut the flowers and the leaf (a die is available, but the flower and leaf need to be cut next to the stamped image for the best effect). 
  4. I placed the flowers on a foam mat that is firm but not too firm (you want it to have a little give). I took the large stylus on the Journey Bloom Tool; starting in the center of each petal, I applied pressure and moved the stylus in a circular motion out to the edges of the petal and back toward the middle of the flower until the petal began to curl in on itself. I did this to each petal. Note: For this second round of flowers, Debbie was the stylus operator.
  5. I turned the flower over, cut the petals apart about 1/4″ from the center. I placed the flower on the mat; using the stylus, I pressed down hard and move in a circular motion in the center only. Note: The petals should pull in toward the middle. You can squeeze and shape the petals with your fingers. The leaves are done the same way but only working on the backside of them.
  6. I placed all the flowers that were created (10 in all) in a box and made a solution of 1/2 Journey glaze and 1/2 water (I saw Richard Garay do this on a video to make a sparkling background for a snowman card). This solution was created in a spray bottle I had in my craft room. I sprayed the flowers; then, sprinkled them with Journey Sparkle Dust (I used a small glitter shaker bottle). I should have sprayed the flowers again to set the glitter, but so far the glitter hasn’t come off.
  7. I cut a circle in the top mat ( top mat measurement 5″ x 3 1/2″) using the pierced circle dies. I placed the pierced circle die on the outside of the circle I wanted to create, and nested the cutting circle die inside the pierced die. I saved the cut circle and set it to the side.
  8. I popped out the mat with the medium Journey Foam Squares and adhered it to the Whipped Cream cardstock base.
  9. I used the circle that was left over from cutting out the mat to stamp the sentiment. I colored the sentiment with the Color Burst pencils in a color that coordinated with the flowers. I placed liquid glue on the back of the circle and pressed it into the circle and directly onto the cardstock base.
  10. I adhered the flower and petal with liquid glue and placed a Spring Accent Dot in the middle of the flower.

One of the mats had the circle cut off-center; so, instead of wasting the cardstock, I looked at it and thought . . . hmmmm. . . . I could make the same card in a horizontal position. I created an additional WOW factor using Orange Rave and Gold silk accents on this card. Note: I left the first two cards “clean”, because I didn’t have the silks I wanted to use with those flowers,. I think having two different ways to complete a card shows the versatility of our amazing products. Some of my stampers like “clean” and others do not – they want Wow, Wow, Wow.

Here is the mistake turned into a raving beauty:

Supplies:

All Fun Stampers Journey – all products can be purchased through my website.

Cardstock: Whipped Cream CS-0040, Lavender Fusion CS-0017, Watermelon Fusion CS-0039, Orange Creamsicle CS-0024
Ink: Black Licorice IP-0009, Lavender Fusion IP-0036, Candy Apple IP-0017, IP-0043
Die: Pierced Circle DI-0039    Use a Bloom Tool to separate the pierced die from the paper TO-0073
Adhesives: Journey Glaze AD-0003 or AD-0002, Journey Foam Squares AD-0085, Craft Glue AD-0111
Embellishments: Journey Sparkle Dust AC-0013, Spring Accent Dots AC-0179
Silks: Orange Rave IP-0118, Gold IP -0096
Suggested Silks for first two cards: Cosmic Grape IP-0117 and Outrageous Pink IP-0109

This week’s Paper Craft Crew Card Challenge #165 is featuring the Hearth and Home Thinlit set. I mentioned in the previous post I love this set. It is so versatile and just makes the most darn cute cards you have ever seen that I’m entering another card for this challenge. The card sketch is below:

PCCCS-161-204-002

This card was one of September Make-n-Take cards. My stampers love this die set and several of them have purchased it already and others have it on their wish list.

This card, also, features the new SU! Brick Embossing folder. It is an outdoor scene using the Hearth & Home Thinlit set. It looks very much like a Spring card, but I couldn’t help myself; I just had to put flowers in the flower box die that comes with the set.

PCCCS 165 Card 2

I matted the entire card with a thin layer of Basic Black to make the Cherry Cobbler brick wall stand out. I gave it a worn look by adding Very Vanilla Craft Ink to the embossing folder and then running the mat through the Big Shot. The flowers and leaves were made using punches. The grass was cut out with a die (it might have come from My Favorite Things – I’m not sure since I purchased it from one of my stampers who was getting rid of their stash). The shade was punched with a retired ribbon type punch from Stampin’ Up!. I love this card and I hope you do too.

Supplies:


A really great simple and quick card I made was one where I used cards from the Project Life card set. The set I used is a retired set; therefore, I am going to list a current Project Life card set in the supply list.

This is such a clean and simple/quick card I think it fits this week’s TGIF Card Challenge.  Here is their sketch:

tgifc13

Using the Project Life cards for mats and sentiment holders on a card is a great way to introduce stamping to new customers that might be intimidated by more technically challenging cards. This takes away the guess work of color combinations that work and limits initial supplies to a bare minimum. It’s also a great way to make cards for those crafters that already have a full plate.

All I had to do was cut my base, fold in half, cut down the largest project life card to 4″ x 5 1/4″, stamp a sentiment on a coordinating smallest project life card, and adhere all of the cards to the card base. This took all of five minutes, at the most. It will take you longer trying to decide what sentiment to use on the card.

I think this card turned out really well.

Project Life Card

Supplies:

While looking for inspiration for card challenges, I came across Virginia’s View Challenge. I had just completed a monochromatic card for my next make-n-take, and I decided to enter this challenge. She specified Ombre & Monocromatic and gave a couple of examples:

Ombre Monochromatic

Ombre Monochromatic

I think these cards are gorgeous!

For my regular blog readers this card was featured as a Paper Craft Crew Challenge as well (might as well kill two birds with one stone). Here is one of June’s make-n-take cards as well as Virginia’s View Challenge:

Supplies:


Price: $28.00

Supply List

Built for Free Using: My Stampin Blog

I sat down this afternoon to complete a card for the Paper Craft Crew Card Sketch 139 Challenge. The design team created a lot of awesome samples to spur the imagination. The challenge sketch is below:

PCCCS139sketch

I wanted to have a Mother’s Day card to share with my group of stampers; so, to work I did go. I really, really, really, (did I say really???) love the Birthday Bash DSP and its color combinations. I just can’t get enough of Calypso Coral, Daffodil Delight, Old Olive.. It just reminds me of summer. The sample sketch looks like a 6″ x 6″ card, but I whittled mine down to a 5 1/2″ x 4 1/4″ card. I wanted a fresh, clutter free card; therefore, I only stamped one large flower in Calypso Coral and accented the sentiment with a smaller flower in the same color. I accented the card with butterflies and diamond rhinestones tinted with a Blendabilities marker (Wild Wisteria – darkest color). I made a scallop oval mat for the sentiment by punching two oval scallops, cutting them in half (one vertical; the other horizontal). I then placed them behind the oval with the sentiment to create a border. If there was overlapping that showed, which it did, I trimmed off that portion of the scallop.

I think the card turned out just like I envisioned. I didn’t have a “Hot Mess” in this week’s challenge like I did in a challenge I entered last week. LOL

PCCCS139


Supplies:

Note – I listed Well Scripted as a digital download since it is retired (I used the clear mount set).

Price: $99.95

Supply List

Built for Free Using: My Stampin Blog

Here is the Freshly Made Sketches 181 sketch:

FMS Final 181-001I wanted to create a white mat on a white background for this challenge. I took the white mat and punched holes around the edges with my paper piercing tool and a piercing guide. I took the floral patch stamps and stamped two flowers along with some leaves; then, I accented them with a pearl. I took the Peachy Keen stamp set and created a border using Crisp Cantaloupe and stamped the word Hello with the ink as well.

Here is my entry in the Freshly Made Sketch Challenge 181 –

Freshly Made Sketch 181


This card is a quick and simple card that would work well for a make-n-take class.

Supplies:

Retired Stamp Set: Peachy Keen


There are several card challenge websites I really like and Paper Craft Crew is one of them. Their challenge this week is

Card Sketch #138

PCCCS138

If you read my previous post regarding my last minute card challenge entry to Pals Paper Arts Card Challenge and how my first attempt at making the Very Vanilla mat stamped with SU! Dictionary stamp and two other stamp sets had turned into a Hot Mess of cluttered-ness, then you might recognize how I took a “Hot Mess” and used it in another card challenge.

I took the On Film die and strategically placed it to take advantage of my “mess.” I think it turned out rather well. From that starting point, I ran a piece of Pistachio Pudding through the Big Shot and embossed it with the retired embossing folder Script (not sure of the actual name) and brushed the edges with Pistachio Pudding ink. I matted it on SU! Mossy Meadow. I colored three rhinestones with the darkest of the Blendabilities Old Olive marker (in the picture, the light causes the rhinestones to reflect the Crisp Cantaloupe paper). I cut out the thanks in Mossy Meadow and Crisp Cantaloupe offsetting the Crisp Cantaloupe on the Mossy Meadow to give a shadow effect. I made the flower with the Boho Blossom punch. I punched four flowers out of the Crisp Cantaloupe; then, ran them through a crimper several times until I could pull them apart, I crumpled them up and uncrumpled them stacking them on top of each other. I punched the smaller of the flowers on the Boho Blossom punch out of the “Hot Mess” paper. I placed them all together, secured them with a brass brad (retired), and curled the petals around the brad. I lifted the frame and thanks up from the cardstock with dimensionals.

Here is the results:

PCCCS138


Note: As I lay awake this morning, Saturday, April 11th, I realized…I think I used Pear Pizzazz paper instead of Pistachio Pudding (that’s what I get for having sheets of paper outside of their wrapping).

Price: $4.95

Price: $99.95

Supply List

Built for Free Using: My Stampin Blog

PAGE TOP
[dealsbar preview] Amazing Deals: !!toolbar-deal-title!! - !!toolbar-deal-merchant!!