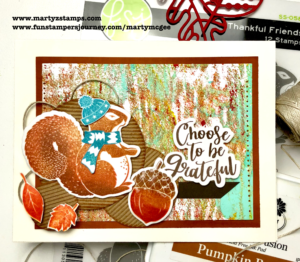
Next weekend, I along with three other friends will be at the Fun Stampers Journey – The Amazing Tour. We are super excited to go and experience all the “Amazing” energy and creativity. I have been to many papercrafting events throughout my 13 years of papercrafting, usually, involves taking cards I have made and trading them with other event participants. We call them swaps. The swaps should be exclusive to the company presenting the event. So, for this trip, my friend – Debbie Kissel – came over and we re-made some swaps we used for a Coach meeting.
I wanted to feature an Artist Trading Stamp (ATS) keeping the price point low for papercrafting beginners and those on a limited budget. Although the card featured in this post looks labor intensive, it is a super simple and quick card to make. This card definitely has a WOW factor. Hello – you can create awesome cards without breaking the bank.
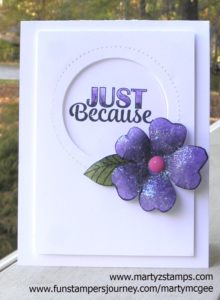
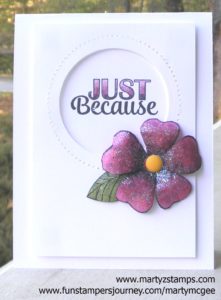
Here is how I made these cards:
- I used Fun Stampers Journey (FSJ) Black Licorice ink to stamp the flower and leaf images. I stamped directly on Watermelon Fusion and Lavender Fusion cardstocks. I stamped the leaf on colored cardstock as well (Sweet Pear or Limeade Splash both would make a wonderful leaf).
- I used the Candy Apple ink pad for the Watermelon Fusion flower and the Lavender Fusion ink pad for the Lavender Fusion flower. Using sponge daubers (one for each color) and starting in the middle of the flower, I applied the ink in a circular motion and stopped about 1/4″ from the tip of the flower petals. Do this until you are satisfied with the shading.
- I fussy cut the flowers and the leaf (a die is available, but the flower and leaf need to be cut next to the stamped image for the best effect).
- I placed the flowers on a foam mat that is firm but not too firm (you want it to have a little give). I took the large stylus on the Journey Bloom Tool; starting in the center of each petal, I applied pressure and moved the stylus in a circular motion out to the edges of the petal and back toward the middle of the flower until the petal began to curl in on itself. I did this to each petal. Note: For this second round of flowers, Debbie was the stylus operator.
- I turned the flower over, cut the petals apart about 1/4″ from the center. I placed the flower on the mat; using the stylus, I pressed down hard and move in a circular motion in the center only. Note: The petals should pull in toward the middle. You can squeeze and shape the petals with your fingers. The leaves are done the same way but only working on the backside of them.
- I placed all the flowers that were created (10 in all) in a box and made a solution of 1/2 Journey glaze and 1/2 water (I saw Richard Garay do this on a video to make a sparkling background for a snowman card). This solution was created in a spray bottle I had in my craft room. I sprayed the flowers; then, sprinkled them with Journey Sparkle Dust (I used a small glitter shaker bottle). I should have sprayed the flowers again to set the glitter, but so far the glitter hasn’t come off.
- I cut a circle in the top mat ( top mat measurement 5″ x 3 1/2″) using the pierced circle dies. I placed the pierced circle die on the outside of the circle I wanted to create, and nested the cutting circle die inside the pierced die. I saved the cut circle and set it to the side.
- I popped out the mat with the medium Journey Foam Squares and adhered it to the Whipped Cream cardstock base.
- I used the circle that was left over from cutting out the mat to stamp the sentiment. I colored the sentiment with the Color Burst pencils in a color that coordinated with the flowers. I placed liquid glue on the back of the circle and pressed it into the circle and directly onto the cardstock base.
- I adhered the flower and petal with liquid glue and placed a Spring Accent Dot in the middle of the flower.
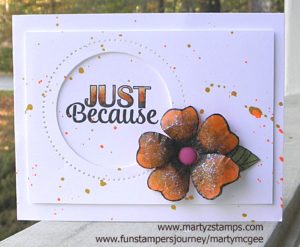
One of the mats had the circle cut off-center; so, instead of wasting the cardstock, I looked at it and thought . . . hmmmm. . . . I could make the same card in a horizontal position. I created an additional WOW factor using Orange Rave and Gold silk accents on this card. Note: I left the first two cards “clean”, because I didn’t have the silks I wanted to use with those flowers,. I think having two different ways to complete a card shows the versatility of our amazing products. Some of my stampers like “clean” and others do not – they want Wow, Wow, Wow.
Here is the mistake turned into a raving beauty:
Supplies:
All Fun Stampers Journey – all products can be purchased through my website.
Cardstock: Whipped Cream CS-0040, Lavender Fusion CS-0017, Watermelon Fusion CS-0039, Orange Creamsicle CS-0024
Ink: Black Licorice IP-0009, Lavender Fusion IP-0036, Candy Apple IP-0017, IP-0043
Die: Pierced Circle DI-0039 Use a Bloom Tool to separate the pierced die from the paper TO-0073
Adhesives: Journey Glaze AD-0003 or AD-0002, Journey Foam Squares AD-0085, Craft Glue AD-0111
Embellishments: Journey Sparkle Dust AC-0013, Spring Accent Dots AC-0179
Silks: Orange Rave IP-0118, Gold IP -0096
Suggested Silks for first two cards: Cosmic Grape IP-0117 and Outrageous Pink IP-0109
