I am excited to announce I will be part of the Little Blue Button Stamps Design Team for the next six months.
If you haven’t heard about Little Blue Button Stamps (LBBS), let me give you the scoop. LBBS offers a wide selection of digital stamps and planner printables. Digital stamps are unique because you can download them immediately to your computer and adjust the size to fit any project you are creating. This makes digital stamps extremely versatile and I really love versatility.
Did I mention they are a great value. I am all about cost and intrinsic value and these digi stamps provide both. Wow!
And . . . . if you don’t like to color but love the look of colored stamps on a project, LBBS has a line of colored digital stamps that are great for cards and scrapbook designs.
I have listed links below for all social media outlets. Make sure to check out LBBS on YouTube. There’s a great video tutorial showing you step-by-step how to purchase and download your digi stamp(s).
It is time for another Creative Design Team Blog Hop. I am so excited to feature products found in the new Easter Blessings catalog. So many possibilities for creating incredible cards, gifts and just plain adorable projects. Grab a cuppa coffee, sit back, relax and hop along on a journey of inspiration. Here we go!
I’m going to let you in on a little surprise. All of my featured products involve NO Stamping! So, for those of you that don’t have a huge selection of inks and stamps, these projects are for you.
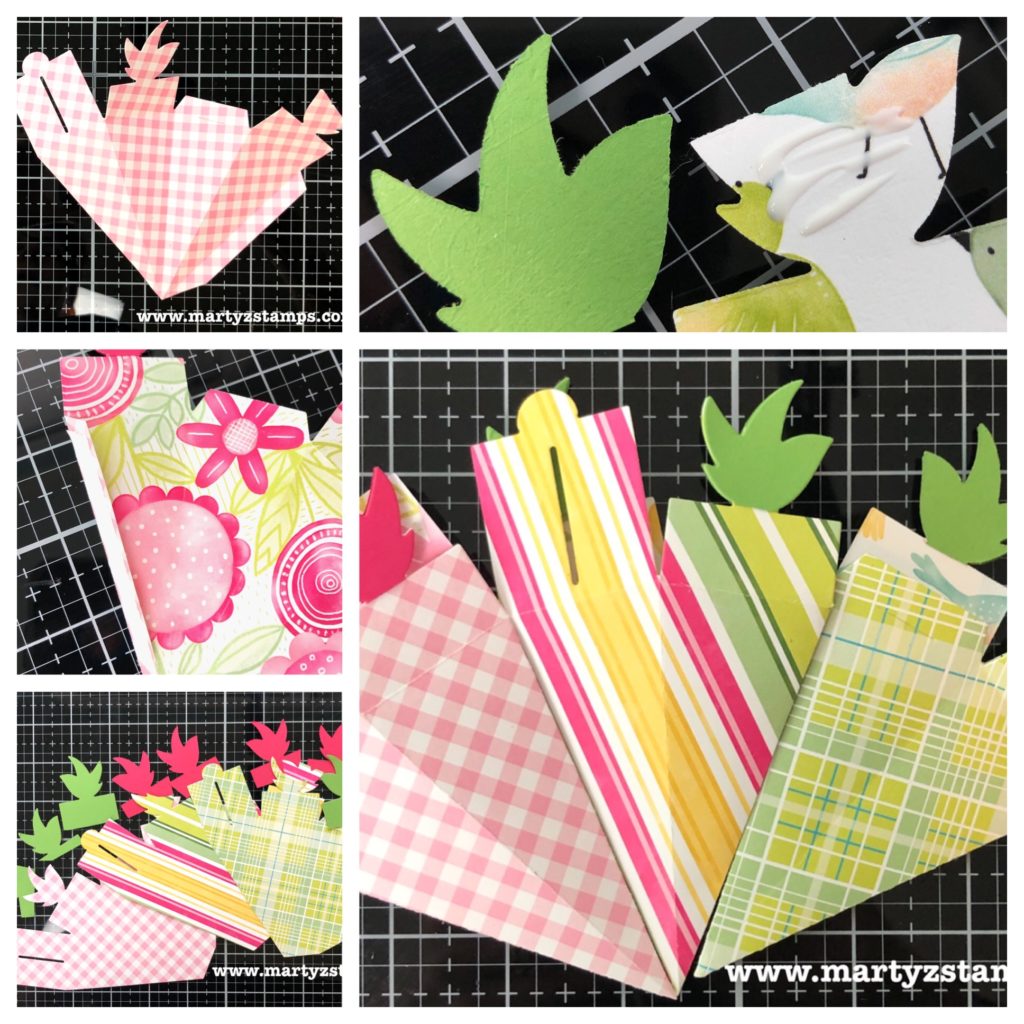
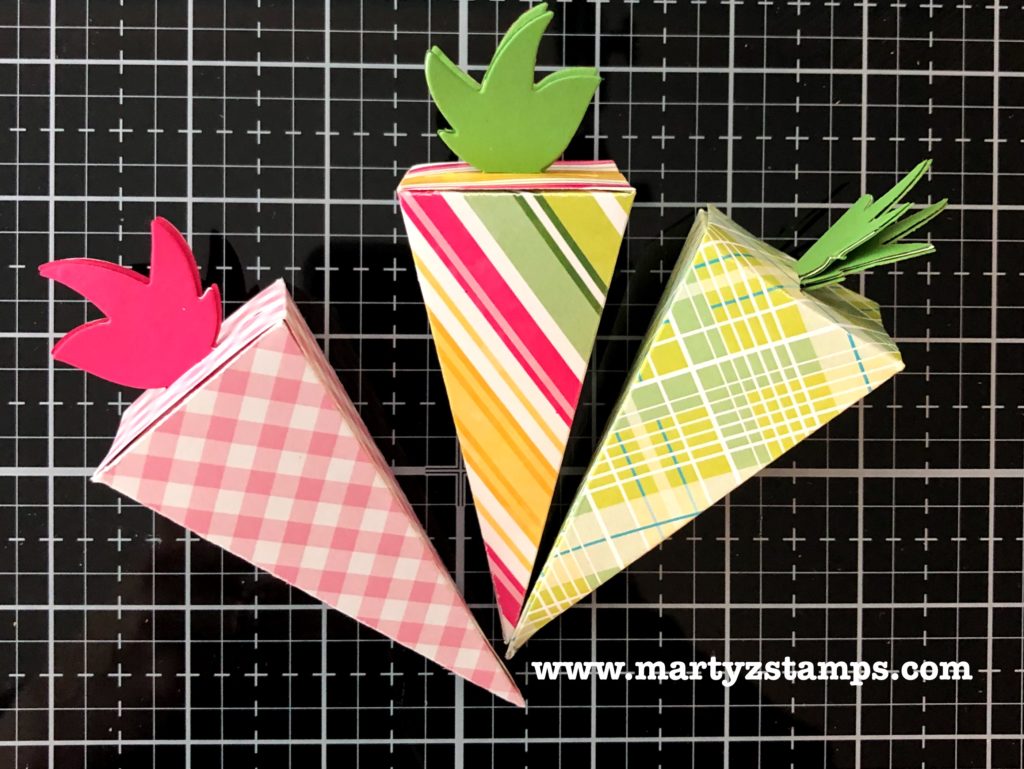
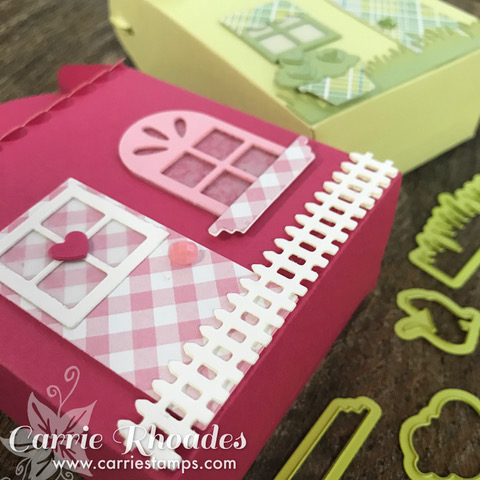
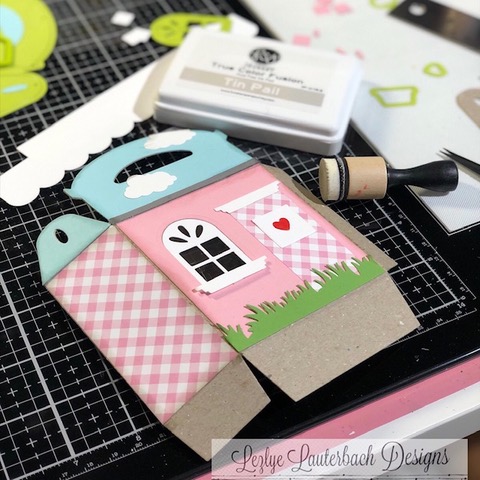
Carrot Treat Box
First up are some adorable Carrot Treat Boxes DI-0521. I used a variety of Create and Bloom Prints PP-0067 to inspire you to think outside the box. These carrot treat boxes are so uniquely cute they are sure to make someone you know hoppy. Check out the picture tutorial for how to create your own treat boxes.
Step 1 (top left hand corner) – Crease all score lines on of the die-cut carrot. Step 2 – Place adhesive on the side flap. Step 3 – Die-cut cardstock for the “green” portion of the carrot. Step 4 – Adhere the die-cut “green” portion to both sides of the carrot top. Step 5 – Adhere sides together.
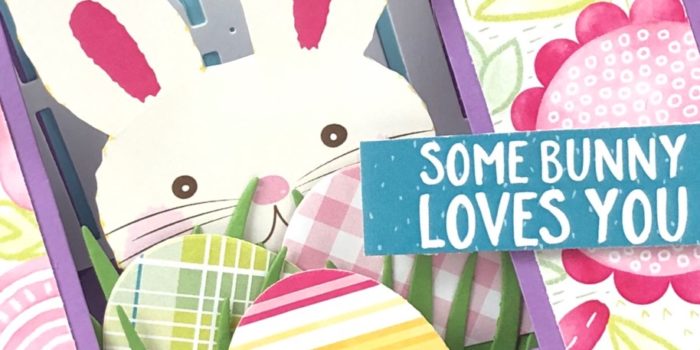
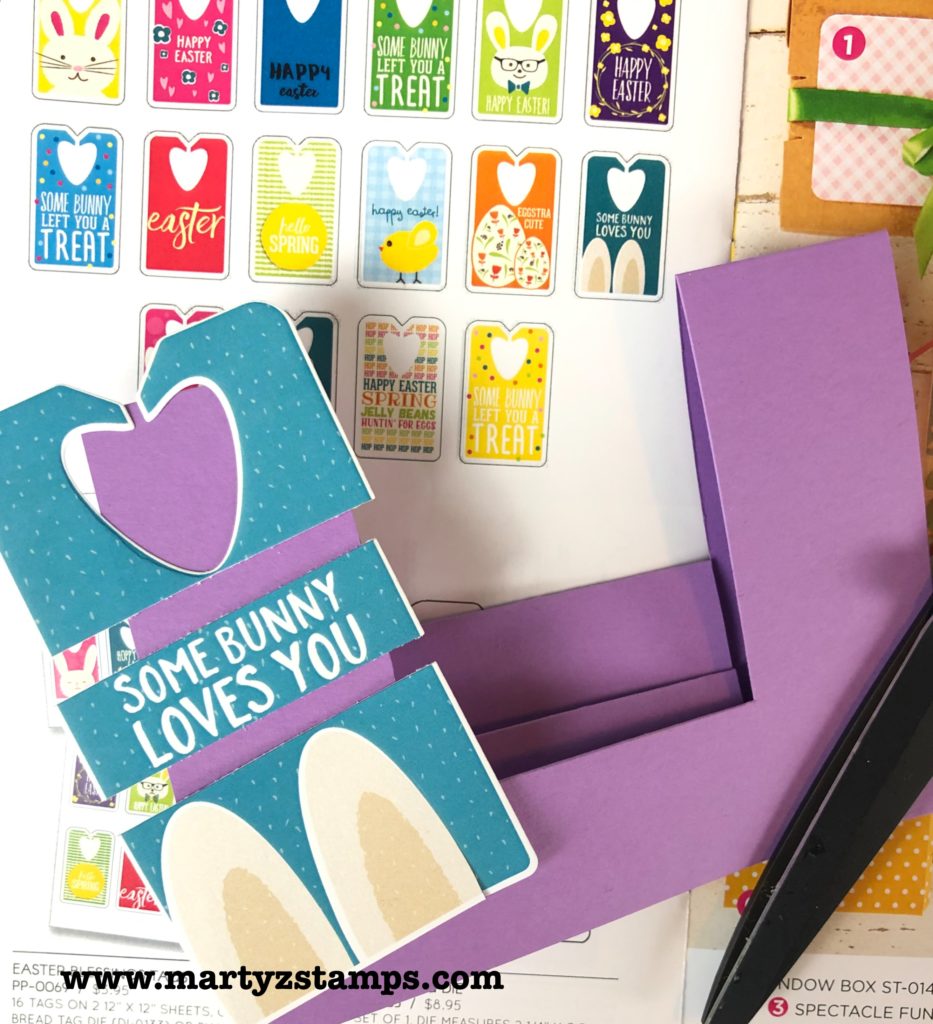
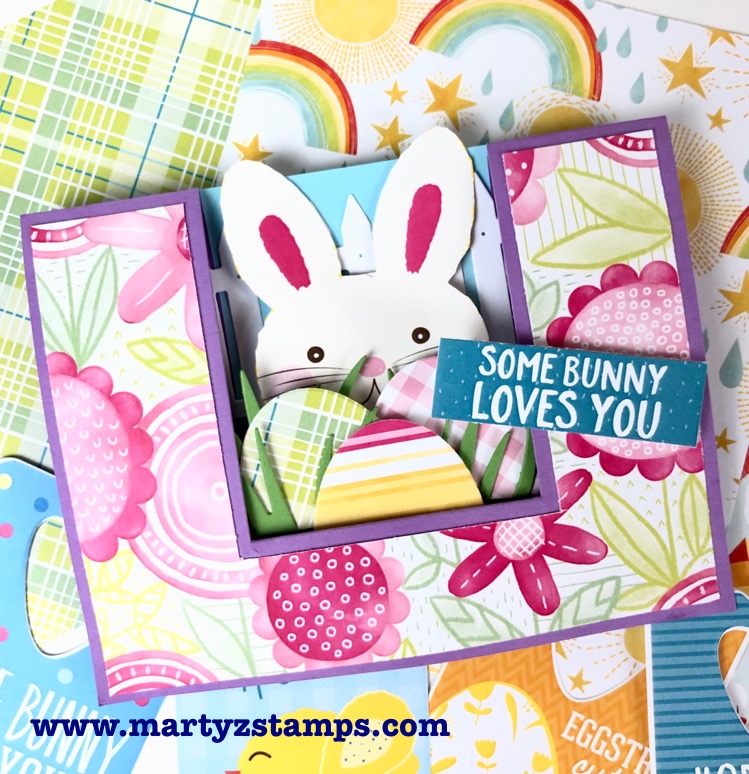
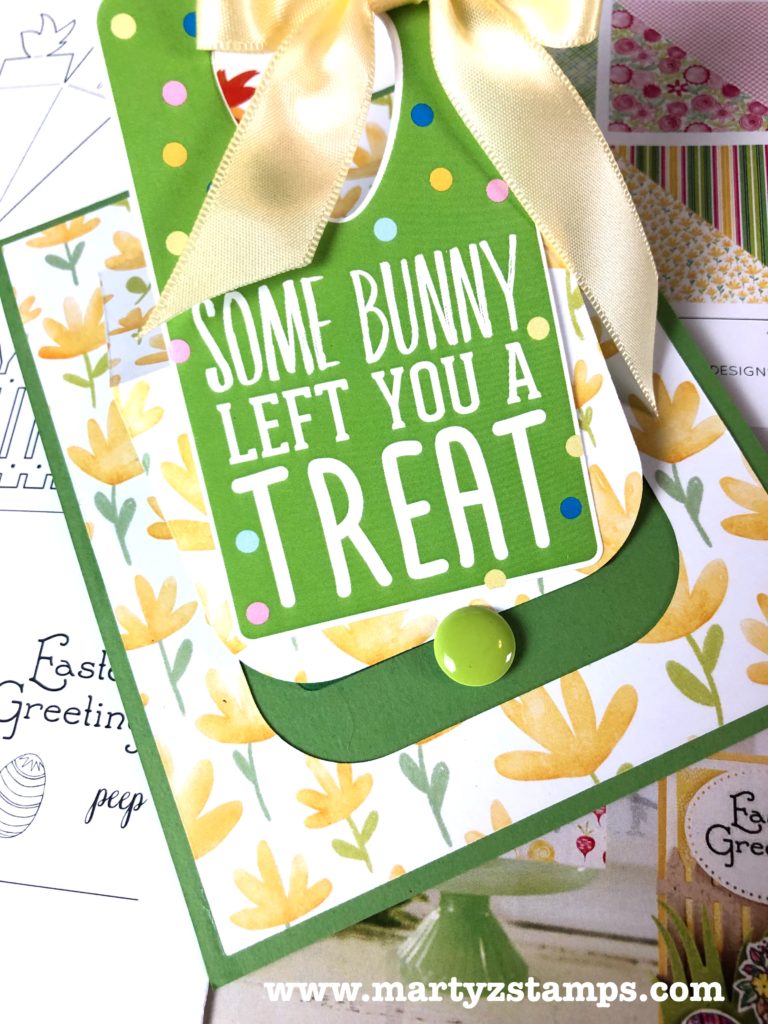
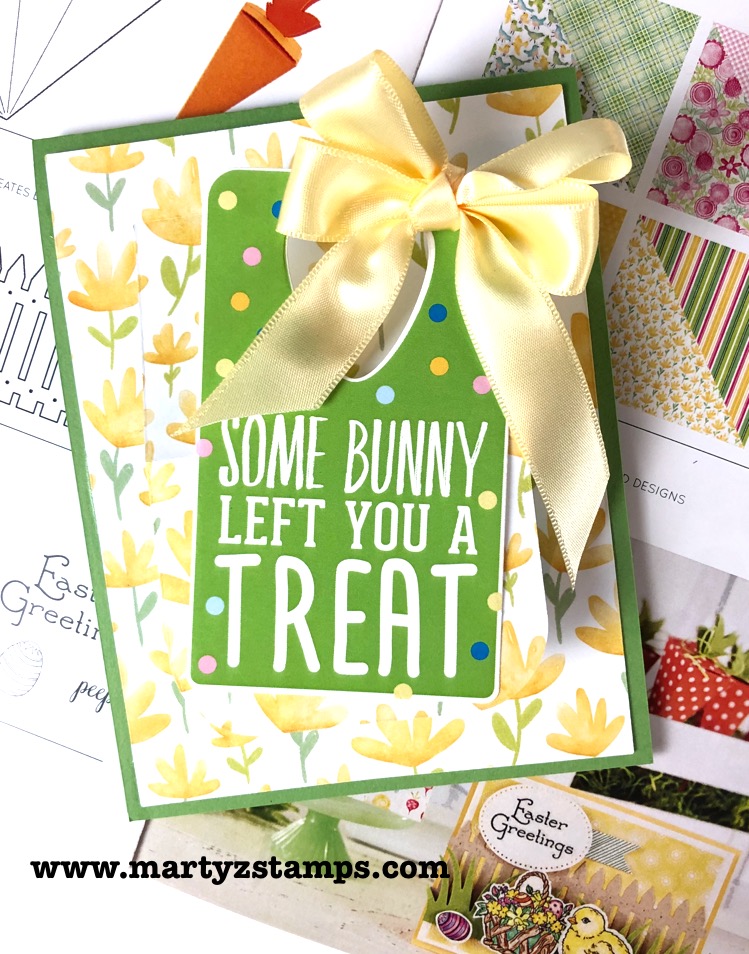
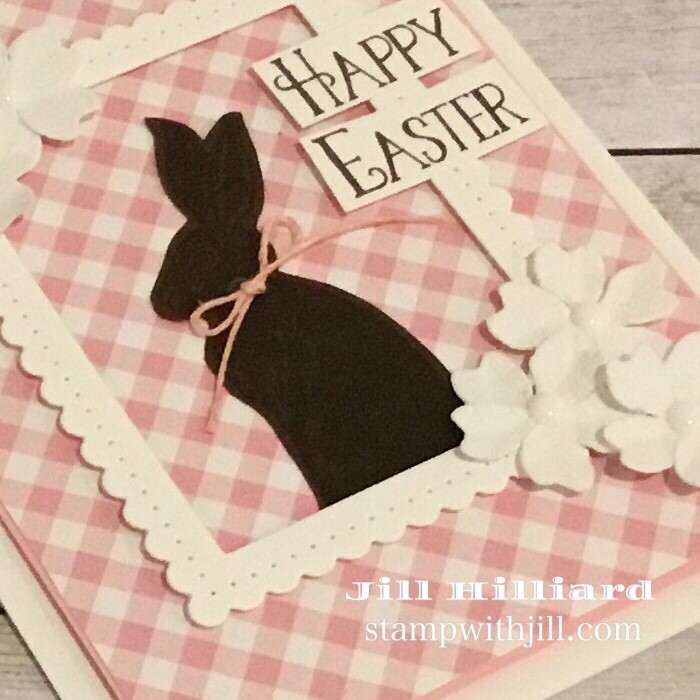
Fancy Fold Some Bunny Loves You Card
Ya’ll know fancy fold cards have a sweet spot in my creative heart. This one came together just like a rabbit hops, hops, hops.
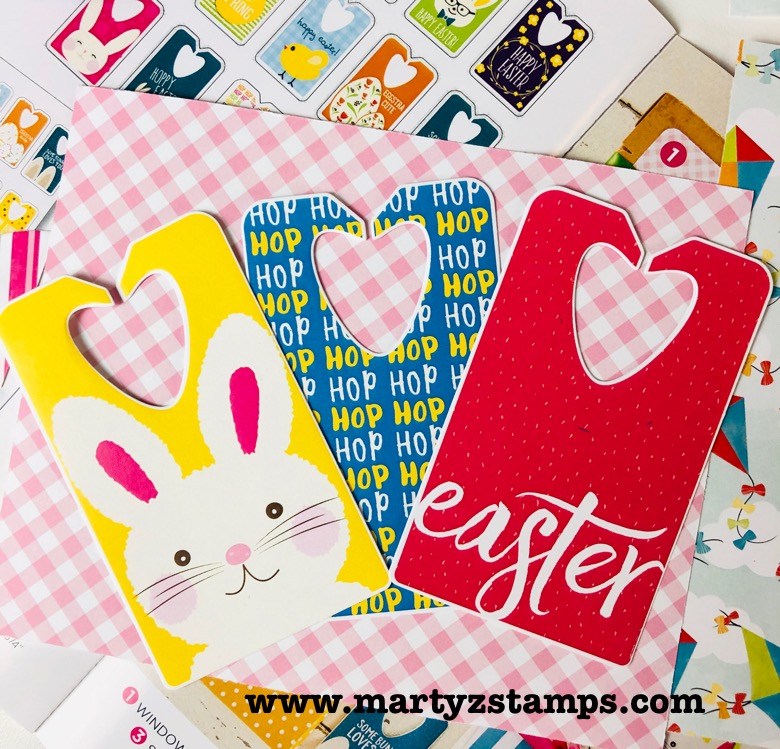
Begin with an Inner Stair Step Card. Choose a couple of Easter Blessing Gift Tags to use on your card project. I chose the Some Bunny Loves You for the sentiment and cut it down.
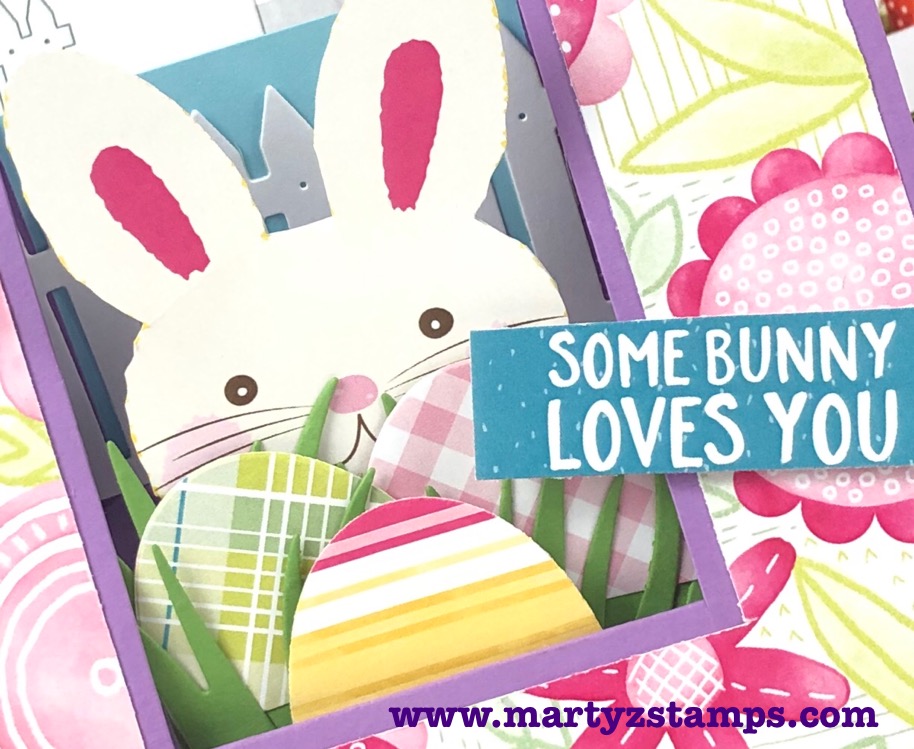
I took the bunny on the yellow background tag (see below) and cut him out.
Here he is peeking out from stash of candy eggs! He’s so cute.
I placed a full 5 1/2″ x 4 1/4″ piece of Pool Play cardstock on the back of the main card for the sky. I adhered onto the back piece a Whip Cream Garden Fence DI-0485. The bunny is adhered to the back side of the middle panel. Tip: I had to add a piece of cardstock to the back of the bunny to give him height. I die-cut grass from the Border Details die set DI-0144 and the eggs from the Fancy Eggs Die DI-0512. To create the print paper mat. I laid the printed paper on top of the base and marked my cut lines with a pencil. I trimmed the printed paper on my trimmer and adhered to the base.
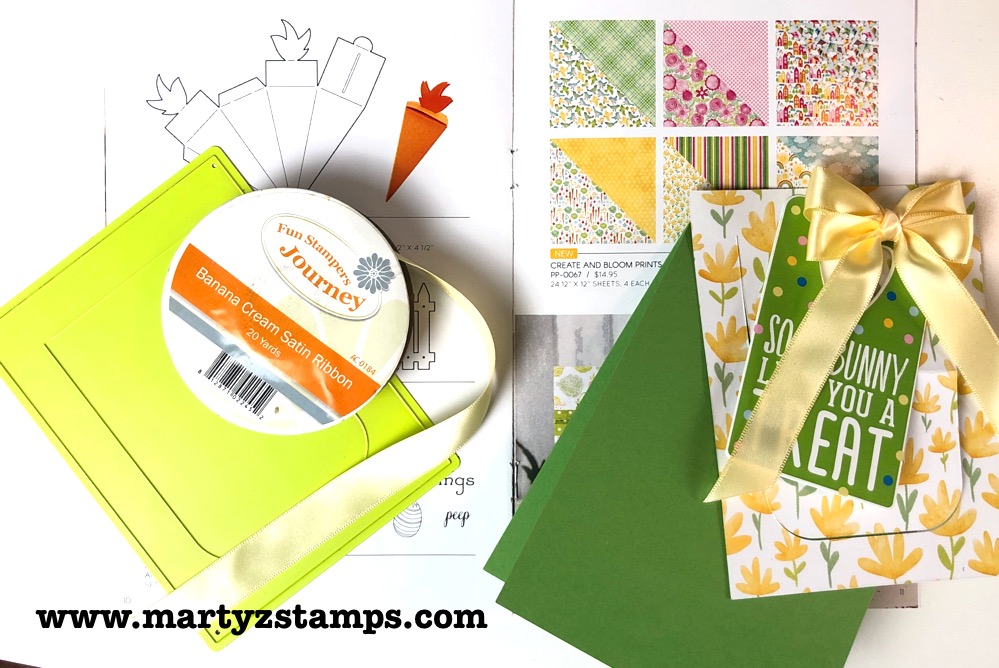
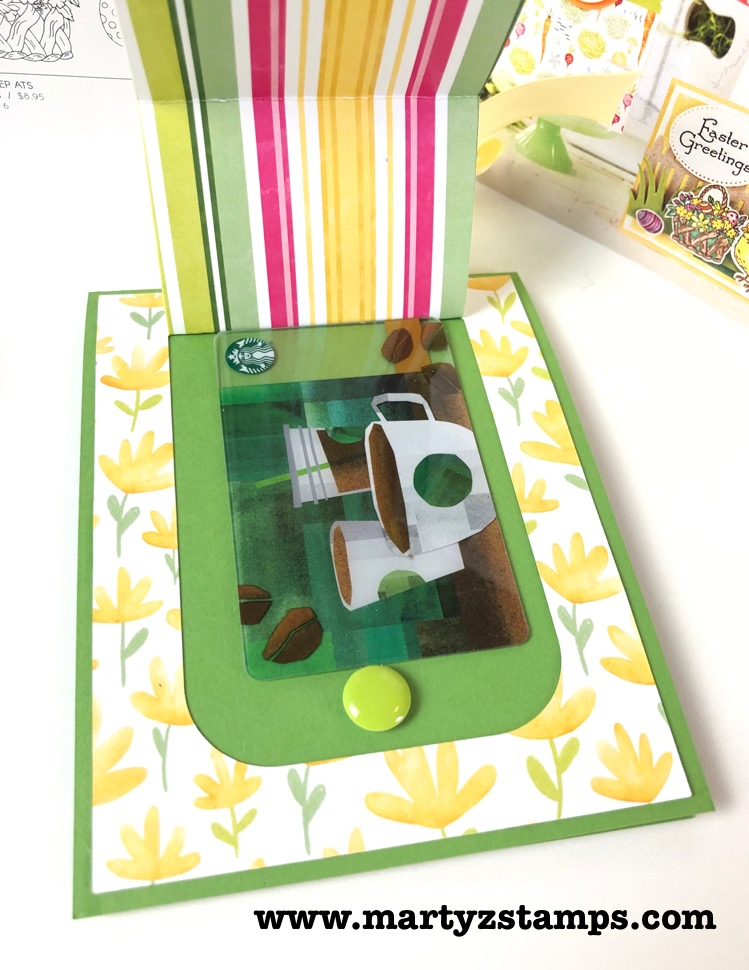
Easter Blessing Gift Card Holder
Many of you enjoy giving gift cards. This card is perfect for holding a gift card with a sweet Easter Blessings Tag.
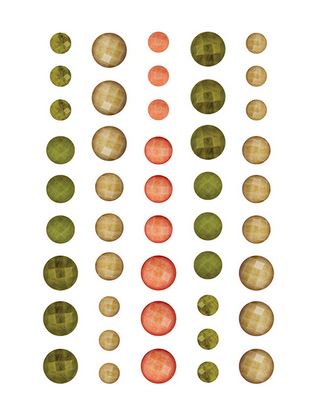
I used the following for this project: Window Pop die DI-0389, Banana Cream Satin Ribbon AC-0184, Easter Blessings Gift Tags PP-0069, Create and Bloom Prints PP-0067, Lemongrass cardstock CS-2019 and Sweet Candy Drops AC-0275.
Die cut the printed paper using the Window Pop die. Create a double bow from the satin ribbon and choose a tag sentiment.
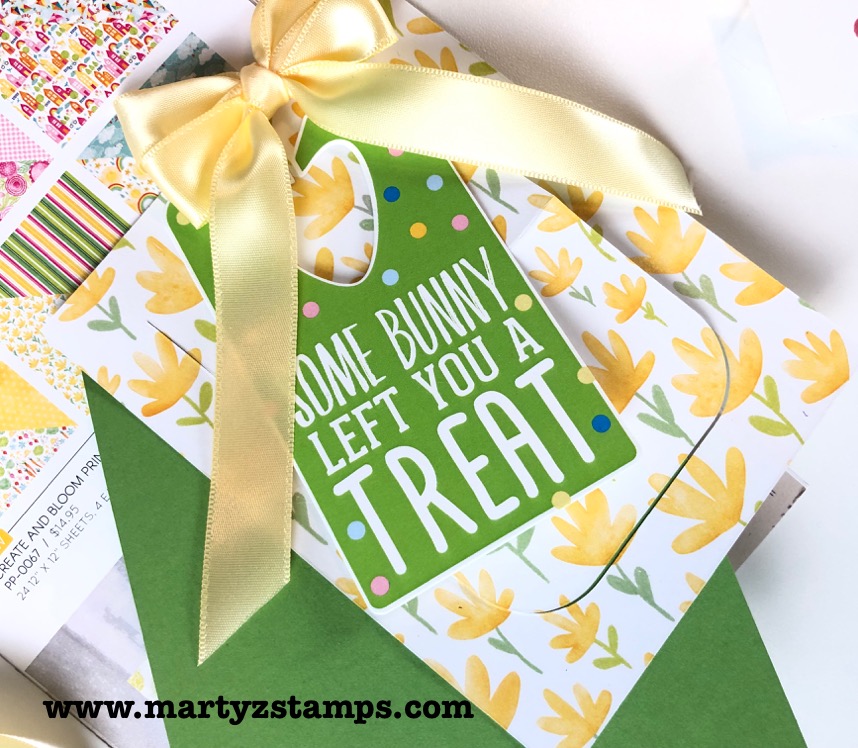
Adhere the die cut paper to the card base and fold the flap in half (this will create an easel effect for display purposes). Adhere the gift card to the card base and apply a Sweet Candy Drop on the bottom portion of the card base under the flap.
Adhere the tag to the bottom portion of the folded flap.
Adhere the bow to the card. It is just that simple!
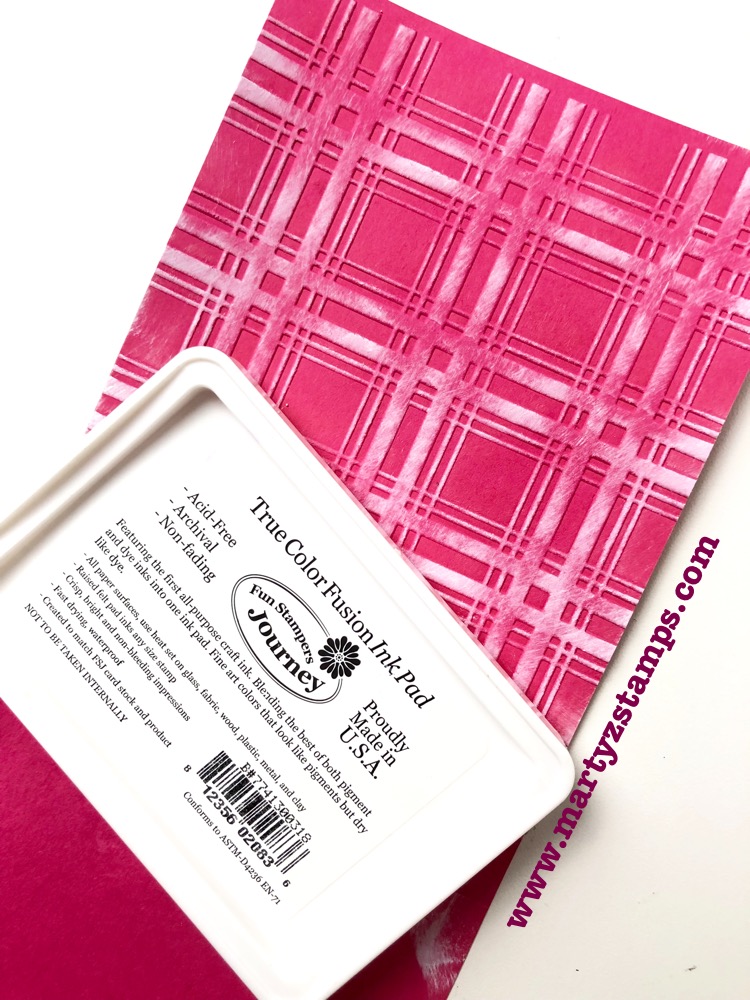
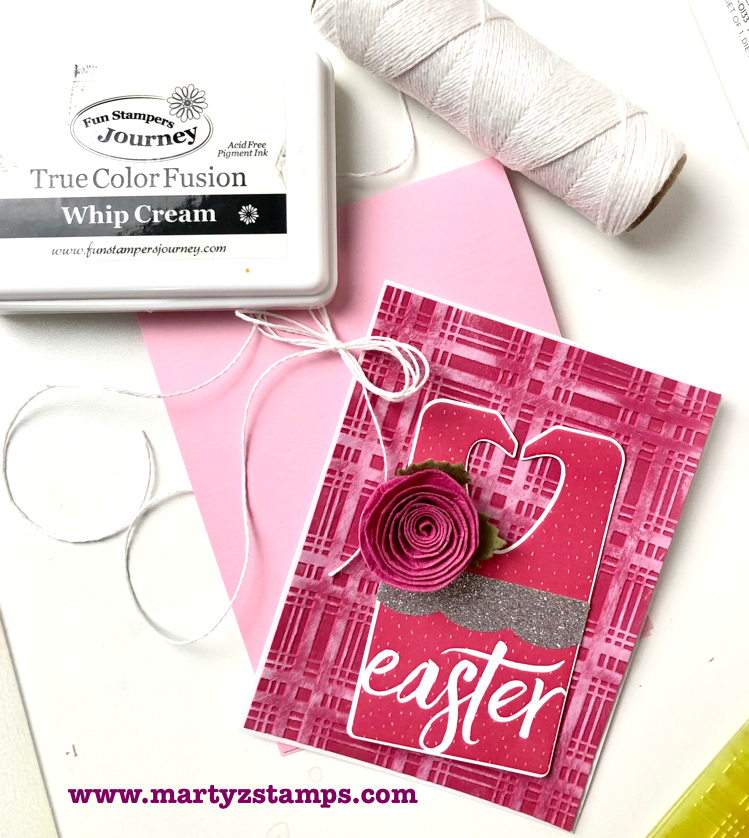
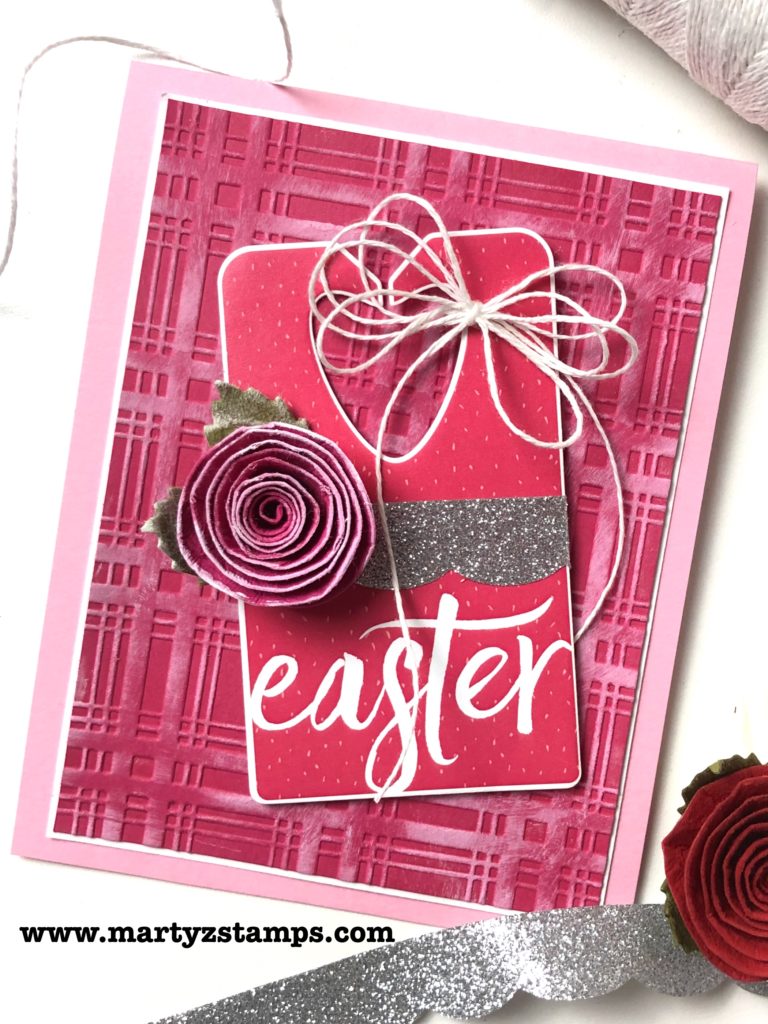
I applied Whip Cream Fusion Ink IP-0009 to the raised portion of the embossed Sweet Berry cardstock CS-0034.
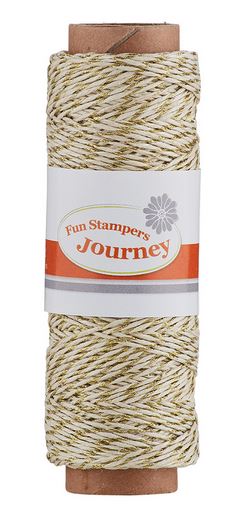
I pulled from my FSJ stash the following to create this card project: Love Buds AC-0177, Whip Cream Thread AC-0128 and Silver Sparkle Tape AC-0259.
I applied the Whip Cream Fusion ink to the petal edges of a medium Love Bud, wrapped a piece of the Silver Sparkle Tape around one of the Easter Blessing Tags and created a quadruple bow from the Whip Cream Thread. I adhered everything to the card mat and base with the tag sentiment raised with Medium Foam Squares AD-0085.
What a WOW card that was quick and simple to make!
If you hop off the trail, hop right back on by clicking one of the Design Team names below or click on the FSJ banner to check out the official FSJ blog.
My friend, Julie Hill, just had a birthday and I missed giving her a card on time, but I guess better late than never. Right?
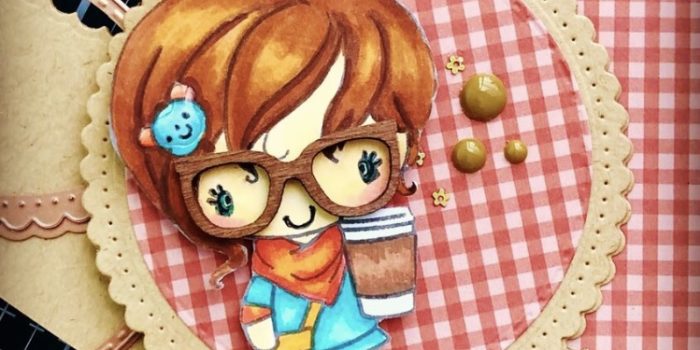
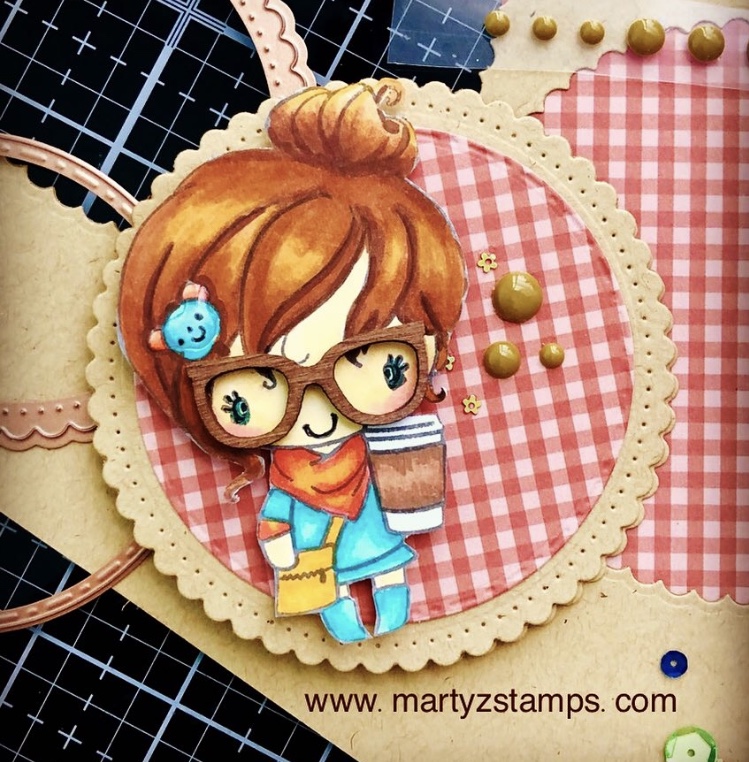
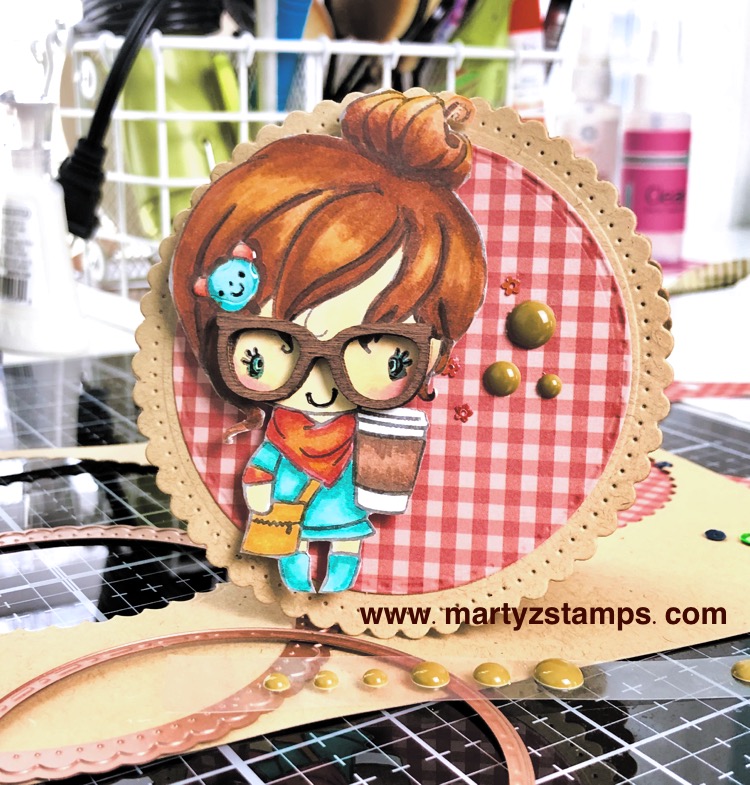
I received the cutest stamp called Brew It Anya from The Greeting Farm in my January Flavor of the Month Kit from Scrapping for Less. Crystal Minkler had created some adorable cards with Anya on a circle mat.
I took the idea and went in a slightly different direction. I made the actual card from a scalloped circle.
Anya is colored using Spectrum Noir Markers and all the cardstock used was from the kit. Even the wooden glasses were part of the kit. They are just too cute (I stole this idea from one of the design team members if I remember correctly).
She’s just too stinkin’ cute!
Post-note – Anya may very well have to go on a regular A2 size card base. The glasses make her top heavy and she rolls to the side when set up for display! LOL Note how the card is positioned next to the dies. They are holding her upright!
To order Spectrum Noir alcohol markers, click the banner below:
To order the Nestabilities Fancy Edged Circle Dies, click the banner below:
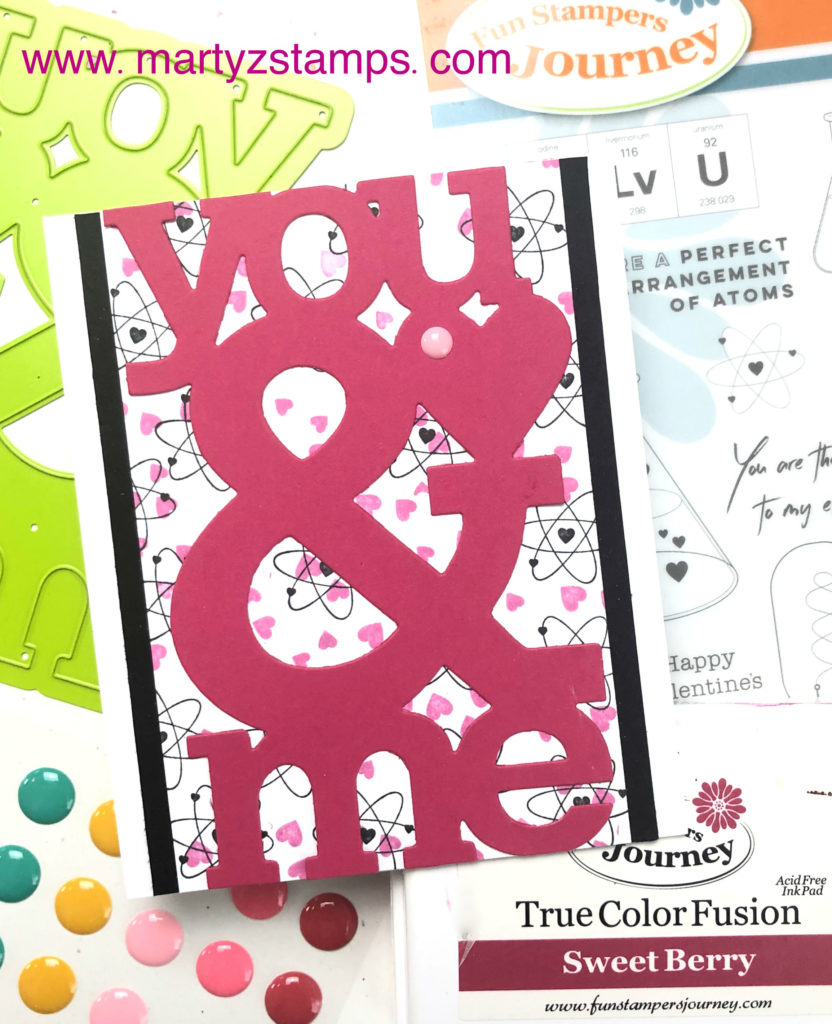
Y’all it’s time again for the FSJ + SB Creative Design Team Blog Hop and I have a surprise for you. I am stepping out of my comfort zone and creating some quick and simple cards that can be used for Valentine’s Day, Anniversary or just to say you care about someone special.
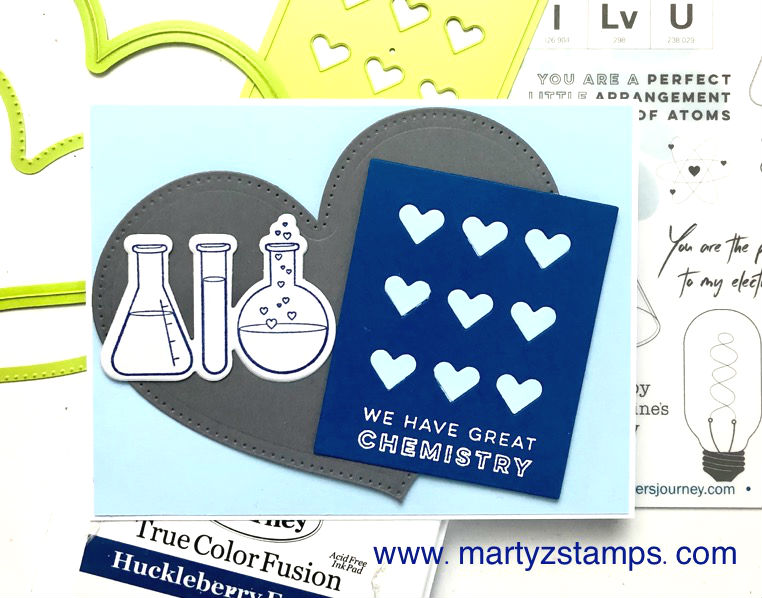
One of my favorite sets is in the spotlight, Perfect Atoms Stamp Set and Dies (SS-0457 and DI-0315), along with, You and Me die (DI-0159). There are endless possibilities with these sets. Where the fun of creating never stops!
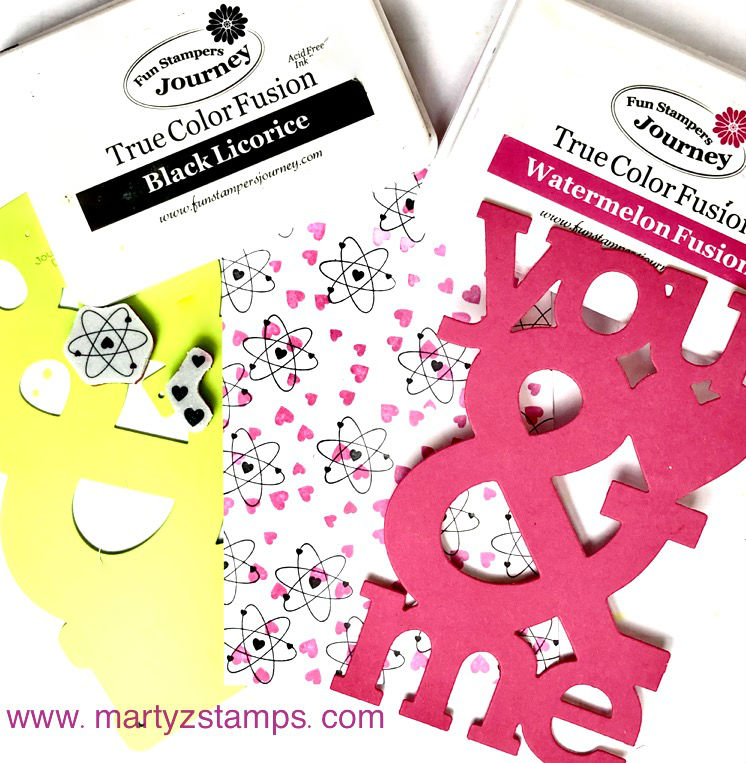
The first card is all about lighting up someone’s world. I pulled out a scrap of Whip Cream cardstock, rubbed a little Lemon Drop Fusion ink onto two areas. I die cut one of the colored pieces with SB Nestabilities Fancy Edged Rectangles Dies (S4-905) and stamped the light bulb image onto the other using Black Licorice Fusion ink and die-cut it out with the coordinating die. Of course, the bulb had to have a little Journey Glaze to give it that sleek shiny look of glass. The base is Whip Cream with the die cut mat adhered directly to the base. The light bulb is popped out with FSJ Medium Foam Squares. I stamped the sentiment in the bottom right hand corner and highlighted the would light with a FSJ Color Burst pencil (any yellow will do).
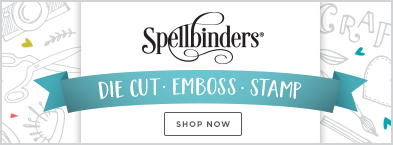
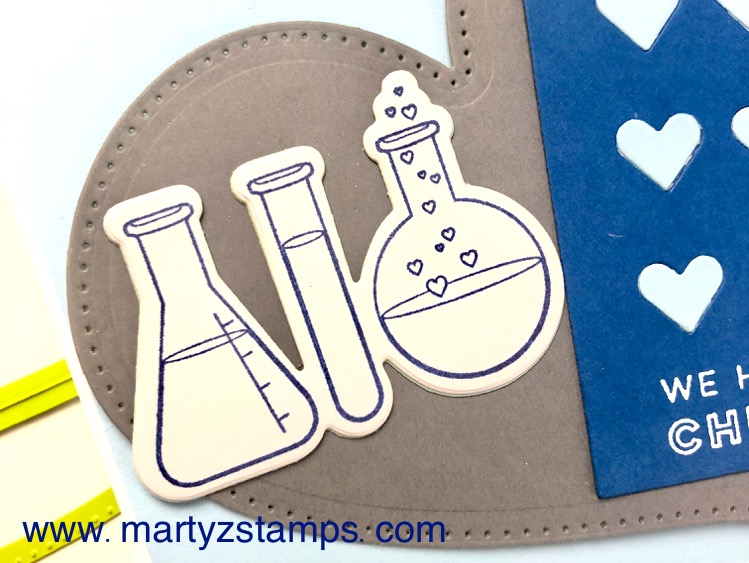
The next card is all pink. The base is Whip Cream with a Bubble Gum cardstock mat die-cut from Lots of Dots Die Set (DI-0424) and adhered directly to the base mat. The scalloped circle is die cut from Sweet Berry cardstock with the Nestabilities Fancy Edge Circle Dies (S4-903). The flask and sentiments were stamped with Black Fusion ink onto Whip Cream cardstock and the flask is colored with Spectrum Noir alcohol markers.
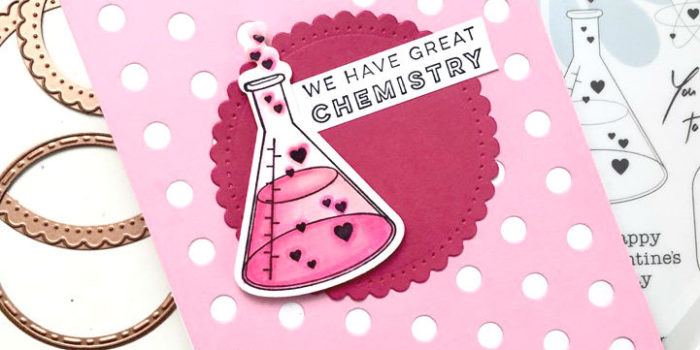
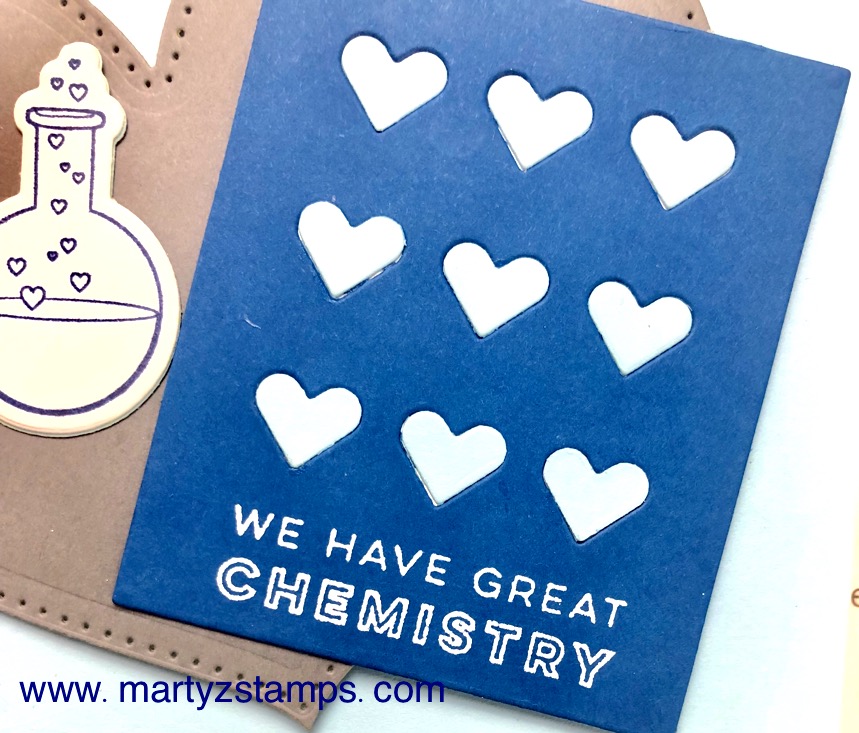
Now, we can’t have a pink card without a blue one, can we? This card is on a Whip Cream base with a Pool Play mat. The heart is die-cut with the Heart Felt Die and Piercing Elements Sets (DI-0033 and DI-0096) from Riverstone cardstock. The accent piece is die cut from Huckleberry Fusion cardstock using the Bunch of Hearts Die Plate (DI-0501). I adhered a piece of scrap white paper behind this die-cut piece and cut a second panel from Pool Play cardstock. I took the hearts from the second cut and enlaid them into the cut out hearts portion of the Huckleberry Fusion panel. The sentiment was stamped with Whip Cream ink and embossed with white embossing powder. The flasks were stamped using Huckleberry Fusion ink onto Tin Pail cardstock. The heart and panel are popped out with medium foam squares.
Last but not least is the adorable You and Me card. The base is Whip Cream cardstock with a Black Licorice Panel. To create the stamped background, I stamped the atom image onto Whip Cream cardstock using Black Licorice ink. I took the small cluster of hearts and stamped them all over using Sweet Berry ink. The You and Me sentiment is die cut from Sweet Berry Cardstock with a Bubble Gum pink Candy dot accenting the heart. All pieces are adhered directly to each other. No foam squares on this one! I can’t believe it, either. Note: This card is slightly shorter. I wanted the die cut sentiment to touch the top and bottom of the card. The finished dimensions of the card 5 1/8″ x 4 1/4″.
Let me know in the comments if this has inspired you to create some quick, simple and clean follow your heart cards for those special someones in your life.
If for some reason you get lost while hopping down the FSJ Creative Team Blog Hop trail, just click here and you will be directed to the FSJ blog.
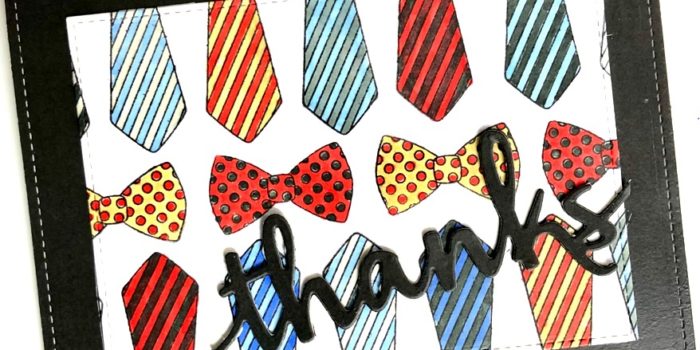
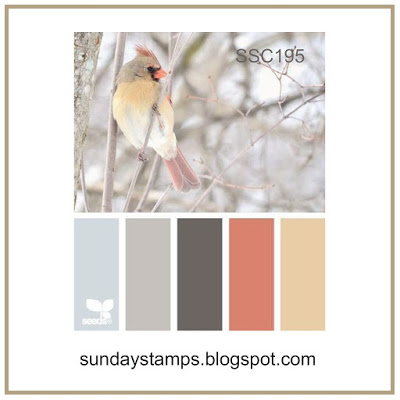
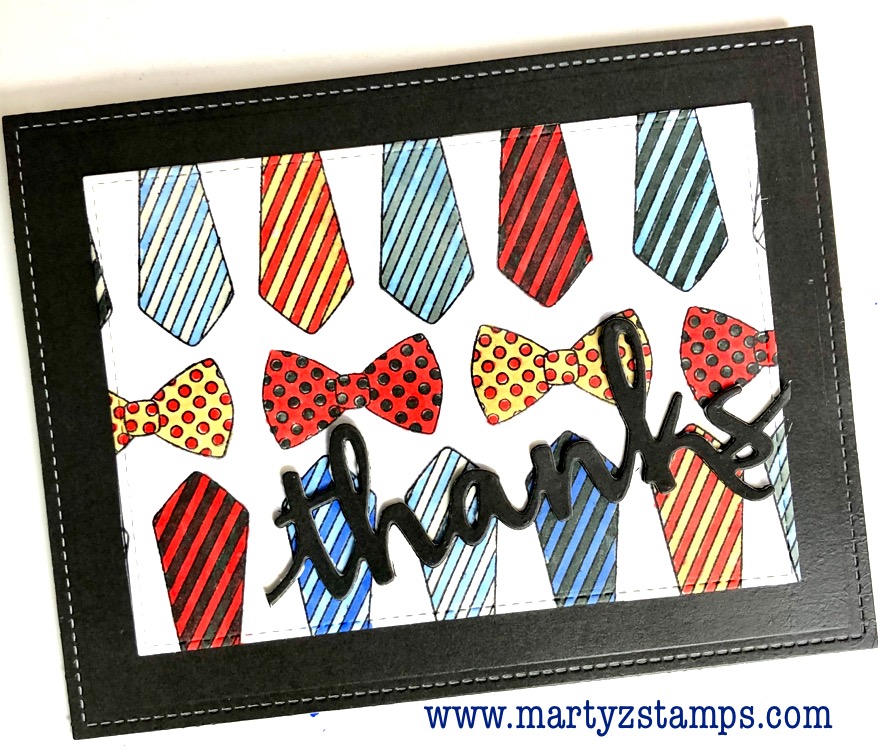
My goal for this year is to find new card challenges to enter. As I started making this goal happen, I stumbled across the Sunday Stamps blog. The sketch for this challenge is a color combo.
I love these colors and as it happened, I had the November 2018 Scrapping for Less Kit that had some stamps crying out to be used. I took one of the kits and created a thank you card with a masculine theme. Here’s a view of the tools I used.
This card is clean and simple (not so quick due to the coloring). I took the “Dapper Man” kit with its coordinating paper to create a fun thank you card. The colored images began by stamping the neck ties and bow ties onto Neenah Solar White cardstock with FSJ Black Licorice Fusion ink. I colored the ties with Spectrum Noir Markers OR3, EB2, IG5, TB1, TB2 and GG1. The sentiment was die cut from the SFL coordinating cardstock base featured on the card and layered on two more “thanks” die cuts from Black Licorice cardstock to create dimension. Both the base mat and image mat were die cut with stitched rectangle dies from my stash.
I am so excited you are hopping along with us for the December FSJ Creative Team Blog Hop! This month’s theme is anything but a card. I couldn’t wait to create a 3D Seasonal gift that works well for Christmas and into the Winter months. There are also a couple of tag ideas and I had to include a coordinating card.
If you get lost along the way, click the Creative Team Image below and you will be directed to the FSJ Blog.
If you’re not lost and just hopping along, follow the trail of designers below:
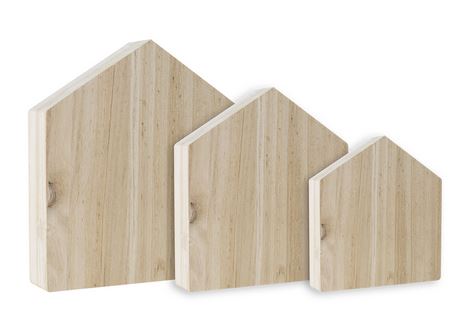
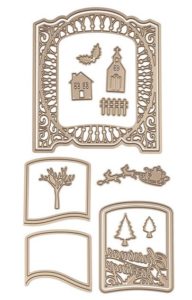
The first project features the medium and small house from the House To Home Wooden Houses.
House to Home Trio of Wooden Houses
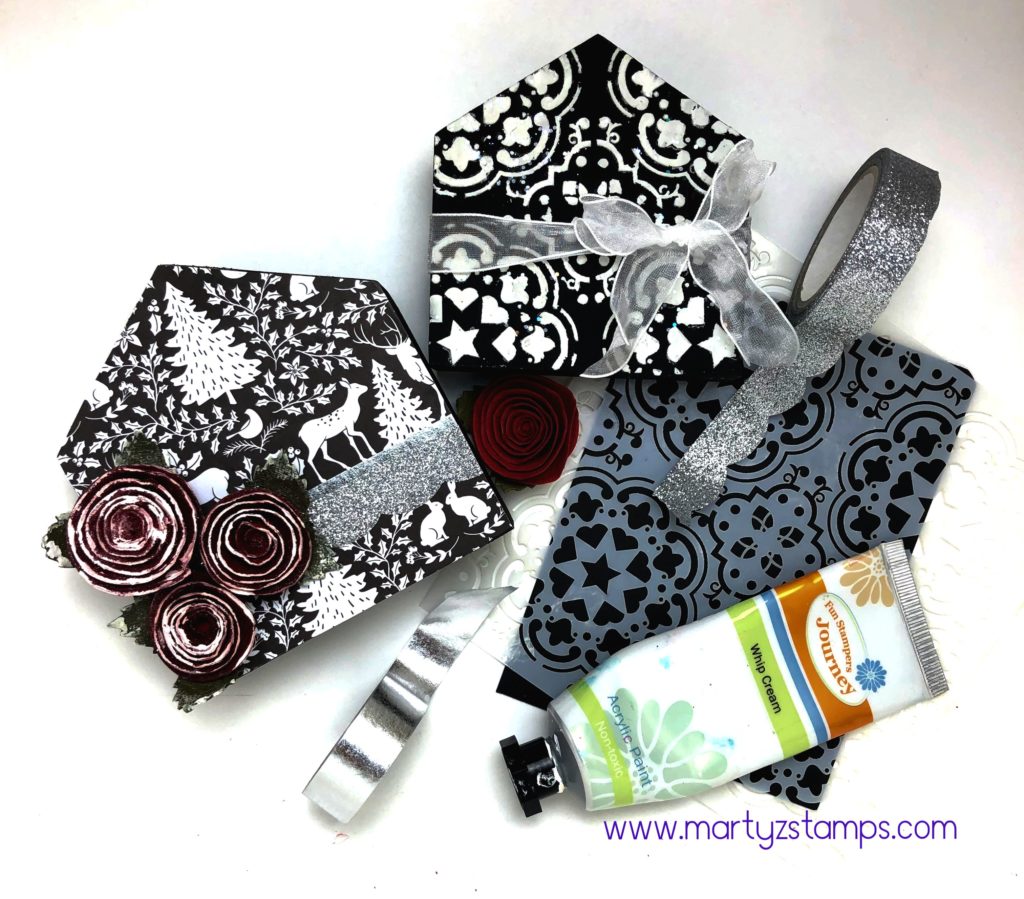
What a great gift for the mantle, dining table or side board. These were so easy to create. Here’s what you need. The Cozy Prints printed paper, Black Licorice and Whip Cream acrylic paint, Shimmer Silver Color Splash, Love Buds Paper Flowers, Cement Tile Stencil, Journey Modeling Paste, Sparkle Tape, Classic Elegance Washi Tape, Sparkle Cuts glitter, Journey Craft Glue, Square Paint Brush, Spatula, Crease Tool, Heat Gun and Special Day Organza Ribbon.
Make this gift by applying Black Acrylic paint to the wooden houses. Once they are dry, cut a piece of patterned paper a little bigger than the house you want to cover and gather your supplies to stencil the coordinating house.
Apply the patterned paper to the house using Journey Craft Glue.
Tip: To make spreading the glue easier, spritz with a little water.
Smooth the paper onto the house and using the edge of your crease tool, press out any trapped air pockets. Turn the house upside down and trim excess paper.
Tip: The glue dries really fast, make sure to position your paper quickly; otherwise, you’ll have a mess.
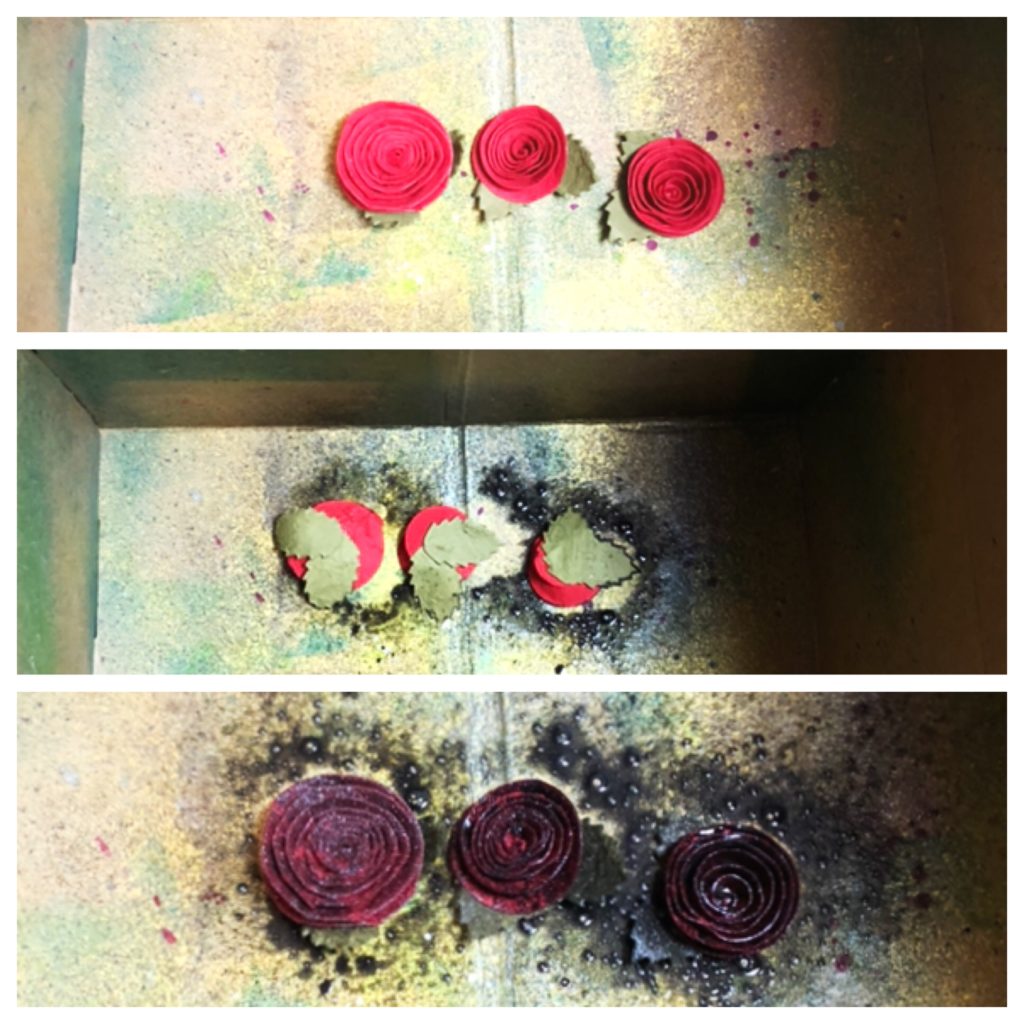
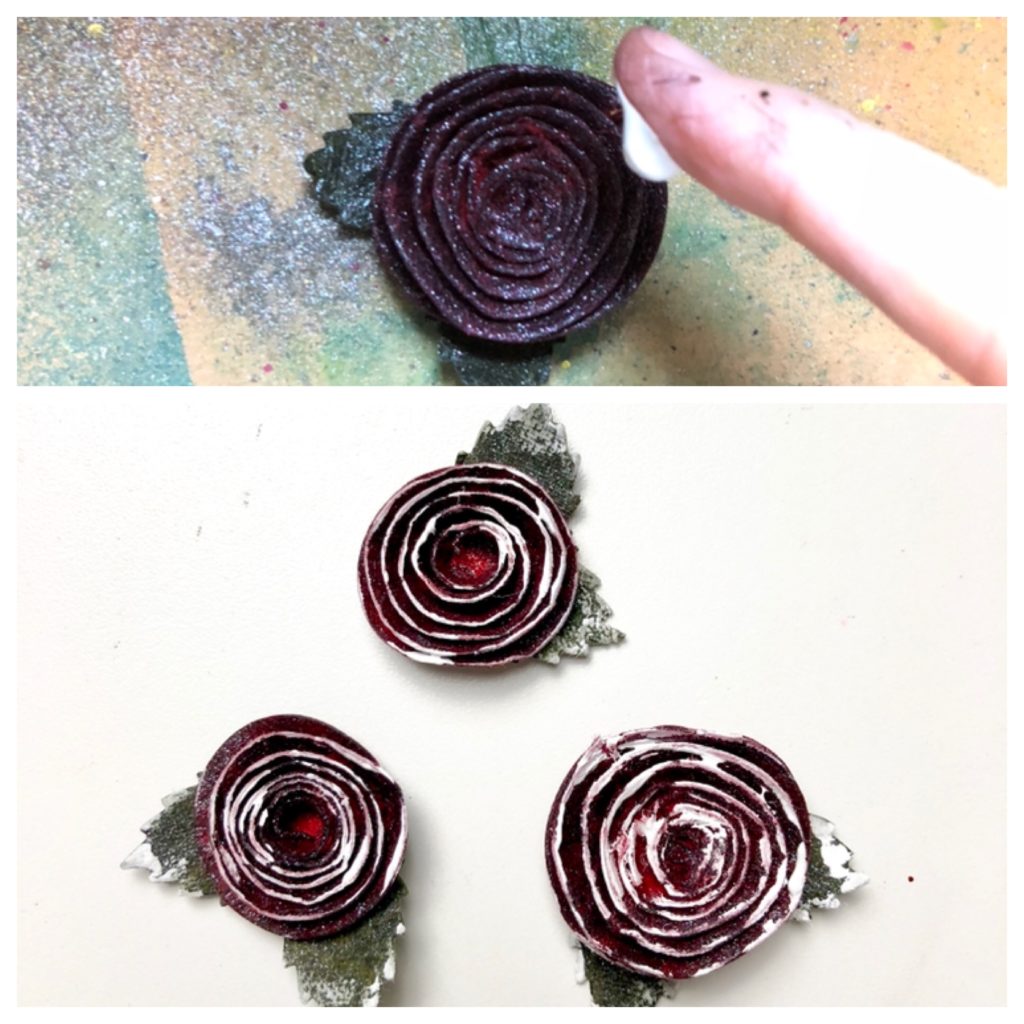
Choose three Love Buds Paper Flowers (large, medium and small). Place the flowers in a box to spray them with the Shimmer Silver Splash. Apply the Splash to the front and backsides of the flowers.
Once they are thoroughly dry (you may have to use your heat gun), place a small amount of White Acrylic Paint onto the tip of your finger and gently apply the paint to the edges of the flowers and leaves.
Take your silver and sparkle washi tapes and layer them onto the house. Adhere your flowers with Journey glue to the house and you’re done with the first house!
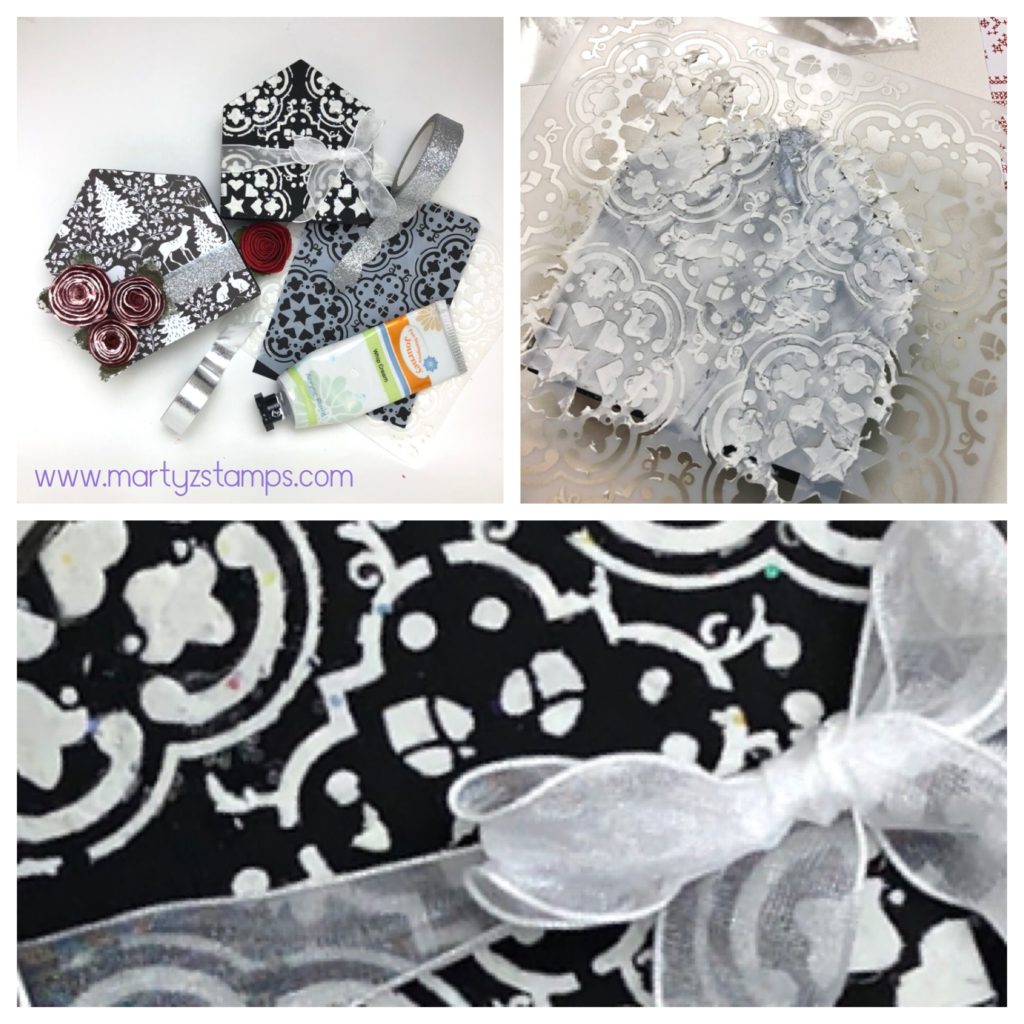
Moving to house number two, place some Journey Medium onto a non-stick surface that can be thrown away or cleaned. Mix in some Sparkle Cuts glitter.
Tip: Make sure to put the top back onto the Journey Modeling Paste to keep it from drying out.
Place the stencil onto the painted house. Apply the Journey Modeling Paste evenly over the stencil making sure to cover every opening. Pull the stencil off. You may want to apply more Sparkle Cuts directly to the paste. When the paste is a little dry, use the palm of your hand to gently tap the paste. This will create a smooth stencil look to the design.
Wrap the Special Days Organza ribbon around the house and tie a bow.
TIP: For a really cool look, apply heat using a heat tool which will cause the ribbon to crinkle in a delightful way.
So easy and so fun!
Coordinating Card
You shouldn’t give a gift without a card, right? How about a coordinating card for the gift? Let’s do it.
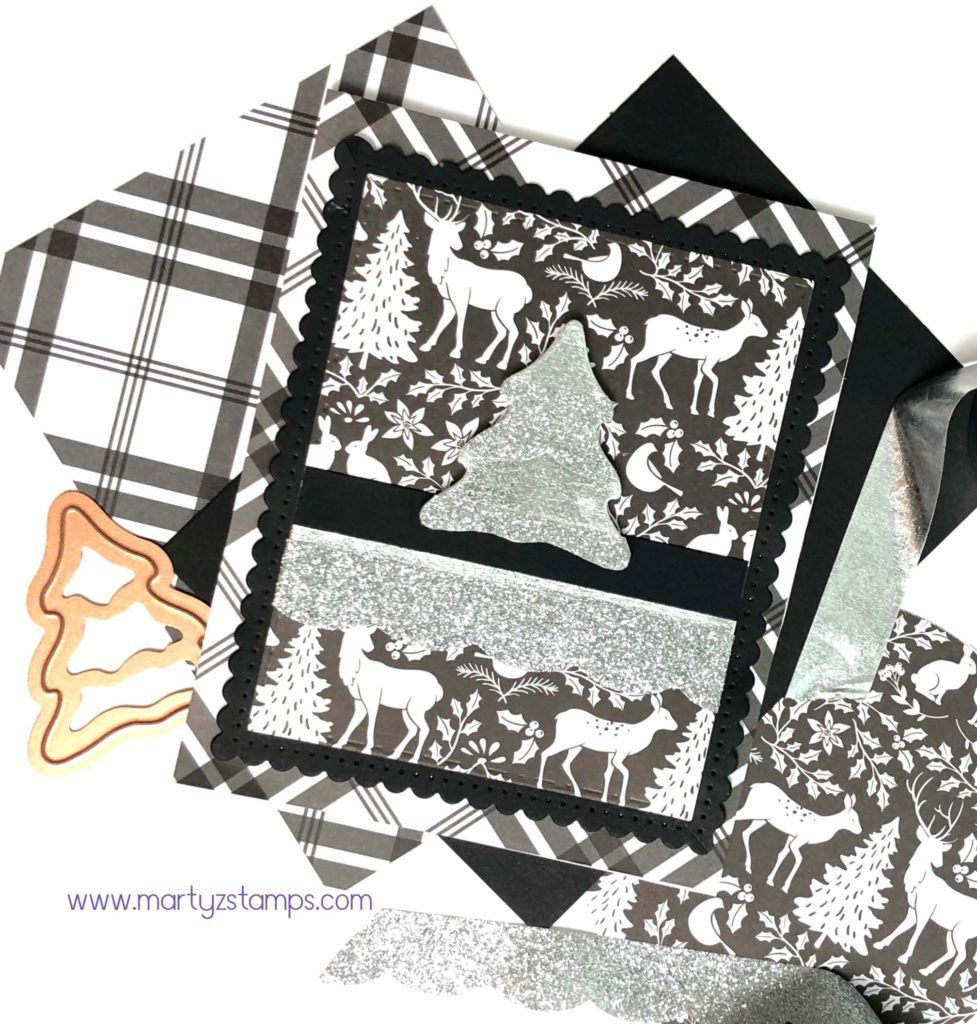
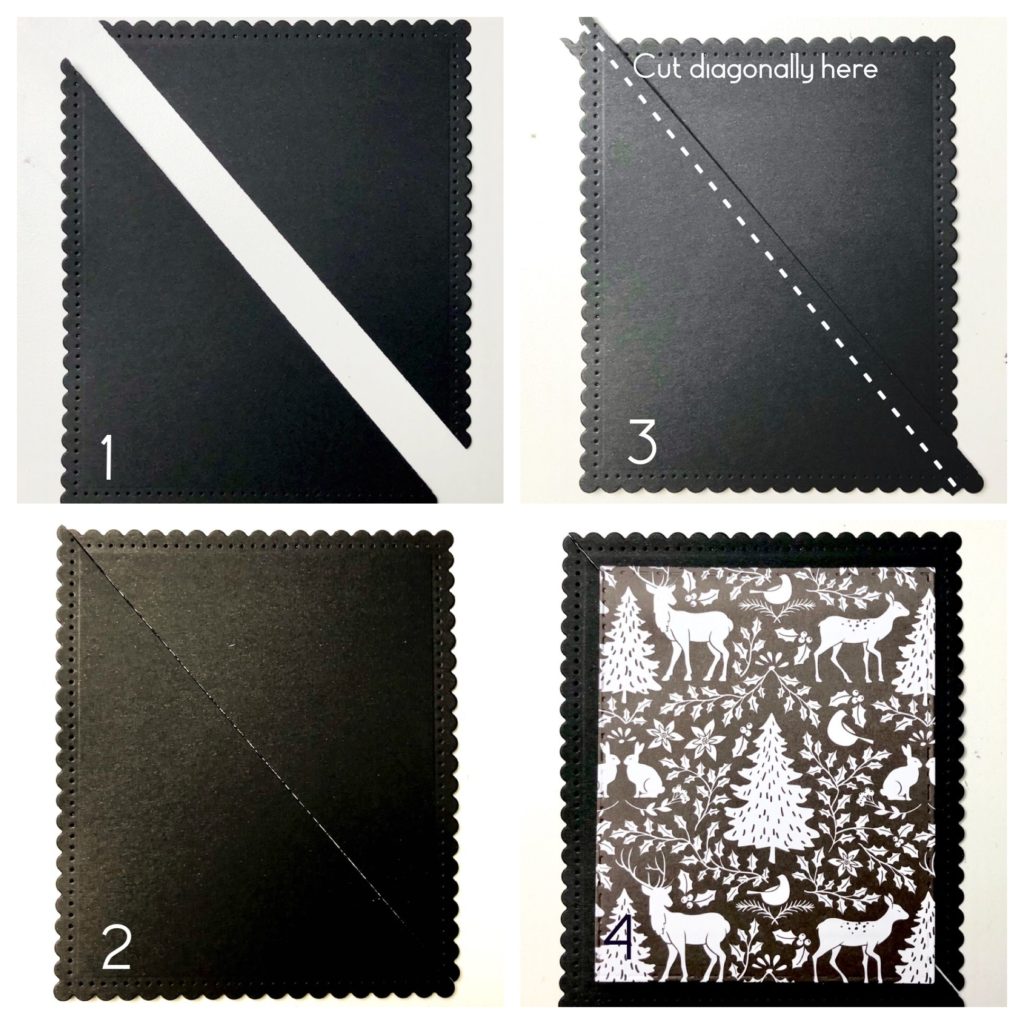
What a simple but elegant card to coordinate with the gift. This card uses a great technique to adjust the size of the scallop mat, but I’m getting ahead of myself. Start by cutting a base from Whip Cream cardstock 4 1/4″ x 10 1/2″. Next, cut a plaid mat from the Cozy Prints paper at 4 1/4″ x 10 1/2″ (it will cover the entire card front). Die cut a Black Licorice mat from Nestabilities Fancy Edged Rectangle Dies (second to largest). This is where we make an adjustment to the size of the mat.
Place the Black Licorice scallop mat on a paper trimmer. Cut from one corner to the other (#1 & 2). Overlap the cut pieces to desired width or height (#3). Adhere the overlapped edges together. On the corners with the overlapped edges, cut diagonally.
TIP: Before cutting make sure the corner scallops line up to make one full scallop. This will allow a seamless mat. The printed mat was cut with FSJ Rectangles die (#4).
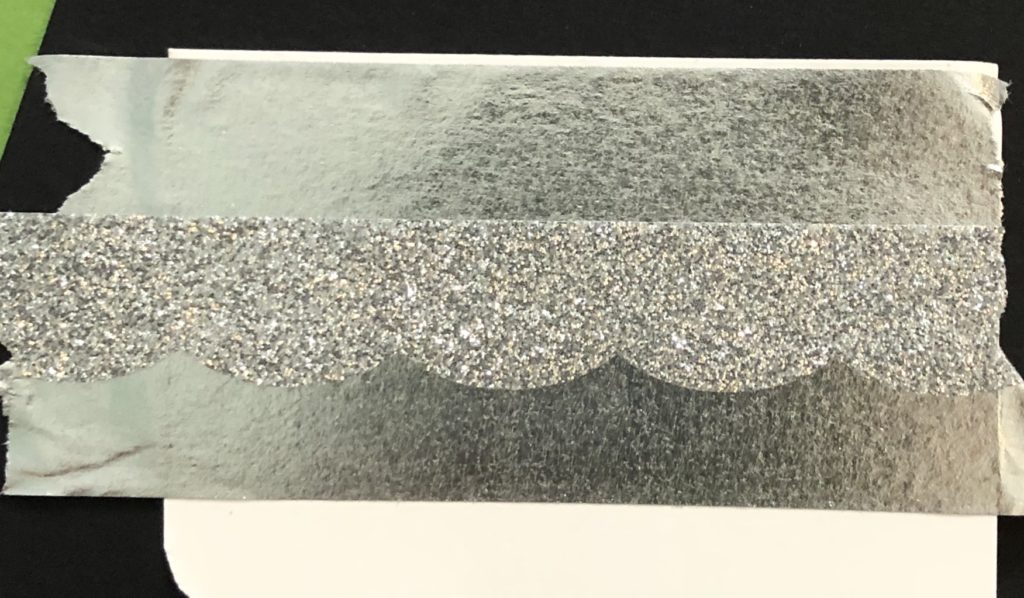
Adhere a black strip of Black Licorice cardstock to the top mat along with the silver and sparkle washi tape.
The last technique for this card is to create the Christmas tree. Apply strips of the silver and sparkle washi tape to a scrap piece of cardstock (overlap as necessary).
Create as many layers as needed.
I die cut a tree using a tree die from the Holiday/Christmas 2015 Card Making Kit. If you don’t have this kit, any tree or ornament die will work.
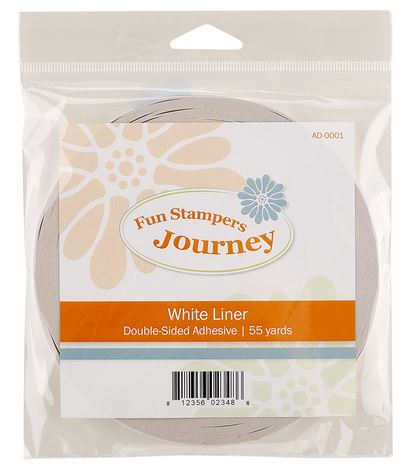
Adhere all mats with White Liner Tape. Pop up the Christmas Tree with FSJ Medium Foam Squares. Finally, add your personal sentiment inside the card.
Tag Time
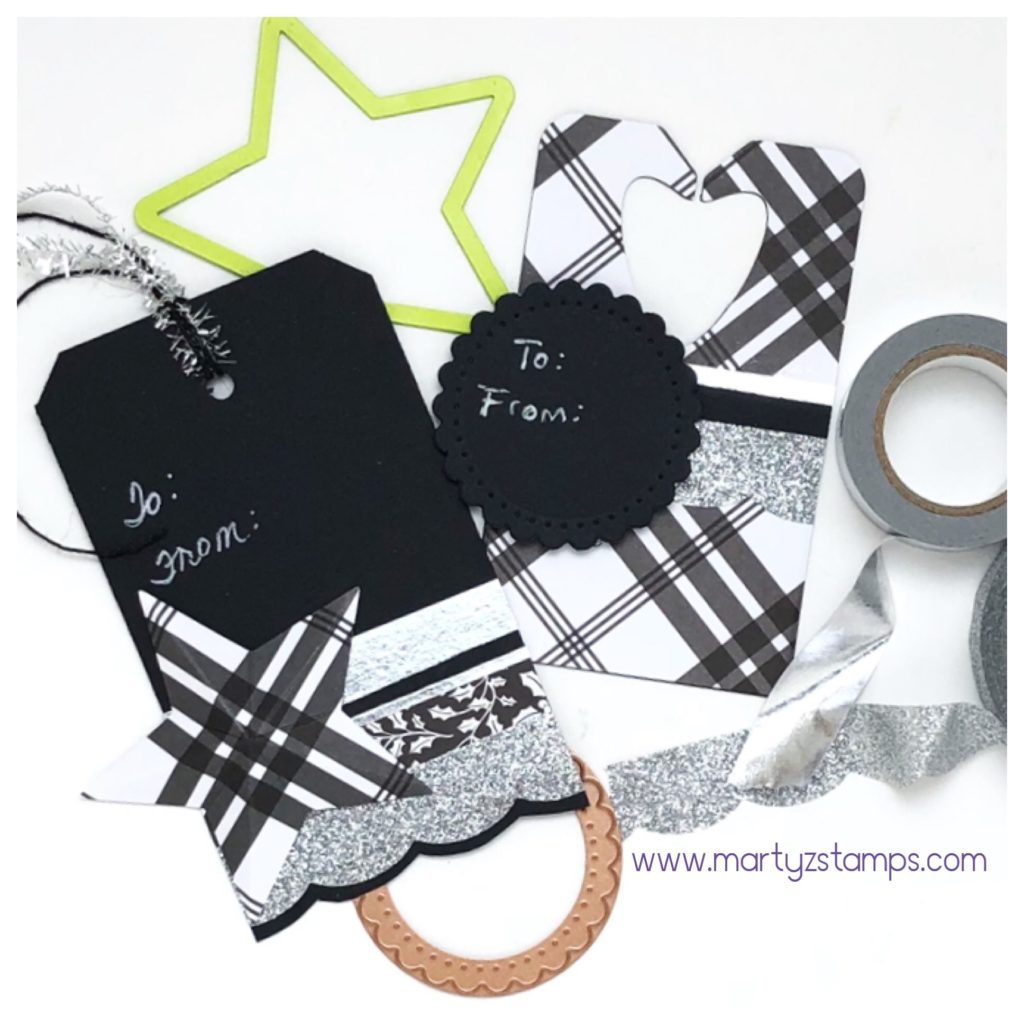
Last but not least are some incredible gift tags to set off your Christmas wrapping.
The Black Licorice tag is a rectangular piece of cardstock with trimmed corner and a hole punched at the top. A combination of washi tape and cardstock layers accent the bottom of the tag. The scalloped bottom was accomplished using Details Pro Shears and following the outline of the Sparkle Tape.
The accent piece is a 3D star cut from FSJ Star dies and scored from the top of the point straight down to the inverted point below. To create the 3D affect, crease each score line and manipulate the score lines into mountains and valleys. The top is adorned with Black Licorice Twine and Silver Sparkle Tinsel. It is as simple as that, really!
The plaid tag is cut from FSJ Bread Tag die. Strips of washi tape and Black Licorice cardstock break up the plaid pattern. The scalloped circle was die cut from Spellbinders Fancy Edged Circles. Both the “To and From” were written with a white gel pen.
All of these projects were such fun to make. Let me know in the comments what is your favorite out of the three projects.
Supplies:
Disclaimer – By clicking on an image you will be redirected to Spellbinders + FSJ website. When you purchase through my website link, I will receive a small commission. This helps to keep me crafting and inspiring others.
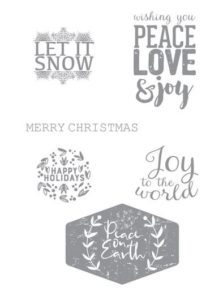
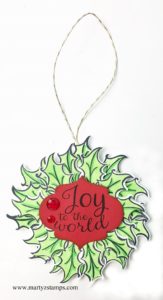
Y’all it is Day 4 of the FSJ + Spellbinders Better Together launch. I had a little time to whip up a gift tag project and once the recipient of the gift opens their package, the tag can be re-purposed as a tree ornament.
The following stamps and dies were used for the project:
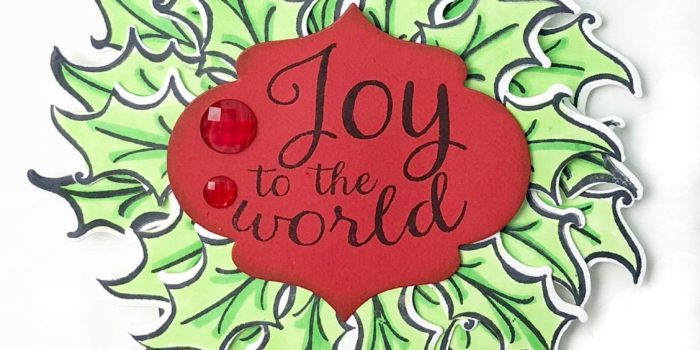
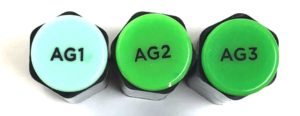
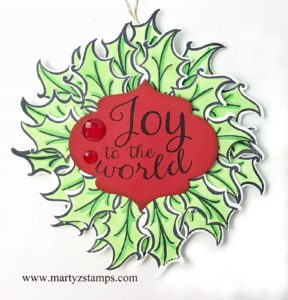
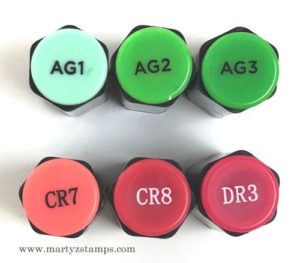
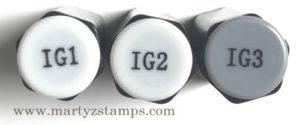
In celebration of the 30 Day Coloring Challenge, I decided to use my Spectrum Noir alcohol markers to color the holly leaves. I stamped them onto Spectrum Noir cardstock using Memento Tuxedo Black ink. Markers AG1, AG2, AG3 were used to color the leaves. Once colored, they were die cut with the Holly Bells coordinating die. I glued the leaves to a round scrap of cardstock creating multiple layers with medium foam squares.
The center sentiment was stamped onto Candy Apple cardstock with Memento Tuxedo Black ink and cut with Holiday Joy’s coordinating die set Special Day Tags Die Set. Two red Rainbow Drops were added to the sentiment for a touch of bling.
The final step was to create a twine loop to hang the ornament on a tree using Gold Thread. It was adhered to the wreath and a Candy Apple cardstock circle adhered to the back to give a finished look.
If you like coloring, this is definitely the project for you.
I hope this inspires you to create some Christmas Tags for those special gifts for family and friends.
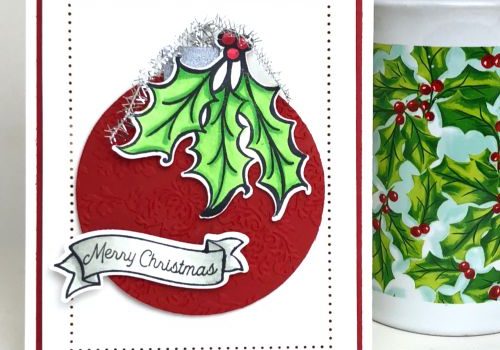
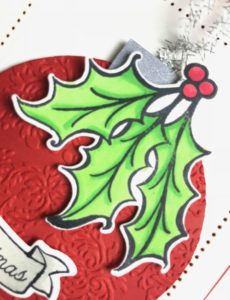
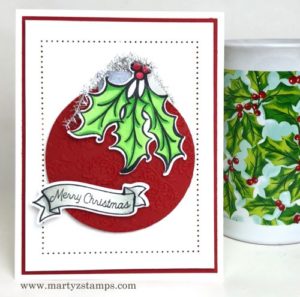
Have you ever messed up a project and used the cast-a-ways to create a new project? Well, this is how the Holly Bells Ornament card came into existence.
Here’s the back story. I began creating my kits for PJ’s & Papercrafting Nov/Dec Virtual Stamp Class and for some reason andfor the life of me, I couldn’t die cut a centered circle into the card mat for the window box card project. This happened on all four attempts. I gave up and walked away.
Flash ahead to the FSJ + Spellbinders Better Together Launch. I planned on posting five projects made with two stamp and die sets I received from Spellbinders to celebrate this partnership. As I was looking around my craft room for inspiration, I found my messed up mat with die cut circle:
Guess what? The mat could be used as a base mat and the circle would make a great ornament. So, the project began. The base of the card is FSJ Whip Cream cardstock with the Candy Apple cardstock mat placed on top of the base. A piece of Whip Cream cardstock with piercings created from the Journey Rectangles die set was adhered to the Candy Apple mat with medium foam squares.
I ran the Candy Apple circle through my Platinum machine in a retired host embossing folder. Any embossing folder with details would work. I suggest the Mystic Impressions Embossing Folder as a substitute for the one I used which is a brocade design.
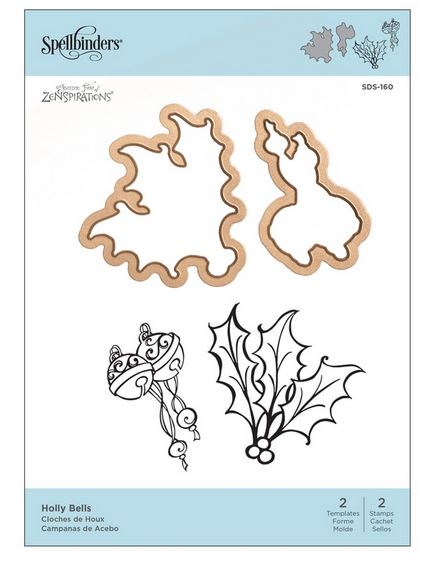
Once these steps were completed, I stamped the holly from the Holly Bells stamp and die set onto Spectrum Noir cardstock using Memento Tuxedo Black ink.
I chose the following Spectrum Noir Alcohol Markers to color the holly:
I did the same with the banner and sentiment from the Winter Build-a-Scene ATS with coordinating die.
The Spectrum Noir markers for the banner are:
I cut a top for the ornament out of Silver cardstock with the scallop die from the Build-a-Scene coordinating dies and adhered it to the back of the red ornament. The colored holly leaves are popped out with medium foam squares and placed at the top of the ornament. The Merry Christmas sentiment banner is popped out with small foam squares in the lower left portion of the ornament and the ornament is popped out with medium foam squares. Man, that’s a whole lot of poppin’ out going on.
The finished project is below:
Leave a comment and let me know how you used a messed up project to create a new project.
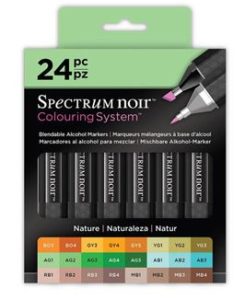
Spectrum Noir Alcohol markers and paper can be ordered from Consumer Crafts. Click the link below. Search “Spectrum Noir Alcohol Markers”:
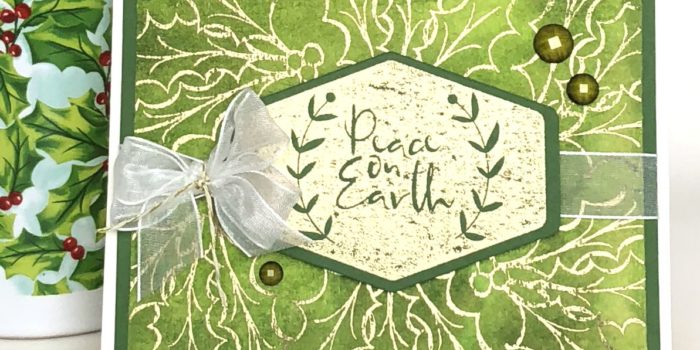
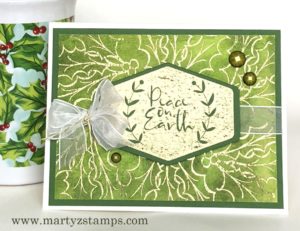
The FSJ + Spellbinders partnership launch is today! To celebrate this day, I created a Christmas card using the Zenspired Holidays, Holly Bells stamp and die set by Joanne Fink.
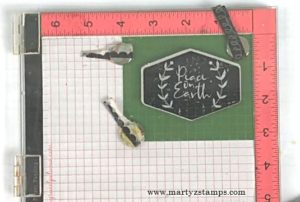
I began with a FSJ Butter Cream base and added a 5 1/4″ x 4″ FSJ Kiwi Slice mat to the base.
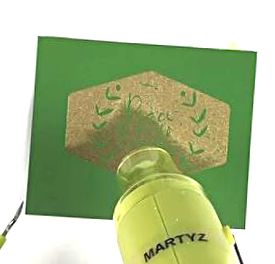
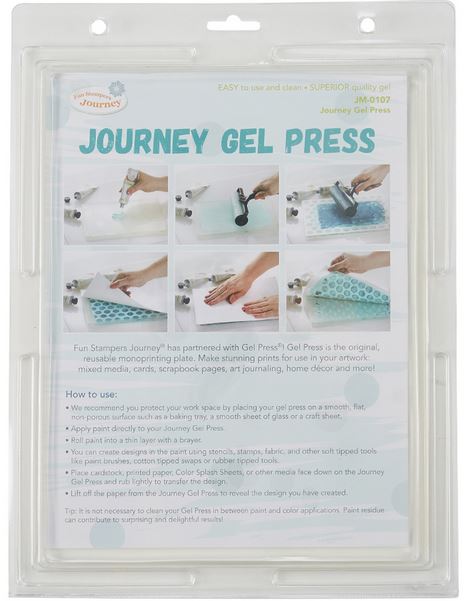
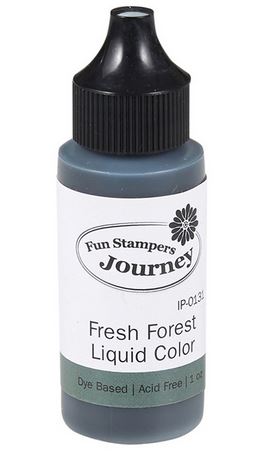
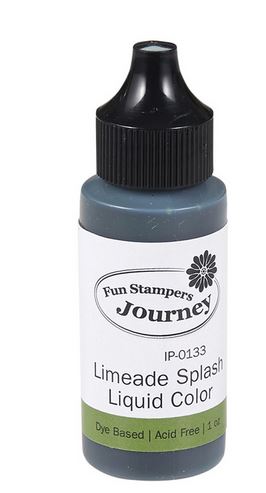
The gold embossed holly leaves mat took several steps. First, I cut a 5 1/2″ x 4 1/4″ watercolor paper mat and set it aside. Next, I placed my Gel Press onto my desk and applied FSJ Fresh Forest and Limeade Splash Liquid Colors to it. Tip: Apply more Limeade Splash for a more Christmas green color. Note: The pictured Gel Press with liquid color was created by cutting a full 8 1/2″ x 11″ Gel Press into fourths.
After spritzing the Gel Press and the watercolor mat generously with water from my media mister, I pressed the watercolor paper mat onto the Gel Press, lifting and reapplying until the entire mat was covered with color.
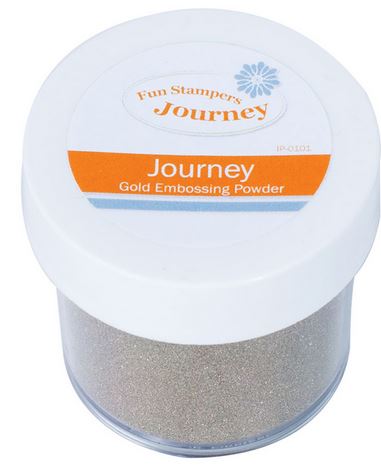
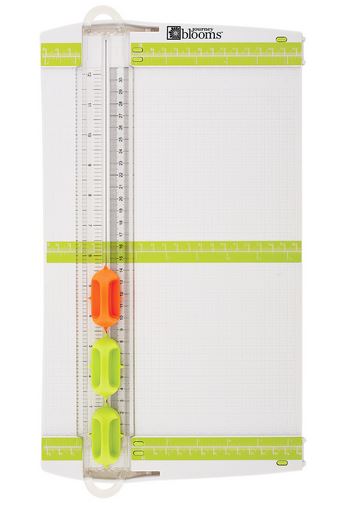
Before embossing with gold embossing powder, I made sure the colored mat was completely dry. To make sure the powder only stayed on the inked image, I applied anti-static powder over the entire mat and then stamped the holly leaves using FSJ Clear Pigment ink. Once I finished stamping, I applied the gold embossing powder and using my heat tool melted the powder creating shiny, gold holly leaves. The last step for this portion of the project was to cut the mat down to 5″ x 3 3/4″ using FSJ Trimmer.
For the sentiment, I gold embossed “Peace on Earth” stamped image from the Holiday Joy stamp set and die cut it with the coordinating Special Day Tags Die Set.
Tip: I used my MISTI to stamp the image four or five times to get a good inked impression.
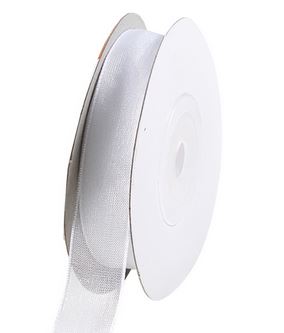
This card definitely needed some ribbon. A 5 1/2″ length of Special Day White Organza Ribbon was placed across the mat and adhered to the back. The die cut sentiment was centered and adhered on top of the ribbon with medium foam squares. A double bow created from the ribbon is attached with a piece of gold thread and the finishing touch are the Sea Stones embellishments. And, of course, they sparkle just a little bit.
Here is the finished project. I hope this inspires you to create your own holly themed Christmas card.
Supplies Used For This Project (click on the banner above to order):
I am so excited to announce a new partnership that begins Thursday, November 1, between Spellbinders and FSJ. They are coming together to bring paper to life.
What does this mean for you? Great savings on awesome product lines. And, there’s more! Shipping is only $5.00 for orders up to $75 and “drum roll, please” . . . . FREE shipping on orders over $75! If you live outside the US, you can now buy FSJ and Spellbinders. So easy to do, just click on any image on this post or one of the images in the sidebar.
Check out the new logo!
I can’t wait for you to experience some great deals. Let me tell you about one of my favorite programs, the Club Kits. What a deal? I especially like the Large and Small Die Club Kit. It’s only $30.00 a month plus shipping (tax may apply depending on where you live). Check them out the Club Kits here.
Y’all, it gets even better. Are you a paper crafter that likes to make beautiful cards from dies? There’s a new club starting up on November 1st called the Amazing Paper Grace Die of the Month membership. It features an exclusive die designed by Becca Feeken and the membership is only $30.00 plus shipping and tax. Here’s a sneak peek. Click on the image to get all the details.
I have saved the best deal for last. It’s the Fall Surprise Bundle a $185 value for only $45! This bundle includes dies and more. This deal is while supplies last (note: all bundles are the same). Click on the picture to get the scoop on this extraordinary bundle.
I’m already loving this partnership and I know you will too.
Check back on Thursday for a blog post featuring one of Spellbinders’ stamps and dies combined with FSJ inks, cardstock and more.
Let me know what you think about this new partnership in the comments below.
This website uses cookies to improve your experience. We'll assume you're ok with this, but you can opt-out if you wish.AcceptRead More
Privacy & Cookies Policy
Privacy Overview
This website uses cookies to improve your experience while you navigate through the website. Out of these, the cookies that are categorized as necessary are stored on your browser as they are essential for the working of basic functionalities of the website. We also use third-party cookies that help us analyze and understand how you use this website. These cookies will be stored in your browser only with your consent. You also have the option to opt-out of these cookies. But opting out of some of these cookies may affect your browsing experience.
Necessary cookies are absolutely essential for the website to function properly. This category only includes cookies that ensures basic functionalities and security features of the website. These cookies do not store any personal information.
Any cookies that may not be particularly necessary for the website to function and is used specifically to collect user personal data via analytics, ads, other embedded contents are termed as non-necessary cookies. It is mandatory to procure user consent prior to running these cookies on your website.