Fun Stampers Journey is providing an amazing opportunity for its coaches to submit their projects in hopes of being given the honor of participating on the Designer Showcase team for the coming catalog year. The chosen designers will have their work showcased at FSJ events throughout the year. This means the design team will receive selected product before product launch to bring to life amazing projects that will inspire others to create.
Any FSJ coach can submit 2 cards and 1 scrapbook page. Once all entries are in by July 10th, Richard and the FSJ Crew will select 20 coaches to move on to the final selection (I don’t know how many are in the final selection). I have worked the last week on my projects. I wanted to share them with my readers the day I submit them to Fun Stampers Journey.
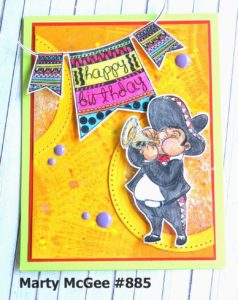
The first card is a birthday card featuring the following ATS sets AT-0156 Felicidades with the Mariachi trumpet player and AT-0195 Bday Banner. The base of the card is FSJ CS-0123 Electric Lime cardstock, the first mat is FSJ CS-0007 Candy Apple cardstock, and the final mat is FSJ CS-0042 Summer Days cardstock. To create the amazing background on the Summer Days cardstock, I took FSJ IP-0113 Orange Rave ink and applied the ink pad to the cardstock with a technique we learned from one of our Bloom Box kits (a sunburst effect is created). Then, I just had to flick as many FSJ silks as I thought reasonible (orange rave IP-0118, electric lime IP-0108, gold ip-0096, sour lemon IP-0110). The pierced open circle was in my scraps of Summer Days cardstock having been left over from a previous project. I started to make a shaker card but I didn’t want anything to disctract from the adorable Mariachi player. I remembered, when we were at the Orlando event, we made a card featuring a star with a sparkle cut center. I created the same thing but with the circle. I adhered a circle of acetate behind the open pierced Summer Days circle (DI-0039 Journey Circles); I took Journey Glaze and placed all over the acetate; then, I sprinkled FSJ AC-0151 Sparkle Cuts over the glaze and rubbed it into the glaze. I set it aside to dry. This technique just makes the card. I cut one end off the cirlce and placed them diagonally across from each other directly onto the background mat. I colored the Mariachi player and the banner with Journey Color Burst Pencils JM-0077. I accented the banner and the trumpet (after I sprinkled Journey Sparkle Dust AC-0013 onto the trumpet) with Journey Glaze AD-0002 4 oz. The banner and the Mariachi player were popped out using FSJ AD-0085 Medium Foam Squares. The final accent were a scattering of Lavender Candy Minis AC-0135. Oops, almost forgot the Sparkle Dust on the rim of the hat, seam of the pants, and the belt buckle. So cute, so adorable. Love it! It just a gorjamust-have card.
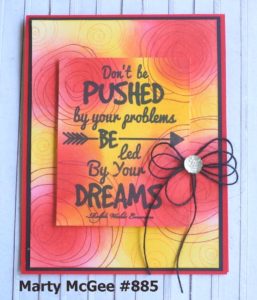
My second card is a quick and simple (very easy card) to bring to life. I started with a base of FSJ CS-0093 Rich Coral cardstock. I love this color. It is a bright red with a hint of orange. The first mat is made using FSJ CS-0003 Black Licorice cardstock. The background base and the raised smaller mat with the sentiment were created using the following: FSJ CS-0040 Whip Cream cardstock, FSJ IP-0114 Outrageous Pink ink, FSJ IP-0052 Rich Coral ink, FSJ IP-0043 Lemon Drop ink, FSJ IP-0042 Summer Days ink, FSJ IP-0041 Black Licorice ink, FSJ Dauber Dowel Large TO-0138, FSJ AC-0004 Journey Black Twine, FSJ AC-0022 Sparkle Drops, FSJ AD-0085 Medium Foam Squares, and FSJ AT-0146 Dreams ATS and last but not least FSJ SS-0454 Flower Swirls.
To begin the background process, I rubbed Outrageous Pink ink and Lemon Drop ink onto the Whip Cream cardstock with the Dauber Dowels. I added a touch of Rich Coral ink to the centers of the Outrageous Pink areas of color. I then took the various sizes of floral blooms from the Flower Swirls stamp set and stamped them onto the swirls of color using Rich Coral and Summer Days ink on the corresponding shade of color.The sentiment was stamped with Black Licorice ink (I used my Misti to stamp the sentiment several times so the black wording would pop). The finishing touch is the triple bow from the Black Twine accented with a Sparkle Drop. The sentiment mat is popped out with medium foam squares.
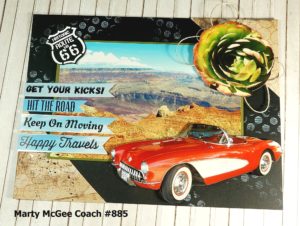
The last project is an 8′ x 6″ scrapbook page. I love the stamp set FSJ SS-0312 Hit The Road. I wanted to create a page featuring this stamp set based around Route 66 out in the Southwest part of our great nation. I knew my friend, Patsy Benson, had vacationed in that area; so, I called her up and asked if she had some pictures I could use. She said yes and I planned a day to drive over and look through her pictures to find the perfect one for my page. Before I went over to her house, I planned out my page. It started off with an 8″ x 6″ piece of Oatmeal Cookie that I distressed with Hazelnut Blend and Buttercream inks. I used a the FSJ SS-0438 Create a Dot background stamp for some interest on the background. I stamped and embossed in white trucks, signs, words in both Black Licorice and Hazelnut Blend cardstocks (I truly wish I had the new cactus stamp set; but alas, I did not). I wasn’t sure what would look great for the picture(s) I chose; therefore, the double color selection of stamped items.
Well, I got there and started looking at the pictures. I knew I wanted a desert/grand canyon type backdrop, and I found the perfect picture. As we were deciding what truck color looked the best on the page, I asked Patsy if there were any Route 66 pictures. She said yes, and we eventually found them. In one of the pictures, an antique convertible was parked at an old-timey gas station, which had multiple route 66 signs in the plate glass windows. As I looked at the convertible, I said, “EEeew (in a good way), what if I cut this convertible out and it looks like it’s driving off the page.” Once I get an inspiration, I’m off and running. Sort of like the Edward Scissor Hands of card making (there is a disaster all around where I was working, but the final outcome is very satisfying). I cut out the convertible and laid it on top of the picture in the right hand bottom corner. Then, I remembered seeing a picture featuring a succulent. I found it and my eyes got wide and I said, “EEeeww (again), I’m going to cut this out too!” Cut, cut, cut, and I’m off and running. Well, as the process usually goes, I change my mind about my first selections of cardstock; the Oatmeal Cookie cardstock did not make the page pop. I needed some color which would make the page truly come to life. think we went up and down her basement stairs twice to her craftroom each time thinking we had gathered all the supplies we needed to complete the page. I think she went up and down probably three more times getting items from the basement as the process developed. After looking through her selection of FSJ cardstock, I thought, Black Licorice would look great and make all the beautiful colors pop off the page. Done! I hated to lose the Oatmeal Cookie sheet because I had put so much effert into creating the background; so, I thought how ’bout I cut off the ends and make triangles. Snip, snip. Done! We tried embossing the route 66 stamp in black on red, Nooo that didn’t quite look right on the page. I tried sprinkling Sparkle Silk – you would think Sparkle Silk would go with anything – not so. I decided to wait until I got home to look through my stamps to find something to add interest to the background mat (I explain later the whole background process). I kept looking at the page and thinking, it needs something else. I then had a bright idea from a card swap I got in Orlando where a coach had stamped onto pictures. I tried the Black Licorice and it wouldn’t dry, but smeared terribly. I initially used Staz-On and it worked, but when I got home, I looked in the cataolog and we don’t have that product; so, I created my own skies using: FSJ CS-0092 Pool Play cardstock, Dowel Daubers, FSJ IP-0035 Huckleberry Fusion ink, FSJ IP-0051 Pool Play ink, and FSJ IP-0009 Whip Cream ink. I rubbed both shades of inks onto the Pool Play cardstock and went back and added white for clouds with the Whip Cream ink. I stamped the Hit the Road sentiments onto the pre-cut strips with Black Licorice ink (I used my Misti to get multiple stamped impressions – making the words crisp). I cut the banner portion of the sentiment strips, and then I added Journey Glaze and spread it out using my finger. It made the pieces look like they were straight from a picture. Voila. Patsy and I both had agreed it needed some twine, but she didn’t have FSJ twine or a background stamp I could use on the Black Licorice cardstock. I knew I could finish the page at home. I placed all the pieces of my project in my plastic bag and came home. That evening, I sat down and pulled the page together within minutes. I placed some looped FSJ AC-0006 Journey Twine Natural behind the succulent picture. I took the ATS Deco Dots AC-0211 and held it folded in half and dapped the rubber into the Buttercream ink IP-0031 and dabbed it in various places on the Black Licorice base. The Oatmeal Cookie corner triangle pieces are adhered onto the Black cardstock. Everything else is popped out. I really love how this page turned out. A picture does not do it justice.
I hope these projects inspire you to create something amazing. If you would like to create using Fun Stampers Journey products, please visit my website at www.funstampersjourney.com/martymcgee.


Trackback 4