December 2016

6 posts

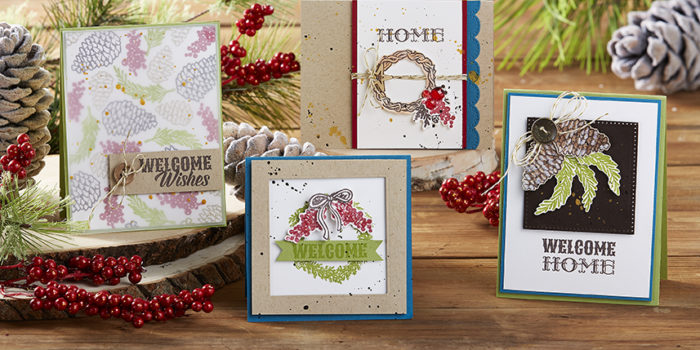
I can’t say this enough, but I really, really love Fun Stampers Journey Bloom Box monthly card kit. I have made a variety of beautiful cards with the December kit. Of course, my group of Bloom Box Girls take the step-by-step instructions and make our own version of the card designs provided in the kit. The official promotion picture of the assembled cards from the December kit is below:

Each kit provides a unique technique, which is a great way to expand your creativity and apply this knowledge to other amazing creations you make.

Here is our first card we made with our December kit:

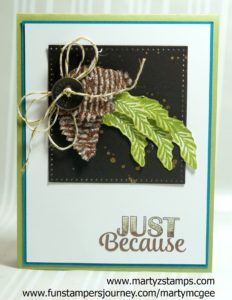
We decided to add another two branches to the bough, and a small pinecone to the this card. We used the Just Because ATS to add a sentiment.

Card #2:

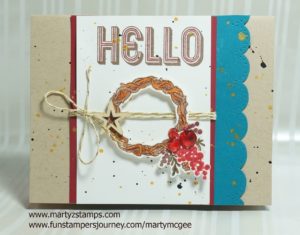
We used our FSJ Color Burst Pencils to color the stamped wreath image. The only change is the sentiment of “Hello” from the FSJ Be Amazing stamp set.

Card #3:

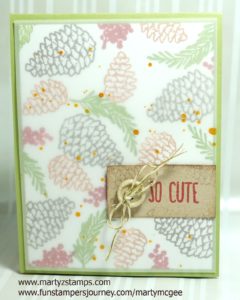
Using vellum over the stamped card images adds a touch of elegance to an already beautiful card. We changed the sentiment and used the “So Cute” from the ATS So Cute stamp.

Card #4:

This is such a cute card. We stamped our wreath onto the base and stamped another image onto some FSJ Whip Cream cardstock. We fussy cut it out (the center and the outside), added some Journey Glaze to the berries and made a double bow. Oh yes, by the way, I love the wow factor a double bow gives a card creation.

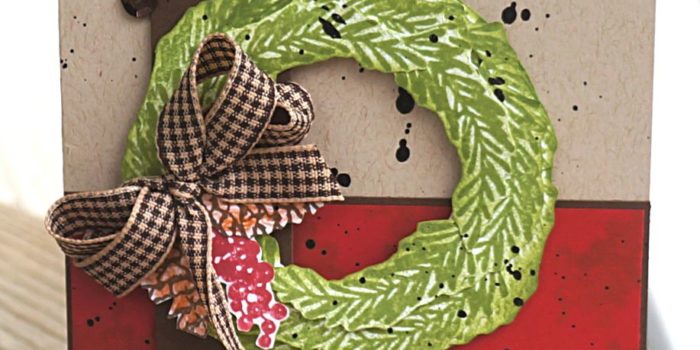
Here are two more cards I made using this set. The wreath on the Oatmeal Cookie and Cranberry Bliss background was a Top 3 pick at Paper Craft Crew website. The other card I made using a SU! woodgrain background stamp and the Christmas sentiment from the FSJ Holiday Script. I did have to use my MISTI to stamp the sentiment about 5 to 6 times to get a good enough impression on the busy background.


It is not too late to sign-up for the December Bloom Box and  5 more months of Bloom Box card making kits.  You can go to my website and order the kit here.

Whoo hoo, I made top three on Paper Craft Crew Challenge #222. I am super excited about this pick because I used my Fun Stampers Journey, December Bloom Box stamp set Welcome Wreaths to make this card. I absolutely love this stamp set and the kit as well. Here is the winning card.

I wanted to keep everything about this card FSJ, and I did except for the sequins. I just haven’t acquired enough FSJ bling, . . . . . yet.  If you click the picture, you will be redirected to the original post.

I love everything about Fun Stampers Journey and I can’t wait to make more amazing cards using their products.


This week’s Paper Craft Crew Card Sketch #222 challenge inspired me to use Fun Stampers Journey December Bloom Box stamp set Welcome Wreaths. Here is their card sketch:


I think wreaths are a great way to welcome in the holidays and the FSJ December Bloom Box Welcome Wreaths stamp set is the perfect set to create a welcoming card featuring a wreath. I began this card with an base using FSJ Oatmeal cardstock. The bottom portion of the card has a FSJ Hazelnut Blend mat with a FSJ Cranberry Bliss mat. The Cranberry Bliss mat is stamped with the berry cluster from the stamp set in FSJ Cranberry Bliss ink. I cut a banner out of FSJ Hazelnut Blend cardstcok and cut out a “v” shape in both ends. The entire card was sprinkled with FSJ Dark Roast silk.

The wreath was a “work in progress while creating”. LOL You know what I mean. You start off with one idea of how to make something unique; and, well, . . it kinda doesn’t turn out like you expected . . . .so, you begin experimenting with different ways to create something beautiful out of a …. pig’s ear …. lol.  I started off with the branch stamp and using FSJ Lemon Grass ink went about stamping the curved branch into a wreath shape (o.k. a circle). This took multiple turns around the circle because I wanted a full and bushy wreath. When I was finished stamping, I thought the wreath look flat and dull. Hmmm,….. what can I do to make it “pop”. I thought, why not fussy cut lots of branches and layer them onto the flat, dull base. Oh, yes I did! And, I think it created the look I was trying to get from the beginning. I must say, it really didn’t take that long to fussy cut the branches (it really didn’t and it was so worth it). I stamped the small pine cones in FSJ Hazelnut Blend and colored them with my FSJ Color Burst Pencils and fussy cut them out. I stamped the berry cluster with FSJ Cranberry Bliss (all of this was stamped onto FSJ Whip Cream cardstock). I fussy cut the berries out as well. No, booing and hissing from the peanut gallery – it’s those little extra steps that make a super cute card. I took some FSJ Cocoa Gingham Ribbon and made a double bow and adhered everything onto the wreath with glue dots. I then put the card together using craft glue and I popped out the wreath and banner using Journey Foam Squares (medium). For a little extra touch, I flicked Dark Roast silk onto the wreath. Last but not least, I added a little bling by placing some dark chocolate sequins onto the card.

Here is the finished card:


Supplies: All product used can be ordered from my FSJ website. Click here. Note: Everything is Fun Stampers Journey except as noted.

December Bloom Box – Welcome Wreaths
Cardstock: Cranberry Bliss, Whip Cream, Oatmeal Cookie, Hazelnut Blend
Ink: Hazelnut Blend, Cranberry Bliss, Lemon Grass
Coloring: Color Burst Pencils
Silk: Dark Roast
Ribbon: Cocoa Gingham Ribbon
Miscellaneous: Sequins (not FSJ)

It is another week with a wonderful card sketch challenge from Freshly Made Sketches #266. Here is their challenge sketch:

I wanted to take advantage of the Christmas season, yet again. I pulled out my Fun Stampers Journey (FSJ) Frosty Fun ATS and coordinating die to use on this challenge. As I was pulling this card together, I tried various colors of cardstock for the background, but every color I chose took away from the Frosty Snowman stamped image. I realized I had the perfect background die I received this past Friday from Fun Stampers Journey. It is the Persian Gardens die. I cut the base and the background die cut out of FSJ Whip Cream cardstock. I adhered the die cut onto the base using FSJ Craft glue which dries in a matte finish.

In place of the heart image, I took a large snowflake from the FSJ Snowflake Elements and applied Journey Glaze to the snowflake and then covered it with Sparkle Dust. I burnished the Sparkle Dust onto the snowflake with my finger. I cut the square piece out of FSJ Cool Pool cardstock with the FSJ Square pierced dies. I adhered both of these accents to the card with the FSJ craft glue. I stamped Frosty Fun onto FSJ Whip Cream with Black Licorice ink and colored him with FSJ Color Burst Pencils. For the circle element, I replaced it with some FSJ Tinsel Trim. I popped Frosty out with Journey Foam Squares (medium). I stamped the Christmas sentiment from FSJ Holiday Script with coordinating die in Cranberry Bliss ink and die cut it out. I adhered it with Journey Foam squares.

This is a cute card to give to a friend or family.


Supplies:

Fun Stampers Journey (all products used can be ordered through my FSJ website – click here).

Stamps: FSJ Frosty Fun (ATS – artist trading stamp) with coordinating die
Cardstock: FSJ Whip Cream, FSJ Coo Pool
Ink: FSJ Black Licorice, FSJ Cranberry Bliss
Dies: FSJ Square Pierced Dies, FSJ Persian Gard Die, FSJ Frosty Fun die
Coloring: FSJ Color Burst Pencils
Ribbon: FSJ Tinsel Trim
Miscellaneous: FSJ Foam Squares, FSJ Snowflake Elements, FSJ Craft Glue, FSJ Journey Glaze, FSJ Sparkle Dust

I made this card Wednesday using the supplies from Fun Stampers Journey November Bloom Box. Their design is quite different from the one me and my Bloom Box Girls created. When I saw Paper Craft Crew #221 Color Challenge today, the light bulb kicked on and I knew this card creation was the perfect fit. Here is the challenge:


pcc221


Using the supplies for the November Bloom Box card design listed as “As American As Apple Pie”, here is their design (to the left, we began making our woven mats. Of course, I did not read the directions, I just jumped right in and sponged the edges november-promotional-flyerof my paper strips and began weaving right away – not really paying attention to the shape of my mat. After about five minutes of weaving, Debbie held up her mat and said, “My mat is more of a rectangle. I think I did something wrong.” The minute I looked up and saw her mat, I knew what we could make out of a more rectangular than square mat – a BASKET!!! When a great idea happens, I tend to act as though I am on an overdose of caffeine. I jumped up, found some Oatmeal Cookie cardstock, cut a handle using FSJ circle dies, I took my last strip of paper for the mat and placed it along the handle to give it a woven look and voila – the super cutest basket you could ever lay your eyes on with apples overflowing was sitting there for us to use on our cards.

On the extra piece of FSJ Butter Cream cardstock, we stamped three apples (we used only two), two apple slices, one pie, and the bunch of wrapped cinnamon sticks. We colored the stamped images using our FSJ Color Burst Pencils (yes, all of us have purchased them and they are awesome. Some of the penciled areas needed to be blended better, and we did this using the FSJ Fusion Blend and Blending stumps.

We stamped the sentiment with FSJ Black Licorice ink and began to adhere all of our pieces to the mat cut out of FSJ Cranberry Bliss cardstock. The card is so cute. Now, here’s how the FSJ Dark Roast Silk was added to the card. I took the card to show my husband, and when I went to put it back up, there was a spot of grease on the base mat. Hmmmmm…. all was not lost. I took the Dark Roast Silk and splashed some on the base making sure to cover the other areas of the card with a sheet of copy paper.

And……here is the finished card. I just love it. And, I love my Bloom Boxes I get every month.

novemberbloombox2016


If you are interested in ordering any Fun Stampers Journey products or subscribing to the Bloom Box kit (the kit is a six month commitment), please click here .

My little kiddos love to play any type of Super Hero. It can be Captain America, Wonder Woman, Super Girl, Superman, Batman, and it goes on and on. This was the reason I purchased Darcies Super Heroes rubber stamp set at the Stamp and Scrapbook Event back in September. I stamped the images when I got home and colored them with my brand new Fun Stampers Journey (FSJ) Color Burst Pencils, and then they have been moved between the kitchen and craft room many times until today.  I, finally, took the time to make a card with my buddy, Jacob, because he asked me to make a card with the super hero images he found laying around last week in my office. I suggested he make a card with his image, and I would make a card for my super hero girl, Sam.

I chose my layout based on Fab Friday’s Sketch Card Challenge #101. Once I got started, the card fell right into place. Here is their sketch:

fabfri101

The base of the card is FSJ Whipped Cream with two mats on top of it FSJ Cranberry Bliss and FSJ Catalina Splash cardstocks.   I took some FSJ Lemon Drop cardstock and using the FSJ Sun Rays die I ran them through the FSJ Platinum Machine. I DID NOT punch out the negative of the cut image, instead I applied adhesive to the backside of the pieces still in the die and carefully tuned the die right side up (the cardstock is on the bottom side of the die) and centered it on the FSJ Catalina Splash mat. I pressed each piece down and then lifted the die creating a negative image sun ray onto the mat. Using FSJ Circle dies, I cut a large pierced circle out of FSJ Cranberry Bliss cardstock and a smaller circle out of FSJ Catalina Splash cardstock and layered them over the negative image of the die circle. The final step involved me stamping the sentiment onto FSJ Lemon Drop cardstock and die cutting them out with FSJ Star dies. Since they blended into the background, I matted them onto FSJ Cranberry Bliss cardstock. The Super Hero girl is raised using FSJ Foam Squares. I LOVE THIS CARD! Sam wanted to hold her card, and I said no – LOL. How ’bout we get a picture of you in a super hero costume, and we can make a scrapbook page to keep for a long time? That sounded good to her – wow, missed that bullet of the card, more than likely, getting torn up and/or mutilated.

Here is the card:


fabfri101_01


The next card is Jacob’s creation. I helped to adhere everything and the image was already stamped, colored, and cut out, but he directed where everything needed to be placed. He did place his stars into position.  I suggested a couple of thin Catalina Spash strips a little more than half way down and he nixed that idea. He’s just keeping it simple! He is my super hero.


fabfrixtra_01


Supplies: If you would like to order any of the Fun Stampers Journey products, please click here .
Stamp Set – Darcie’s JCS281
Coloring Tools: Fun Stampers Journey Color Burst Pencils with Fusion Blender and Blending Stubs
Cardstock: Fun Stampers Journey – Cranberry Bliss, Catalina Splash, Lemon Drop, Whipped Cream
Dies: FSJ Sun Ray Die, FSJ Circle Dies

PAGE TOP
[dealsbar preview] Amazing Deals: !!toolbar-deal-title!! - !!toolbar-deal-merchant!!